 Ask AI
Cloudinary Image & Video Release Notes: October 31, 2026
Last updated: Oct-31-2026
Developer Experience and Agentic Tooling
New upload and video skills, plus automatic version checks
The Cloudinary Skills pack now includes two new skills: cloudinary-upload and cloudinary-video.
- The upload skill guides your AI agent through signed and unsigned uploads, upload presets, large files, remote uploads, and signature generation, so the upload code it writes follows Cloudinary best practices.
- The video skill helps your agent build video experiences in the Cloudinary Video Player, from choosing adaptive or progressive delivery to adding captions, chapters, transcripts, and hotspots, so you get the most out of Cloudinary's video features.
Skills versioning
Agent skills don't have a built-in way to stay current, so we built a version-checking mechanism right into our Cloudinary skills. The first time your agent decides to use a Cloudinary skill in a new session, the skill guides it to first check whether a newer version of that skill is available. If there is, the agent advises you to update it, so you're always working with the latest guidance.
Whether you've installed Cloudinary skills before or not, run the installation command now to get the new upload and video skills, the latest version of our existing skills, and the new version-checking feature:
From now on, your skills let you know whenever a newer version is available, so you never miss an improvement.
Cloudinary plugin for ChatGPT and Codex
You can now install Cloudinary as a plugin in ChatGPT and Codex. Open the plugins directory in ChatGPT, or run /plugins in the Codex CLI, then search for Cloudinary and install it from the list. ChatGPT and Codex share one plugins directory, so a single install covers both.
The plugin connects the Cloudinary Asset Management MCP server over OAuth, so your agent can upload assets, search and organize your media library, read asset details and usage metrics, and build transformation URLs, with no API keys to configure.

Cloudinary Image
AI-generated and AI-altered images now carry C2PA credentials (Beta)
From August 2026, the EU AI Act requires you to disclose AI-generated and AI-altered media, both to the machines that crawl your content and to the people looking at it. For the machine-readable part, the preferred way is C2PA: an open industry standard for content credentials that travel with an asset to record where it came from and what happened to it along the way.
Cloudinary now adds or preserves C2PA credentials and keeps them with your asset, including through transformation and delivery. It also stores whether each asset is AI-generated as a field on the asset, so you can find them with a search or use conditional transformations to show a visible disclosure, such as an AI-generated label, only on the assets that need one.
Example: Overlay an AI disclosure badge on the bottom right for assets where cld_ai_generated is true

With the C2PA credentials feature enabled:
- Cloudinary preserves existing manifests: If an uploaded asset already carries a C2PA manifest, Cloudinary carries it forward and adds a new manifest on top that records its own actions, such as transcoding or editing.
- Generative AI starts a chain: If a transformation applies generative AI, such as generative fill or background removal, Cloudinary adds a manifest marking the result as AI-altered, even if the original had none.
-
New searchable provenance fields: Cloudinary stores two independent fields with each asset:
-
ai_generatedrecords whether AI generated or altered the asset. Cloudinary sets it automatically when an uploaded asset's manifest indicates AI generation, or when you save the result of a generative AI transformation as an asset. Cloudinary doesn't analyze an uploaded file's content to detect AI generation: it relies on the C2PA manifest. If an asset never had a manifest, or the manifest was stripped before upload, Cloudinary can't tell that it's AI-generated. For those assets, such as imports from a generation pipeline, set the newai_generatedupload parameter to mark them as AI-generated. -
has_c2parecords whether the asset carries a C2PA manifest. Cloudinary always sets it itself. Not every manifest involves AI, for example a photo signed by the camera that took it, so an asset can havehas_c2paset totruewithout being marked as AI-generated.
You can search by provenance on both fields in the Search API or the Media Library search, for example with
ai_generated=trueorhas_c2pa=false. -
Conditionally transform AI-generated assets: Reference
ai_generatedascld_ai_generatedin a conditional transformation to apply transformations only to assets marked as AI-generated. For example, you could overlay a disclosure badge that displays only on AI-generated assets, so the same transformation works across your whole library.
Choose what your users see when a delivery URL fails
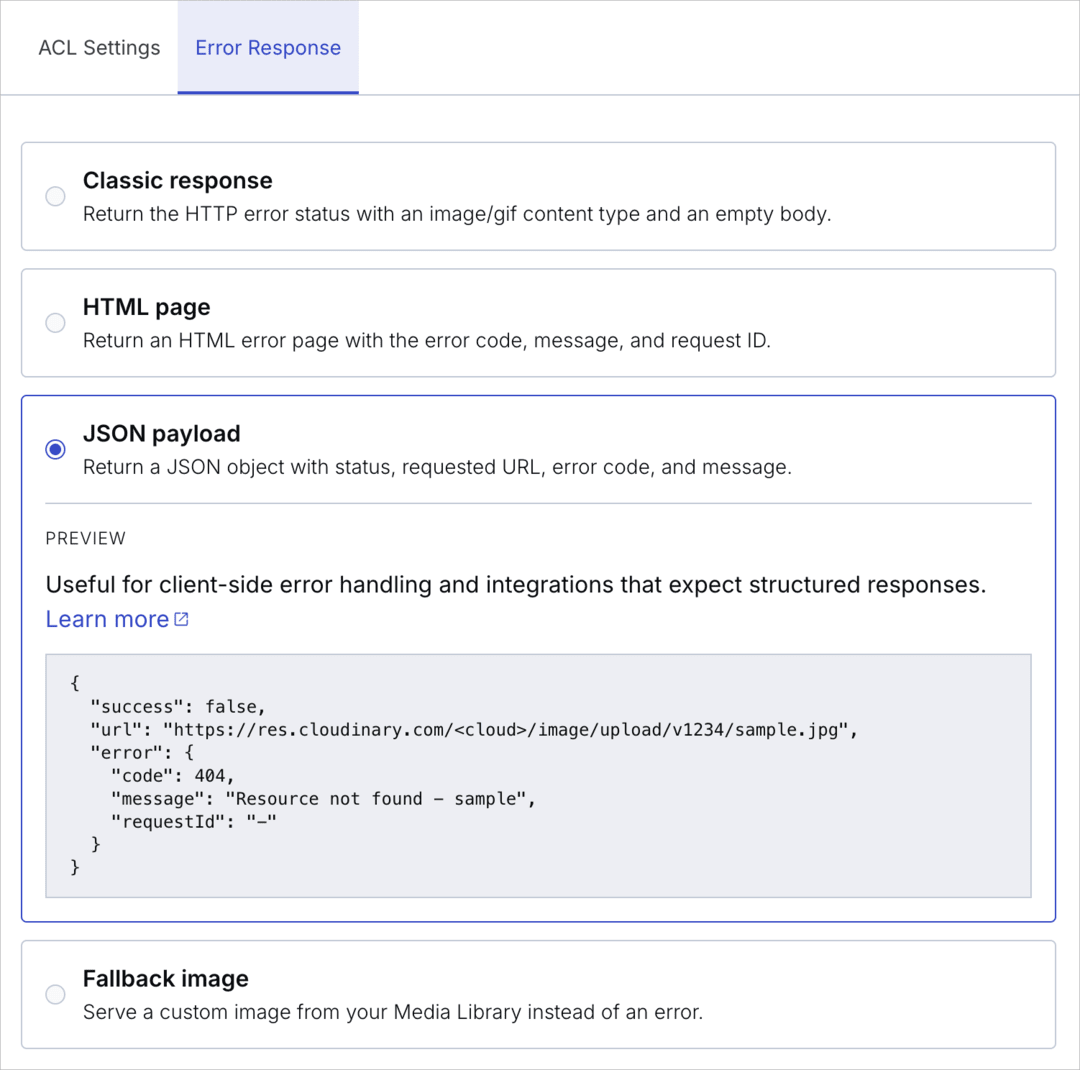
A broken delivery URL used to return an empty body with the error buried in a response header, leaving your users with nothing and your developers digging through headers. You can now choose how those errors are surfaced:
- Classic response (default for accounts created before September 14, 2026): Returns error details only in the X-Cld-Error response header, with no response body.
- HTML page: Returns a human-readable HTML page with the same error details.
- JSON payload (default for accounts created on or after September 14, 2026): Returns a structured JSON body with the HTTP status code, a descriptive error message, and a unique request ID to help with troubleshooting.
- Fallback image (paid plans): Returns a designated image from your product environment instead of an error, so your end users see a placeholder rather than a broken asset.
Example: JSON payload returned for a missing asset

Select your preferred error response format in the Console at Settings > Delivery > Error Response.
Product Gallery v2: Style your gallery with a true React or Next.js component
Product Gallery v2 is a major new version built for React and Next.js apps: your gallery now renders in the initial HTML of the page, so viewers see it right away instead of waiting for JavaScript to load, and you can restyle it entirely from your own stylesheet.
Version 2.x is now the recommended version for all new implementations. From now on, all new features and bug fixes go only into v2, and v1 receives security updates only, so it's recommended to upgrade your existing v1 implementations.
Because version 2 keeps the same configuration parameters, methods, and events as v1, you can usually upgrade a script-tag embed just by changing the script URL to product-gallery-v2.cloudinary.com. If your own CSS or JavaScript depends on v1's internal markup, set the deprecated useLegacyV1Mode option while you migrate.
Version 2 also adds:
-
npm package for React and Next.js: Install
@cloudinary/product-galleryand render the gallery with theGallerycomponent. -
Server-side rendering: Render the gallery on the server with
resolveConfig()and hydrate it on the client, in Next.js App Router or any React SSR pipeline. See the Next.js sample app for a working example. - CSS customization: Style the widget from your own stylesheet using stable, human-readable class names and CSS custom properties.
-
CSS-driven sizing and native responsive images: The widget fills its container and lets the browser pick the right image size using
srcsetandsizes.
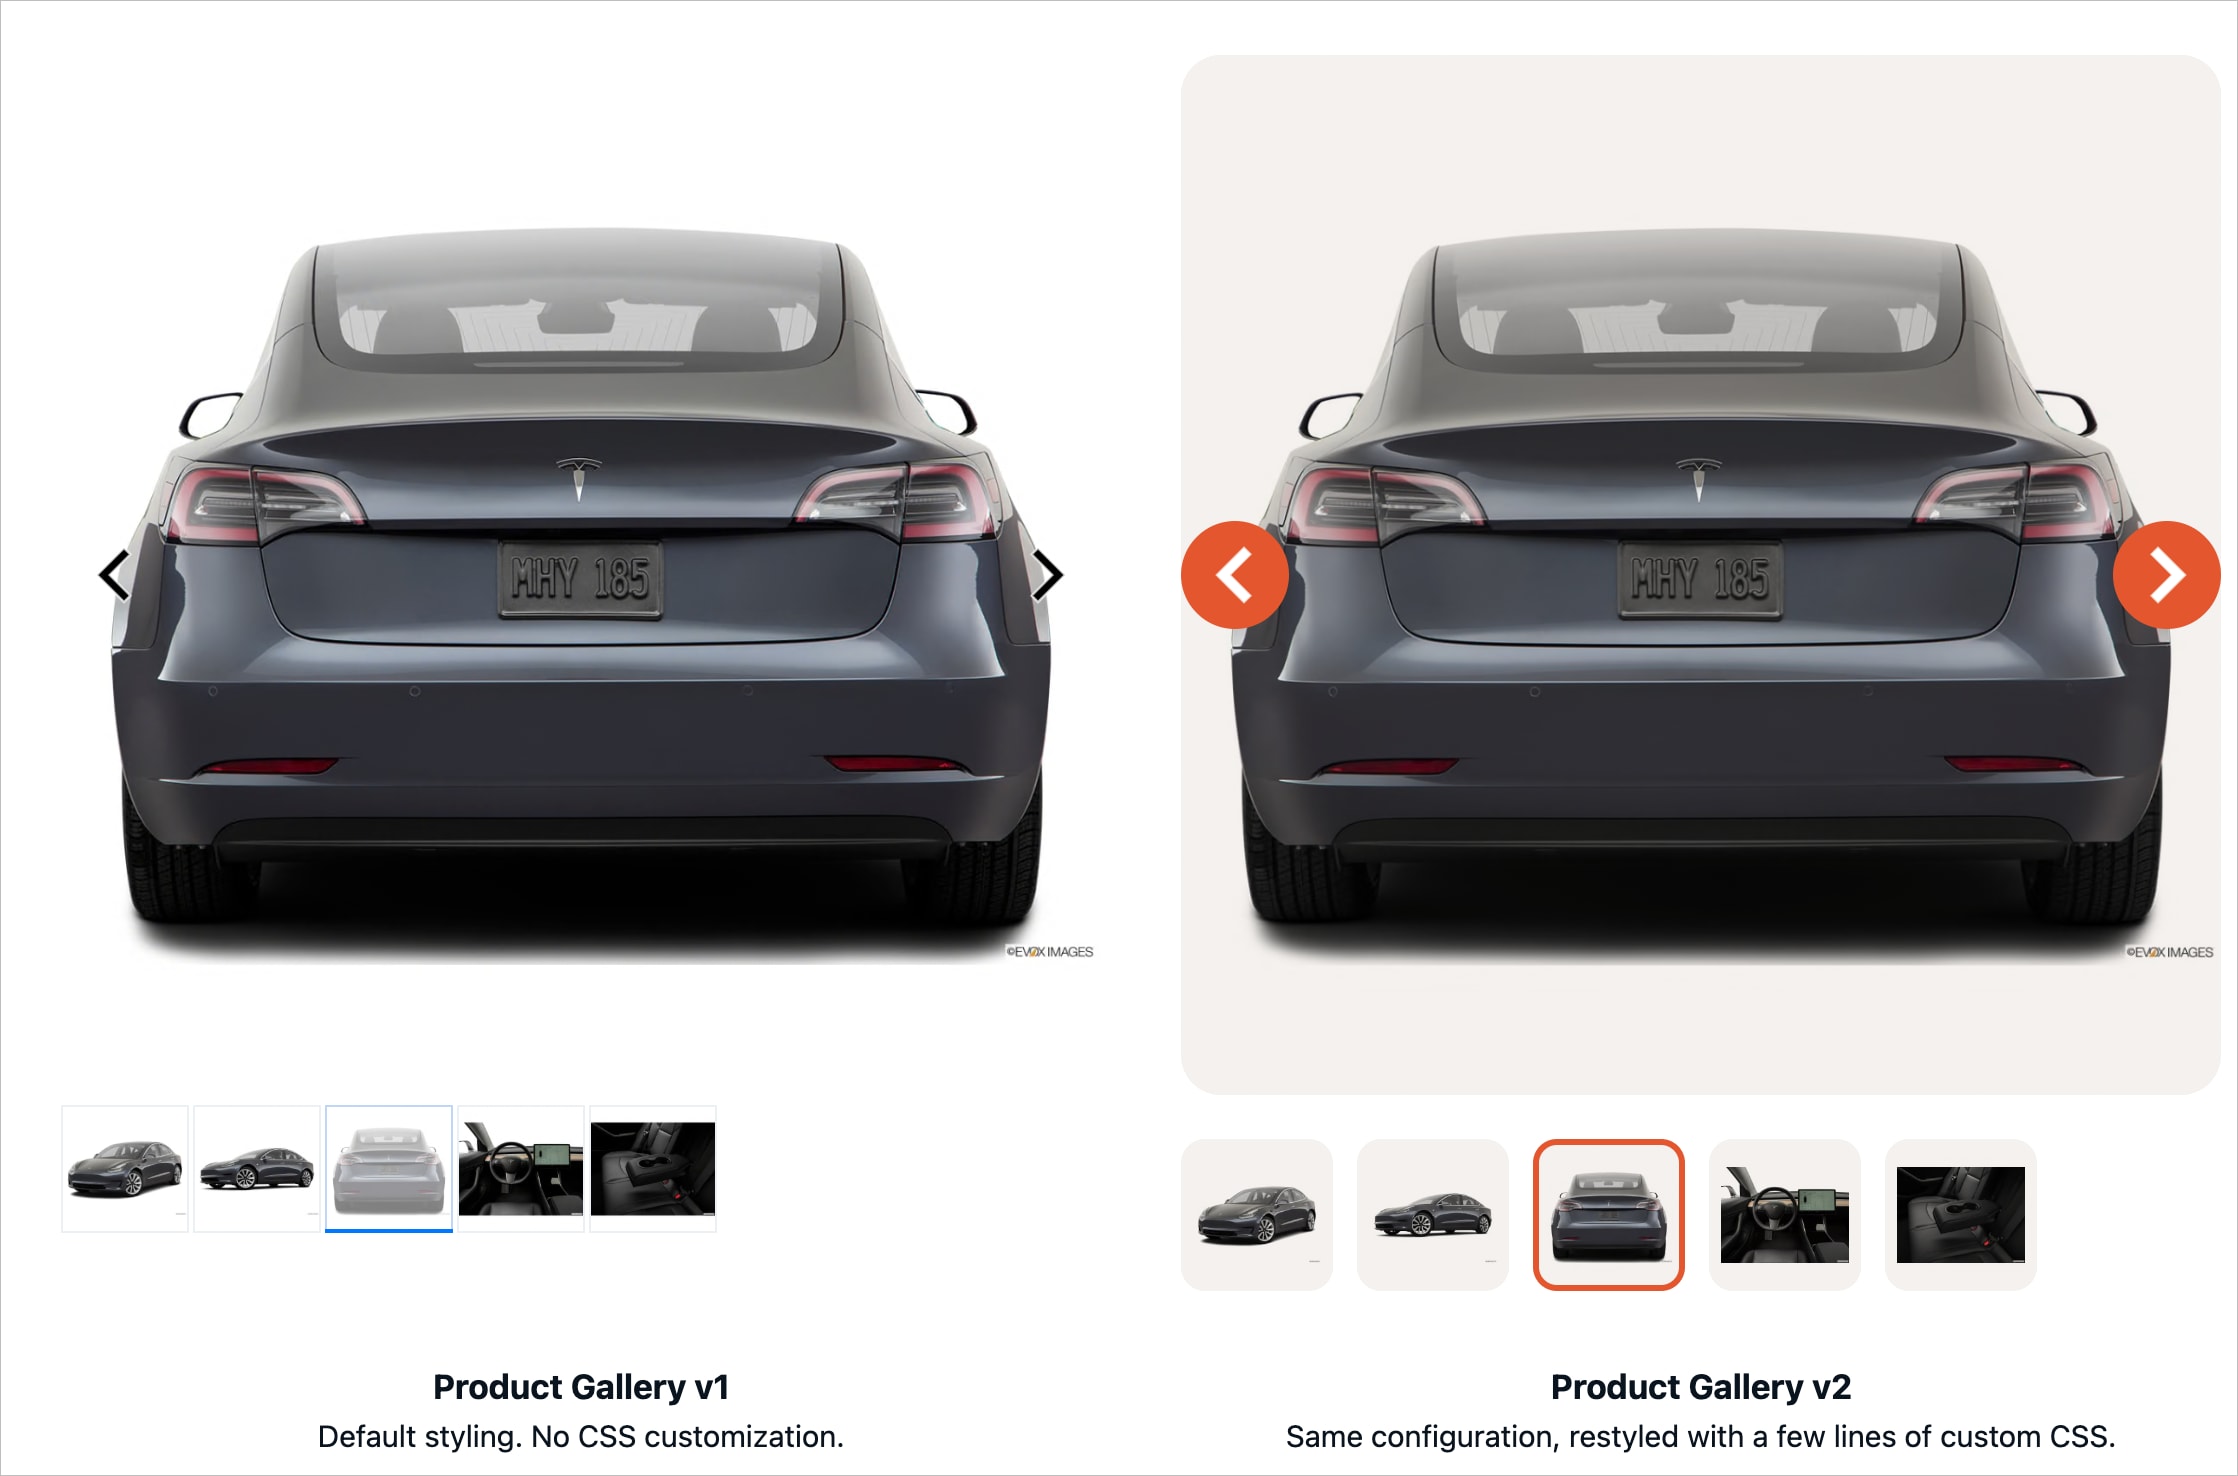
Example: The same gallery in v1 (default) and in v2, restyled with custom CSS
Both galleries use the same configuration and images. The v2 gallery on the right uses a few lines of custom CSS to add a rounded, tinted card for the main image, brand-colored navigation buttons, and rounded thumbnails with a brand-colored selection ring.
Let the Image Generation add-on auto-select the best AI model
The Image Generation add-on generates new images from a text prompt, and (optionally) reference images you provide, across a growing roster of supported AI model families. Until now, choosing the AI model to use required knowing what each one is good at, and revisiting that choice every time the roster changed.
You can now set model.mode to auto to have Cloudinary pick the best model for each request, based on your prompt, the number of reference images, the requested size, and where the image is stored.
Add an optional preference to say what the choice should optimize for: quality, economy, or the default balanced, each with a _fast variant that also favors faster models. The response reports the model that actually ran, so you can always see what generated an image.
Example: generate an image without naming a model
Automatic model selection works on both the text_to_image and image_to_image endpoints, and in both synchronous and asynchronous mode.
The model roster has also grown, with new models from OpenAI, Google, Black Forest Labs, Meta, ByteDance, Microsoft, xAI, Alibaba, and Recraft. You can pin any of them with model.id.
DigitalSourceType metadata preserved on transformed images
DigitalSourceType is a standard IPTC metadata tag, embedded in an image file's XMP metadata, that records how the image was created, for example whether a camera captured it or AI generated it. It can help meet transparency requirements, such as those in the EU AI Act, and platforms such as Google and Meta use it to identify AI-generated content.
Cloudinary used to strip it along with the rest of an image's metadata on transformation. Cloudinary now keeps this tag from your original image in transformed images by default, with no flag needed, even when you use fl_force_strip.
Transformations that generate AI content, such as generative fill and background removal, remove the tag, because the original's value no longer describes the result.
Cloudinary preserves the tag for JPG and PNG delivery, from JPG, PNG, TIFF, AVIF, and HEIC/HEIF originals.
Note that derived images generated before this feature was introduced don't include the tag. To add it, invalidate the cached versions so they're regenerated with the tag preserved the next time they're requested.
Cloudinary Video
Build reusable video pipelines visually with Video Canvas, now generally available
Build a video transformation pipeline by connecting blocks on a canvas instead of writing the URL by hand, preview the result as you go, and save it as a reusable applet. Saving an applet creates a named transformation, so you can use it in any delivery URL or SDK call.
Video Canvas is out of Beta and now generally available. Open it from the Video section of the Console. The Video Canvas API, for managing applets programmatically, is generally available too.

Turn an existing transformation into a Video Canvas applet
If you already have a video transformation, you no longer need to rebuild it block by block to use it in Video Canvas. Import a transformation string or one of your named transformations, and Video Canvas opens it as an editable flow of blocks, ready to adjust and save as an applet. Any step without a dedicated block becomes a Custom transformation block, so the flow still produces the same result as the original.

Generate audio description scripts in the Video Player Studio
People who are blind or have low vision miss what's shown on screen unless something describes it. You can now generate an AI audio description (AD) script from the Transcript and Localization section of the Video Player Studio. The script describes the video's scenes, subjects, and actions, and viewers can turn it on from the player's captions menu. You can edit or download it, or set it as the default track. To generate descriptions in code instead, use the AI Video Analysis API (Beta).

Do more with the Image to Video add-on
The Image to Video add-on (Beta) uses AI to turn your still images, such as product shots or hero images, into videos, right from the Image to Video app in the Console.
If you haven't tried it yet, getting started is now easier: you don't need to write a prompt, and you can earn extra free add-on credits as you go. You can also crop images to focus the video on what matters, and session folders keep the videos you generate organized and easy to find.
Generate a video without writing a prompt
Not every image needs a scripted camera move. In the Image to Video app, you can now leave the prompt empty and generate straight from your start frame, or from your main image in Reference Images mode. The app creates a subtle, natural animation that keeps your image's subject, composition, and style intact.
A prompt is still required when you generate videos via the API.
Earn more free Image to Video add-on credits
Free add-on credits let you try Image to Video before you pay for an add-on plan, and now you can earn more of them by completing tasks in the Image to Video app.
Generating videos at least 24 hours apart and sharing your feedback earn up to 20 credits, and an active Image to Video subscription adds a one-time bonus of 32 credits. Click Earn Free Credits in the app's top bar to see your progress and the tasks you haven't completed yet.

Crop source images to focus the video on what matters
You can now crop source images without leaving the app, so the video focuses on the part of the image that matters. Cropping also avoids the black bars that square product shots and other images that aren't 16:9 or 9:16 can produce. The crop saves as a new asset in your Media Library, so the original image stays unchanged.

Keep your generated videos organized with session folders
Generated videos no longer have to pile up in one folder. Choose a session folder from the bar above the preview area, or create a new one, and every video you generate saves to that folder for the rest of your session. The preview area shows the newest videos in that folder, so you can pick up where you left off.

Getting around is quicker as well. All generations and Runs now sit in the session folder bar, and the new Clear and return to folder icon (X) takes you from an image or video back to your folder's videos in one click.
When you generate videos via the Image to Video API, the new optional folder parameter sets where each video is saved.
SDKs and libraries
Next.js SDK v7: Bring the power of Video Player v4 to your Next.js app
Version 7 of the Cloudinary Next.js SDK is a major release, built around upgrading CldVideoPlayer to Cloudinary Video Player v4.
Here's what you get with the new version:
-
Video Player v4:
CldVideoPlayernow uses Video Player v4.x (up from v1.11.1), three major versions newer. It also picks up newer player features, such as automatically showing custom posters saved in the Video Player Studio.- If you customize the player with your own CSS, check that it still applies.
-
Easier to use in the App Router:
CldImage,CldUploadButton,CldUploadWidget, andCldVideoPlayernow include the'use client'directive, so you can use them directly in Server Components without adding it yourself. If you pass event handlers or a render function to a component, use it in a Client Component. -
Breaking change: The deprecated
onUploadcallback is removed fromCldUploadWidgetandCldUploadButton. UseonSuccessinstead, whose second argument is now an options object. -
Fixes:
CldVideoPlayernow re-initializes correctly when users navigate away and back, among other fixes.
See the upgrade guide for details on code update you may need to make in order to upgrade to the new version, including TypeScript type updates.
Example: upgrade to version 7 and replace onUpload with onSuccess
Account management
Track how your asset count grows over time
See how your asset library grows over time with the new Number of Assets chart in the Console's Usage Reports. The line graph shows the overall trend for your product environment at a glance, so you can spot bulk upload spikes and plan for growth. To see the exact asset count for a specific day, hover over that date.

Give API keys read-only access without full admin rights
You can now assign the Reports and Viewer system roles to a product environment API key from the API Keys page, so you don't have to hand it broader access than it needs. Reports grants read-only access to reporting details, including the ability to call the usage endpoint of the Admin API, and Viewer grants read-only access to all assets, without the ability to make changes. Both join the existing Master Admin and Media Library User roles available for product environment API keys.

Announcements
Metadata stripped from derived videos
Metadata stripping for derived videos now follows the same behavior as derived images: when you deliver a video with a transformation applied, Cloudinary strips the global metadata of the original, such as title, artist, album, description, copyright, GPS location, and chapter markers. Previously, derived videos kept most of this metadata, and the fields that survived depended on internal processing decisions.
To keep the metadata in a derived video, add the fl_keep_iptc flag. However, chapter markers are stripped even then, and adaptive streaming and animated outputs never carry this metadata.
Incoming transformations still keep the metadata by default, so use fl_force_strip to strip it at upload.
Cloudinary is rolling this behavior out gradually. It automatically applies to all product environments created on or after June 21, 2026. Cloudinary is enabling it for product environments created before that date gradually over time.
Product Gallery v1 moves to security maintenance mode
With the release of Product Gallery v2, v1 receives security updates only. Existing v1 implementations keep working and aren't upgraded automatically, even if they load latest. An official end-of-life date for v1 will be published in advance.
Roles and Permissions is now the standard
Roles and Permissions is now the standard permissions system for Cloudinary accounts, and only a small number of accounts are still on the legacy system. Roles and Permissions lets you assign multiple roles to users, groups, and API keys, scope access to account or product environment level, and, on Enterprise plans, build custom roles from individual permissions.
The documentation now describes Roles and Permissions throughout. If your account still uses the legacy system, or you want to compare the two, see the legacy permissions reference page. To learn how your existing roles map to the new system, see Migrating to Roles and Permissions.
Custom policy management now requires its own permission
Creating, updating, or deleting custom policies now requires the Manage custom policies permission. Of the system roles, only the account-level Master Admin role includes it. If your automation uses an account management key with a custom role to manage custom policies, add this permission to that role, or its requests return a 403 error. The root account management key has full permissions, so it isn't affected.
Error
Rate this page:
