Angular image transformations
Last updated: Feb-17-2026
Overview
After you or your users have uploaded image assets to Cloudinary, you can deliver them via dynamic URLs. You can include instructions in your dynamic URLs that tell Cloudinary to transform your assets using a set of transformation parameters. All transformations are performed automatically in the cloud and your transformed assets are automatically optimized before they are routed through a fast CDN to the end user for optimal user experience.
For example, you can resize and crop, add overlay images, blur or pixelate faces, apply a large variety of special effects and filters, and apply settings to optimize your images and to deliver them responsively.
The @cloudinary/url-gen package simplifies the generation of transformation URLs, and includes special components and directives for easy embedding of assets in your Angular application.
If you haven't yet installed the Angular SDK, you might want to jump to the quick start first.
See also: Angular video transformations
Image transformations with Angular
To transform an image asset, use the @cloudinary/url-gen package to create the transformation, then pass the transformed image object to the cldImg attribute in your advanced-image component to render the image on your site. For example:
CloudinaryModule in app.module.ts instead.In the above example, the front_face image is cropped to a 150 x 150 pixel thumbnail with rounded corners, focusing on the face, resulting in this URL:

The @cloudinary/url-gen package installs an additional transformation-builder-sdk library as a dependency, which handles the transformation generation part of the URL.
You can use the Transformation Builder reference to find all available transformations, syntax and examples.
The advanced-image component is used instead of an image tag because it can provide extra functionality, such as lazy loading and responsive images. Learn more about Angular plugins.
If you did want to use an image tag, you could build the URL using the toURL method, and set the src attribute as follows:
Alternative ways to apply transformations
There are a couple of other ways to apply transformations to your images that you may prefer to use, for example if a new transformation is not yet supported by the SDK, or if you're more familiar with other SDKs. Note, however, that you won't benefit from your IDE's code completion feature for building the transformations in these ways.
See also: Shortcuts and aliases for other ways to simplify the syntax.
URL syntax
You can add any transformation in URL syntax using the addTransformation method.
For example:
This can be used together with other actions and qualifiers in the usual way. It's useful if a new transformation is added but not yet available in the SDK, or if you're just more familiar with the URL syntax.
Object syntax
If you prefer the more concise syntax used for transformations in the Node.js SDK, you can use the transformationStringFromObject method to build the transformation, and add it to your image using addTransformation, importing only transformationStringFromObject instead of all the individual actions and qualifiers.
For example:
Passing attributes through the advanced-image component
You can pass the following <img> tag attributes through the advanced-image component:
widthheightloadingalt
For example:
Syntax overview
The @cloudinary/url-gen package provides an intuitive coding experience for transforming an asset:
- The SDK supports an action-based syntax, designed to make building delivery URLs and transformations logical and discoverable.
- It allows discovering the available options from within your development environment, and ensures that only options that are supported can be used together.
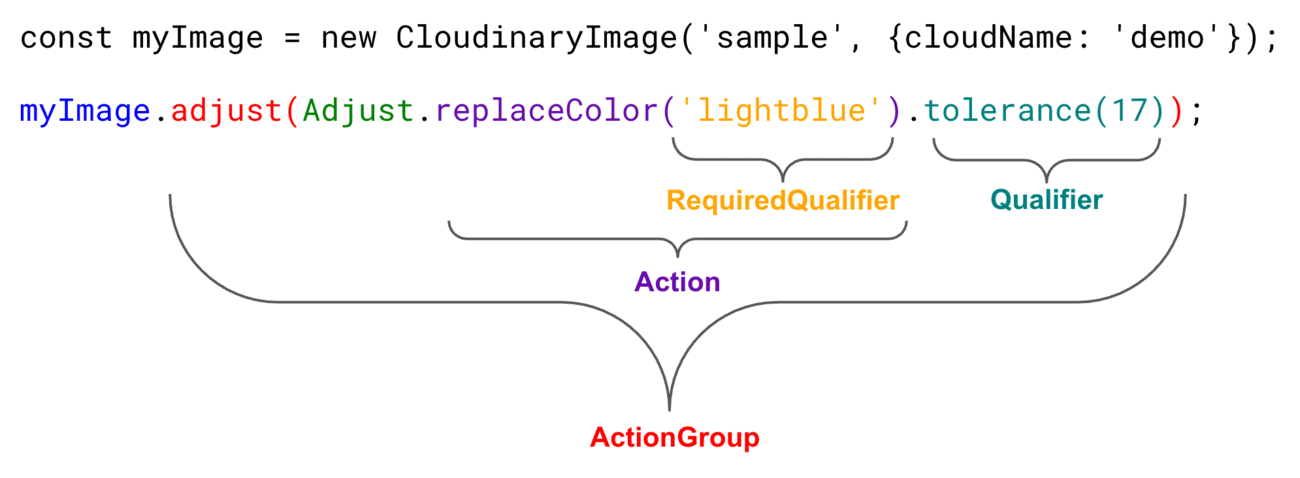
The general form of the syntax is:
An example being:
Actions and ActionGroups
- Assets expose methods called ActionGroups (
myImage.adjust()) that represent a directive to Cloudinary on how to transform a specific aspect of an asset - ActionGroups receive an Action object as a parameter that defines the specific action to apply
- Action objects are created through Factory methods (
Adjust.replaceColor()) - Some actions require a qualifier as a parameter (
lightblue) - You can find more Actions in
@cloudinary/url-gen/actions - You can import all actions with
import {Actions} from '@cloudinary/url-gen'
Qualifiers and QualifierValues
- Actions expose methods to define their behaviors (
tolerance()) - We call the methods on Actions, Qualifiers
- Qualifiers usually accept a QualifierValue (
17intolerance(17)) - QualifierValues can be primitive (numbers, strings) or predefined SDK values that can be imported
- Many QualifierValues are functions
- You can find more QualifierValues in
@cloudinary/url-gen/qualifiers
The output of each ActionGroup is a complete transformation component (separated by slashes) in the URL. For example, the syntax example above would generate the following URL:

Tree shaking
The @cloudinary/url-gen package allows you to import only what you need, to minimize your bundle size.
See the Transformation Builder reference for all actions and qualifiers.
For example, if you import Effect, you import all effect actions, which may be more than you need. The only reason you may want to do this is to make other methods discoverable. Without tree shaking, actions require qualification (for example, Effect.outline()).
-
Without tree shaking:
You can also use:
In this case
outline()is equivalent toEffect.outline(). -
With tree shaking:
Similarly, for qualifier values:
-
Without tree shaking:
-
With tree shaking:
Most of the examples shown in this guide use tree shaking.
Shortcuts and aliases
To simplify some of the syntax, you can use string shortcuts for nested qualifiers. For example, rather than:
you can say:
Additionally, there are aliases for delivery format and quality, to shorten the syntax further. For example, the above can be shortened to:
For quality, instead of:
you can say:
Deliver and transform images
The @cloudinary/url-gen package makes it easy for you to create image URLs including any transformation parameters.
Direct URL building
You can build an image URL by:
- Configuring your Cloudinary instance.
- Instantiating a
CloudinaryImageobject for the image you want to deliver, usingcld.image().
- Calling the
toURL()method of theCloudinaryImageobject to return the delivery URL:
The resulting URL, myURL, is:

Specifying a version of your image to deliver
You can specify a particular version of your image to deliver by using the setVersion method. The version is added to the delivery URL as explained in Asset versions.
For example, to specify version 1610625835 of the sample image from the example above:
The resulting URL is now:
Specifying the delivery type
You can change the delivery type from the default of upload to any of the other delivery types, using the setDeliveryType method.
For example, to define a fetch URL:
The resulting URL is:
Transforming your image
Images are transformed by adding serialized transformation instructions to the image delivery URL. For example, to scale your image to a width of 400 pixels, add c_scale,w_400.
https://res.cloudinary.com/demo/image/upload/c_scale,w_400/bike.jpg
Using the @cloudinary/url-gen package, you transform an image by performing one or more transformation actions on the CloudinaryImage object (see the syntax overview). Remember to import the actions that you are using:
Chaining transformations
Cloudinary transformations can be chained together (each transformation is applied to the result of the previous transformation). For example, the following code crops the image to 150x150, rounds the corners, applies a sepia effect, adds text to the top center of the resized image, then rotates the entire result by 20 degrees and delivers a PNG.
The code above generates the following image delivery URL:

Code explorer: Angular image transformations
In this Angular app, you can see all the transformations that are used throughout this guide. Each transformation example has its own xxx.component.ts file showing the imports and syntax required. (Use the hamburger menu to see all the files.)
There are various templates defined (xxx.component.html), which use the advanced-image component to display the transformed images on a simple web page.
This code is also available in GitHub.
Apply common image transformations
This section provides an overview and examples of how to implement the following commonly used image transformation features using the @cloudinary/url-gen package.
- Resizing and cropping
- Converting to another image format
- Applying image effects and filters
- Adding text and image overlays
- Image optimizations
Keep in mind that this section is only intended to introduce you to the basics of using image transformations.
- For comprehensive explanations of how to implement a wide variety of transformations, see Image transformations.
- For a full list of all supported image transformations and their usage, see the Transformation URL API reference.
Resizing and cropping
There are a variety of different ways to resize and/or crop your images, and to control the area of the image that is preserved during a crop. The following example uses the fill cropping method to generate and deliver an image that completely fills the requested 250x250 size while retaining the original aspect ratio. It uses face detection gravity to ensure that all the faces in the image are retained and centered when the image is cropped:
You can also use automatic gravity to determine what to keep in the crop automatically.
For details on all resizing and cropping options, see resizing and cropping images.
Converting to another image format
You can deliver any image uploaded to Cloudinary in essentially any image format. There are three main ways to convert and deliver in another format:
- Specify the image's public ID with the desired extension.
- Explicitly set the desired format using the
formataction type of thedeliveryaction. - Use
autoformat to instruct Cloudinary to deliver the image in the most optimized format for each browser that requests it.
For example:
1. To deliver a .jpg file in .gif format:
-
Either add the
.gifextension to the public ID when instantiating theCloudinaryImage:This is the returned URL:
-
Or use the
deliveryaction, settingformattogif(note thatmyImage.format('gif');is an alias formyImage.delivery(format('gif'));:This is the returned URL:
2. To let Cloudinary select the optimal format for each browser, set format to auto. For example, in Chrome, this image may deliver in .avif or .webp format (depending on your product environment setup):
This is the returned URL:
For more details, see:
- Delivering images in different formats
- Automatic format selection (f_auto)
- Tips and considerations for using f_auto
Applying image effects and filters
You can select from a large selection of image effects, enhancements, and filters to apply to your images. The available effects include a variety of color balance and level effects, tinting, blurring, pixelating, sharpening, automatic improvement effects, artistic filters, image and text overlays, distortion and shape changing effects, outlines, backgrounds, shadows, and more.
For example, the code below applies a cartoonify effect, rounding corners effect, and background color effect (and then scales the image down to a height of 300 pixels).
For more details on the available image effects and filters, see Visual image effects and enhancements.
Adding text and image overlays
You can add images and text as overlays on your main image. You can apply the same types of transformations on your overlay images as you can with any image and you can use gravity settings or x and y coordinates to control the location of the overlays. You can also apply a variety of transformations on text, such as color, font, size, rotation, and more.
For example, the code below overlays a couple's photo on a mug image. The overlay photo is cropped using face detection with adjusted color saturation and a vignette effect applied. The word love is added in a pink, fancy font and rotated to fit the design. A balloon graphic is also added. Additionally, the final image is cropped and the corners are rounded.
Image optimizations
By default, Cloudinary automatically performs certain optimizations on all transformed images. There are also a number of additional features that enable you to further optimize the images you use in your JavaScript application. These include optimizations to image quality, format, and size, among others.
For example, you can use the auto qualifier for the fetch-format and quality attributes to automatically deliver the image in the format and quality that minimize file size while meeting the required quality level. Below, these two parameters are applied, resulting in a 50% file size reduction (1.4 MB vs. 784 KB) with no visible change in quality.
For an in-depth review of the many ways you can optimize your images, see Image optimization.
Plugins
The Cloudinary Angular library provides plugins to render the media on your site in the optimal way and improve your user's experience:
- Lazy loading to delay loading images if they are not yet visible on the screen.
- Responsive images to resize your images automatically based on the viewport size.
- Image accessibility to make your images more accessible to your users with visual disabilities.
- Image placeholders to display a lightweight version of an image while the target image is downloading.
Both lazy loading and image placeholders are great techniques for helping to optimize your page load times and, in turn, improve your metrics related to Core Web Vitals.
In this example, the responsive and accessibility plugins are applied:
CloudinaryModule in app.module.ts instead.The following sections explain each of the plugins in more detail, but you can also jump straight to a full example to start playing.
Plugin order
We recommend the following order when using our plugins to achieve the best results (omitting any you don't need):
Lazy loading
Lazy loading tells the browser not to download images that are not yet visible on the user's screen, and wait until the user scrolls to that image. This feature can potentially save bandwidth for images that are not actually viewed, and decrease the time needed to load a page.
This video shows lazy loading in action. See how the GET request is triggered only when the image is starting to come into the viewport:
To enable the lazy loading feature for a particular image, use the lazyload() plugin. This allows you to specify parameters that control when the image loads. For syntax details, see the reference.
Example: Set root margin and threshold
Load an image when 25% of it is visible. Specify a bounding box around the root element with margins, top: 10px, right: 20px, bottom: 10px, left: 30px:
height and width attributes to the advanced-image component:
Responsive images
You can make your images responsive, so that they automatically resize based on the viewport size. If the viewport is small, then a small image is requested, saving bytes and reducing page load times.
This video shows responsive image behavior in action. See how a new image is requested when the browser is resized, based on the configured step size:
To enable the responsive images feature for a particular image, use the responsive() plugin. You can specify either the step size or a set of image widths. For syntax details, see the reference.
Example 1: Set step size
Set the step size to 200 pixels:
Example 2: Specify a set of image widths to use
Specify a set of image widths (800, 1000 and 1400 pixels):
Server-side rendering of responsive images
If you're using server-side rendering for your site, you must:
- Use the placeholder plugin together with the responsive plugin.
- Provide dimensions for the container element.
- Add styling to the advanced-image component.
For example:
Where:
Image accessibility
This feature makes an image more accessible to users by specifying one of the following modes:
| Mode | Transformation applied |
|---|---|
monochrome |
Reduces the image to use only one color. |
darkmode (default) |
Adds a dark tinting effect to the image. |
brightmode |
Adds a bright tinting effect to the image. |
colorblind |
Adds an effect to differentiate between colors that are similar. |
To enable the accessibility feature for a particular image, use the accessibility() plugin. For syntax details, see the reference.
Example: Apply an accessibility transformation
Help color blind users by using the colorblind mode:
Image placeholders
An image placeholder is a lightweight version of a target image that can be downloaded quickly, and will occupy the same location as the intended target image, while the target image is still downloading. Once the target image download has been completed the placeholder is replaced with the final image. This feature is especially useful together with large images.
Placeholder images offer the following features:
- The page loads quickly without blank locations.
- No page content 'jumping' as the elements dynamically adjust to add downloaded images.
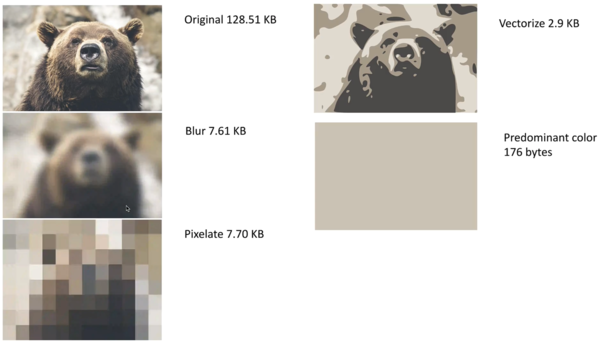
You can specify four different types of placeholder:
Placeholder type
|
Transformation for the placeholder image |
|---|---|
blur (default) |
A low quality, blurred version of the target image. |
pixelate |
A low quality, pixelated version of the target image. |
vectorize |
A low quality, vectorized version of the target image. |
predominant |
A solid, single color image - the predominant color in the target image. |
To add a placeholder for a particular image, use the placeholder() plugin. For syntax details, see the reference.
Example 1: Apply a placeholder transformation
Use a blurred placeholder image while waiting for the full quality image to download:
Example 2: Combine lazy loading with a placeholder
You can also combine placeholder images with the lazy loading feature. In this case, when the user scrolls to the image location, the placeholder image is downloaded followed by the target image.
For example, to use a solid, single-color placeholder image and the lazy loading feature:
In this video, you can see all the different placeholder types combined with lazy loading:
Code explorer: Angular plugins
See the plugins in action in this Angular app:
This code is also available in GitHub.
 Ask AI


