Backups and version management
Last updated: Feb-05-2026
Backing up your assets lets you maintain a version history of each file, so you can view, download, or restore previous versions, and recover deleted assets when needed. When automatic backup is enabled, Cloudinary saves a copy of every uploaded asset. Backups include only original assets, since Cloudinary can regenerate derived or fetched assets at any time.
You can use Cloudinary's default backup storage, or configure your own external storage bucket (available on paid plans only).
Enabling automatic backup
Automatic backup is off by default. When you turn it on, Cloudinary stores a backup copy of every new upload and tracks multiple revisions for each asset. You can also run a one-time backup to include assets uploaded before you enabled the feature.
Cloudinary stores backups in a secondary, write-protected location. If you don’t set up your own Amazon S3 or Google Cloud Storage bucket, Cloudinary uses its default backup storage. These backups count toward your managed storage quota and can significantly increase usage.
Backup is available on all plans. However, using your own cloud storage bucket is available only on paid plans.
To enable backup of your newly uploaded assets:
- Go to the Backup page of the Cloudinary Console Settings.
- Turn on Enable automatic backup.
- Click Save Changes to activate backups for all newly uploaded assets.
Once enabled, the Existing assets section appears on the same page.
To back up assets that were uploaded before you enabled automatic backup:
- In the Existing assets section, click the go here link.
- On the Upload Settings page that opens, click Perform initial backup.
- When prompted, verify the notification email address shown in the confirmation box, or enter a different one if needed, and click OK.
Cloudinary sends a confirmation email to the address you provide after the backup completes.
- If you have many assets, Cloudinary may route you to a page to request support assistance with the initial backup.
- Cloudinary creates a backup only when a file is replaced with a new version. Changes to metadata or tags alone won’t trigger a backup.
- Cloudinary doesn't back up remotely fetched assets (e.g., profile images from Twitter or Facebook) or derived assets, as it can regenerate them at any time.
Enabling backup video tutorial
This video shows how to back up new and existing assets to Cloudinary storage:
Using your own backup storage
Paid accounts have the option to back up to a designated storage bucket, either through Amazon Simple Storage Service (Amazon S3) or Google Cloud Storage, instead of using Cloudinary's default backup location. These backups do not count against your Cloudinary storage usage.
- When using your own backup storage, the backup location should not be touched or modified in any way. Additionally, no life-cycle policy (archiving, deletion), no versioning, and no object locks should be enforced on that location.
- If you have already backed up files to one storage location (including Cloudinary's default backup), then change to a different storage bucket, we recommend contacting support to ensure that a full backup is written to your new bucket.
To enable this option, your storage bucket must be allowlisted. This requires the following steps:
-
Add an empty file to your bucket with your cloud name as the filename, under the following folder structure:
.wellknown/cloudinary/<your_cloud_name>- By adding this file, you indicate that you have access to this bucket and that you permit Cloudinary to access and modify this bucket's contents.
- If you want this bucket to be allowlisted for more than one Cloudinary product environment, you can add an appropriately named file for each cloud name.
Provide Cloudinary with information and access to your bucket:
- Backing up to Amazon S3
- Backing up to Google Cloud Storage
Backing up to Amazon S3
To configure automatic backups to an Amazon S3 bucket:
-
Create your Amazon S3 bucket, and name it with your company name and region, for example:
cloudinary-backup-wodup-us-east-2. -
Grant full access permissions to Cloudinary's AWS account,
info@cloudinary.com, using one of the following methods:-
AWS Console: Set up the bucket policy using this JSON code. Make sure to replace
<your_bucket_name>with your bucket's name.
-
AWS CloudFormation: Use CloudinaryS3Backup.json within AWS CloudFormation to create the backup bucket.NoteIf at a later point you need to update permissions on an existing S3 buckets, changes may take some time to propagate, and you may not see the changes taking effect right away.
-
AWS Console: Set up the bucket policy using this JSON code. Make sure to replace
-
In your Cloudinary Console Settings, go to the Upload page. Enter the name of your S3 bucket in the Use your own backup bucket field and click Save.
Enable automatic backup and click Perform initial backup to back up your current assets to your S3 bucket. Any new uploaded assets will be automatically backed up to this bucket.
Backing up to Google Cloud Storage
To configure automatic backups to a Google Cloud storage bucket:
-
Create a Google Cloud storage bucket using this naming convention:
{XXX}-gs-cld, for example:mycloud-gs-cldMake sure to select the Fine-grained access control method when creating the bucket.
Grant full access permissions to Cloudinary by adding
service@cloudinary-gcs-production.iam.gserviceaccount.comas a member with the Storage Object Admin role.-
In your Cloudinary Console Settings, go to the Upload page. Enter the name of your Google Cloud bucket in the Use your own backup bucket field and click Save.
Enable automatic backup and click Perform initial backup to back up your current assets to your Google Cloud storage bucket. Any new uploaded assets will be automatically backed up to this bucket.
Overriding the global backup setting
You can selectively override the global backup setting when uploading a specific file by setting the backup parameter in the upload API call.
For example, if the global backup setting isn't enabled, setting the backup parameter to true when uploading the file sample.jpg, ensures that the uploaded file is backed up:
Deleting backups
To delete backup storage that you no longer require:
If you are using Cloudinary's default backup storage, contact the support team with your cloud name and last four characters of your API secret. The backup will be deleted, freeing up space in your product environment.
If you are using your own backup storage, you can delete this yourself, but you should contact the support team to update the database records for your backups.
Versioning
You can list and restore assets from backup either programmatically, or via the Media Library.
Managing asset versions programmatically
Programmatically, you can:
- Get details of backed up versions of an asset
- Restore a specific version of an asset
- Download a backed up version of an asset
- Delete versions of an asset
Getting details of an asset's versions
To see details of backed up versions for a specific asset, use the resource method of the Admin API, setting the versions parameter to true. For example:
Sample response:
Restoring a version of an asset
To restore a specific version of an asset, use the restore method of the Admin API together with the versions parameter set to the version_id of the specific version. You can use arrays to specify more than one asset and each asset's corresponding version to restore. For example:
Downloading a version of an asset
To download a backed up version of an asset without restoring it, use the download_backup method.
- The endpoint returns the specified version of the asset in bytes.
- The SDKs return a URL of the asset that can be used to download that version of the asset (within an hour of the request).
For example, to return the URL of a backed up version of an asset with asset_id of 62c2a18d622be7e190d21df8e05b1416 and version_id of 26fe6d95df856f6ae12f5678be94516a, use the following syntax (the cURL example returns the asset in bytes):
The SDK methods return the URL to download the requested backed up version of the asset, as follows:
The URL returned in the response is valid for an hour.
Deleting a version of an asset
To delete a specific version of an asset, use the delete backed up versions of a resource method of the Admin API together with the version_ids of the specific versions to delete. For example:
Managing asset versions via the Media Library
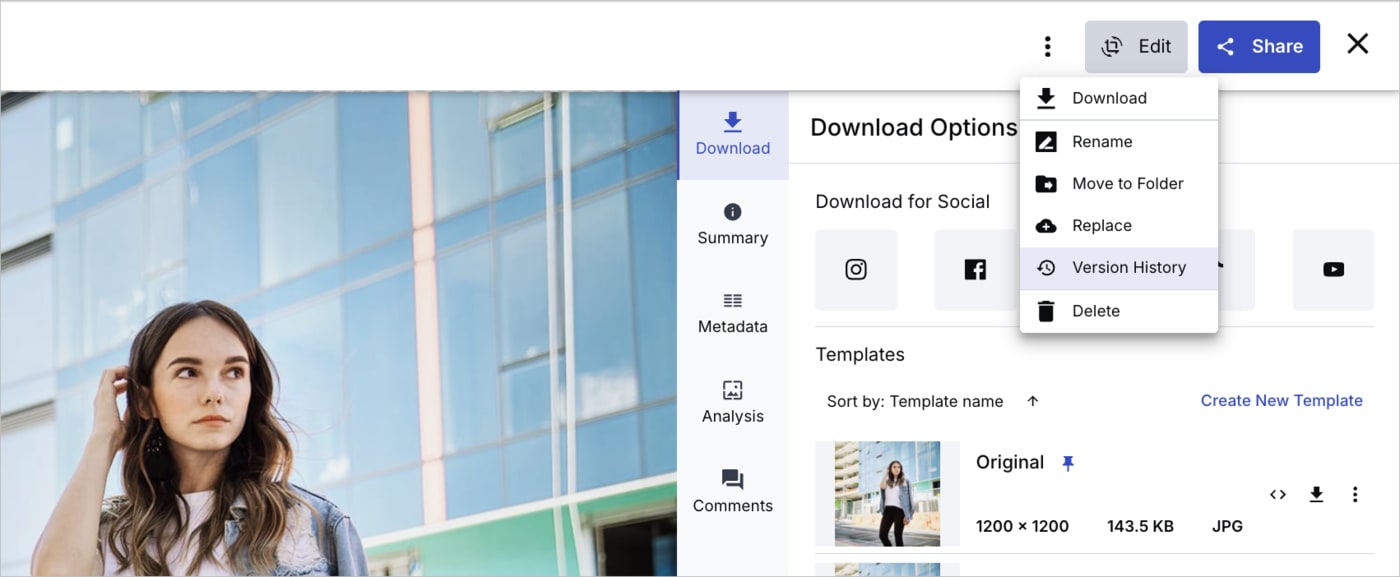
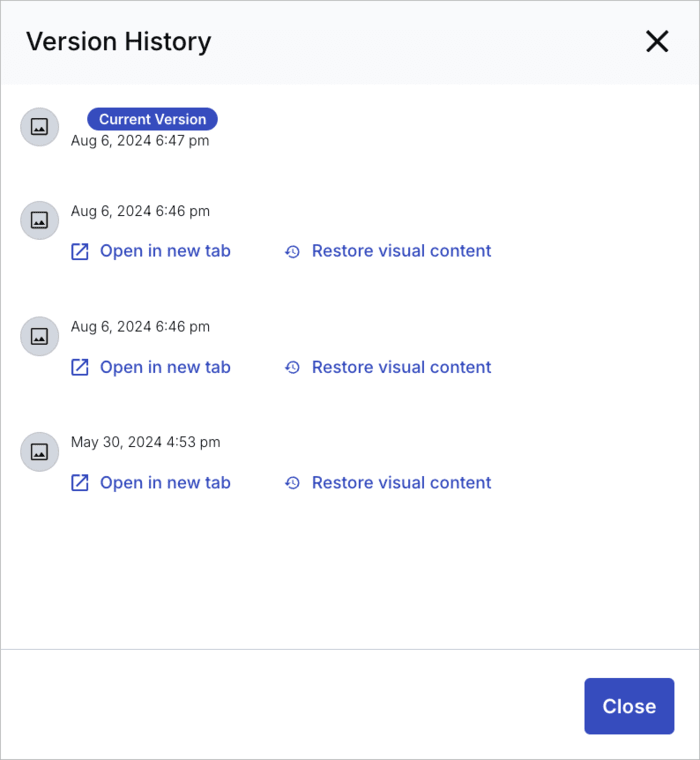
You can list, preview and restore previous versions of an asset from the asset management drill down page by clicking Version History from the kebab menu:
To preview a specific version of the asset, click Open in new tab. To restore a previous version, click the Restore version history link next to the listed version.
Restoring deleted assets from backup
You can restore deleted assets from backup either programmatically, or via the Media Library.
You can, however, upload a new asset with the same public ID as a previously deleted and backed-up asset. In that case, the newly uploaded asset becomes the latest version of the backed-up asset.
Restoring deleted assets programmatically
To find specific assets that you want to restore from backup programmatically, you can use the search method with the expression parameter set to status=deleted, together with other supported expression fields to narrow down the results:
Once you've found your deleted assets, you can restore them from backup programmatically using the restore method of the Admin API. If no versions are specified, the latest backed up version of the asset is restored. For example, to restore deleted assets with the public_ids 'image1' and 'image2':
To restore a specific version of a deleted asset, use the versions parameter, as shown in Restoring a version of an asset.
Restoring deleted assets via the Media Library
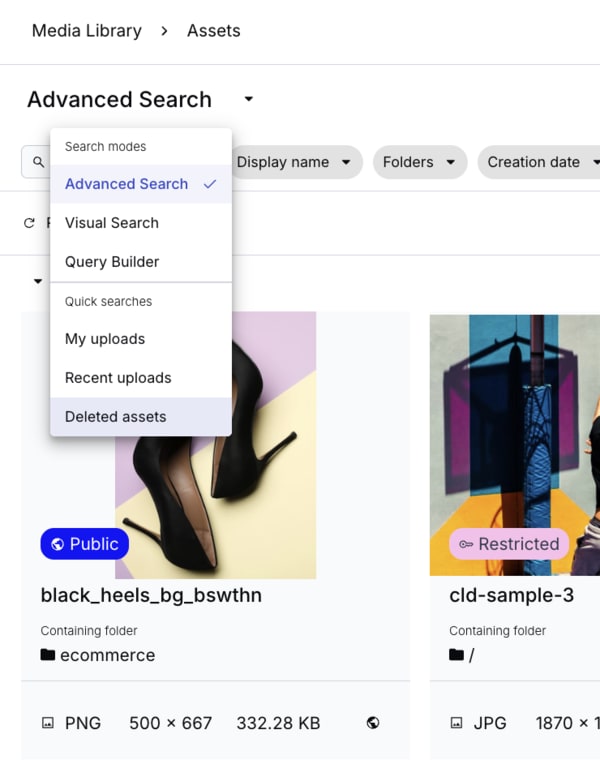
To restore deleted assets through the Media Library, navigate to the Assets page of the Media Library. In the Advanced Search drop down, select Deleted assets.
You can optionally narrow the search down further using Advanced Search filters.
In the Preview pane or the kebab menu for the asset management drill down page of the asset you want to restore, click Version History. Then, select a specific version to restore as described in Managing asset versions via the Media Library, and click Restore visual content.
Restoring deleted assets video tutorial
This video shows how to restore deleted assets in the Media Library:
 Ask AI


