Delete temporary UGC assets
Last updated: Feb-09-2026
When you allow users to upload their own content to your product environment for time-bound activities, such as to see how your product looks in their environment, as in the Try before you buy use-case, you need to manage the deletion of these temporary assets.
One way to do this is to use MediaFlows to check periodically for uploaded assets that have been present for a certain amount of time and automatically delete them.
This guide demonstrates how to build a PowerFlow that does just that.
Sign up for free if you don't yet have a Cloudinary account.
Overview
The PowerFlow uses the following blocks:
- On Scheduled Search: Triggers the flow periodically and runs the rest of the flow for the assets returned by the search
- Iterate Assets: Ensures that the subsequent blocks run for each asset returned by the search
- Condition: Checks if the asset is an image or video
- Scheduled Email Report: Includes the asset from its part of the flow in a scheduled daily email
- Delete Media: Deletes the asset from your Cloudinary product environment
- Add To Logs: Writes a message to the log
On Scheduled Search
The On Scheduled Search block triggers the flow periodically and runs the rest of the flow for the assets returned by the search.
Steps:
- Add the On Scheduled Search block to your canvas.
- Click the block to edit its settings.
- Set the Recurring schedule according to when you want the flow to trigger. See example cron expressions.
- Set the Search expression to return the assets you want to delete. For example, to delete assets uploaded over a day ago with the tag
ugc-contentapplied, use the expression:created_at < 1d AND tags:ugc-content. Learn more about writing search expressions. - Specify how many assets a run of the flow should process.
Example cron expressions
| Scenario | AWS cron expression |
|---|---|
| Run every eight hours | 0 0/8 * * ? * |
| Run every day at 10:00 AM UTC | 0 10 * * ? * |
| Run every Monday at 2:00 PM UTC | 0 14 ? * MON * |
| Run once per hour | 0 * * * ? * |
Iterate Assets
The Iterate Assets block ensures that the subsequent blocks run for each asset returned by the search.
Steps:
- Add the Iterate Assets block to your canvas and connect the output of the On Scheduled Search block to its input.
- Click the block to edit its settings.
- Set the Source of asset list field to On Scheduled Search Resources (use the
+icon to insert the variable). - Set Run in parallel to Yes. There's no reason to process each asset in order and it's faster to run in parallel.
Condition
There are two Condition blocks in this flow, which lead to three possible branches: one for images, one for videos, and one for raw files.
Is it an image?
The first Condition block checks if the asset is an image. If it isn't, the flow moves to the second condition block, which checks if it's a video.
Steps:
- Add the Condition block to your canvas and connect the output of the Iterate Assets block to its input.
- Click the block to edit its settings.
- Set the name to something meaningful like
Is it an image. - In the First variable field, click the
+icon to insert a variable. Select Resource type from Iterate Assets. - Set the Operator to
equal_to. - Set the Second variable to
image. - Set the Variable type to
String.
The top output connector is the path taken if the condition is true (in this case if the resource type is "image"), otherwise the flow continues through the bottom output connector.
Is it a video?
If the asset isn't an image, the flow moves on to check if it's a video.
Steps:
- Add the Condition block to your canvas and connect the bottom output of the previous Condition block to its input.
- Click the block to edit its settings.
- Set the name to something meaningful like
Is it a video. - In the First variable field, click the
+icon to insert a variable. Select Resource type from Iterate Assets. - Set the Operator to
equal_to. - Set the Second variable to
video. - Set the Variable type to
String.
If the asset isn't an image or video, the flow presumes that it's a raw file.
Scheduled Email Report
At this point in the flow there are three branches. Add the next three blocks to each of the branches and configure them according to whether the asset is an image, video, or raw file.
The Scheduled Email Report block includes the asset from its branch of the flow in a scheduled daily email.
Steps:
- Add three Scheduled Email Report blocks to the canvas.
- Connect the top output of the Is it an image condition block to the input of one.
- Connect the top output of the Is it a video condition block to the input of the next.
- Connect the bottom output of the Is it a video condition block to the input of the third.
- Click each block in turn to edit its settings.
- Set Use the asset from to Iterate Assets.
- Set the Recipients to one or more email addresses (separated by commas) that will receive the email.
- Set the Time to the UTC time at which the email will be sent. If the flow runs three times a day, and this block fires in one or more of those runs, the flow sends one email per day.
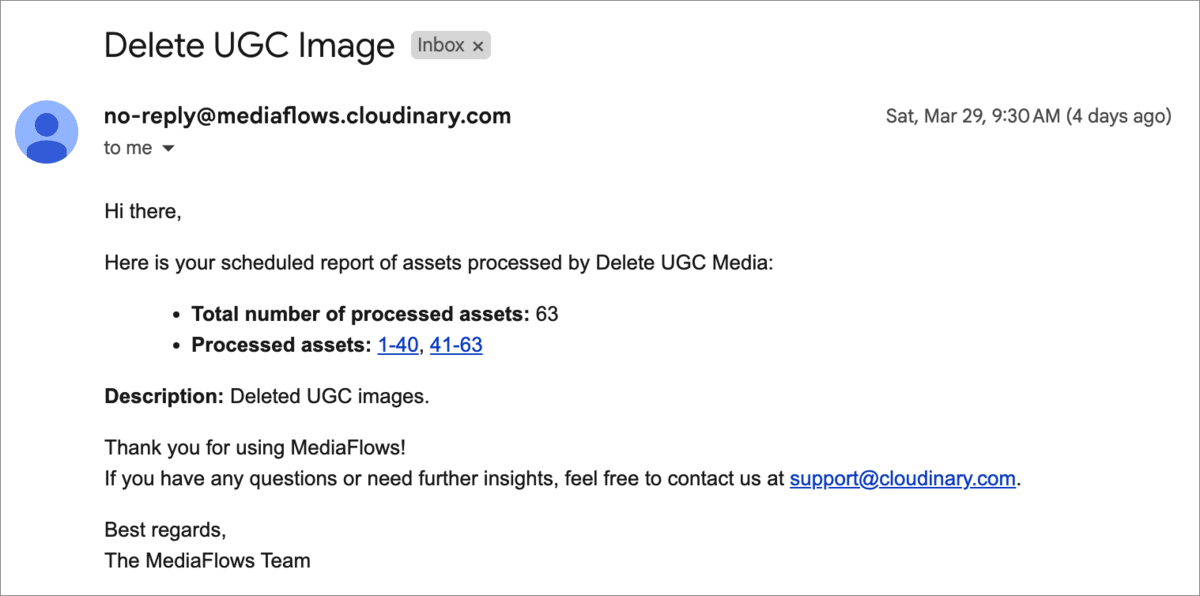
- Set the Report name to something meaningful to that branch, e.g.
Delete UGC Image. - Set the Description to something meaningful to that branch, e.g.
Deleted UGC images.
The email that's sent looks something like this:
Delete Media
The Delete Media block deletes the specified asset from your Cloudinary product environment.
Steps:
- Add three Delete Media blocks to the canvas.
- Connect the output of each Scheduled Email Report block to the input of one of these blocks.
- Click each block in turn to edit its settings.
- Set the name to something meaningful like
Delete Image,Delete Video, orDelete Raw. - Set Use the asset from to Iterate Assets.
- Set Invalidate to true to invalidate CDN cached copies of the asset.
Add To Logs
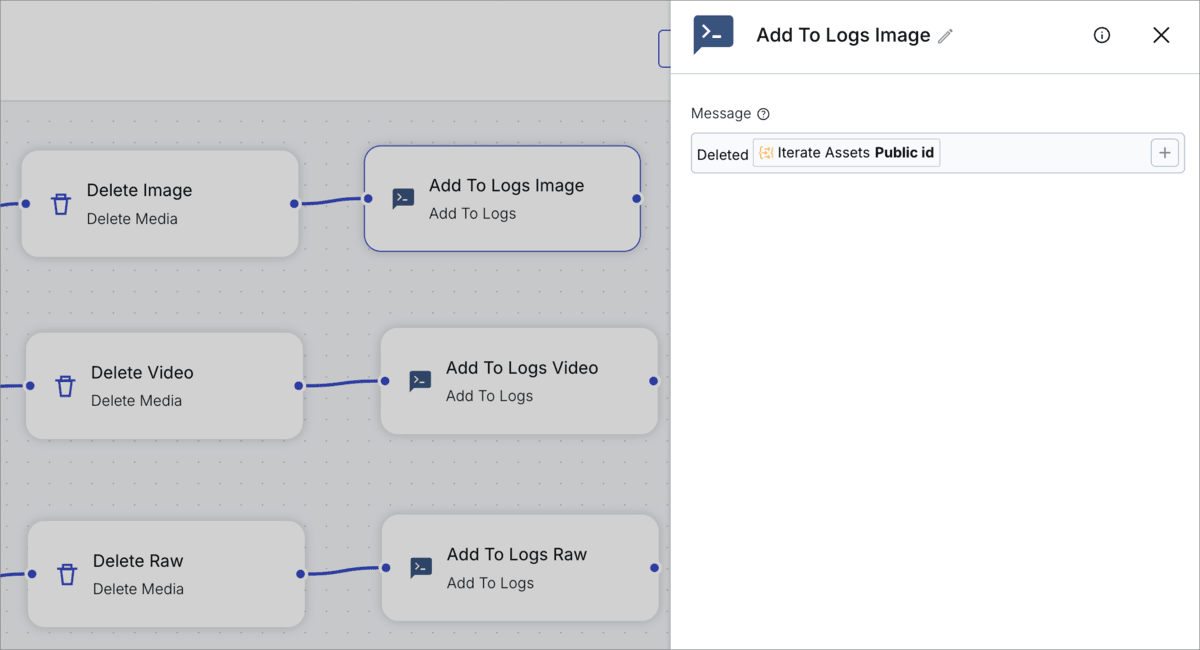
The Add To Logs block writes whatever message you want to the log. In this case, you could record the asset's public ID.
Steps:
- Add three Add To Logs blocks to the canvas.
- Connect the output of each Delete Media block to the input of one of these blocks.
- Click each block in turn to edit its settings.
- Set the name to something meaningful like
Add To Logs Image,Add To Logs Video, orAdd To Logs Raw. - Set the Message to something meaningful. To add the public ID of the deleted asset, click the
+icon to insert the Iterate Assets Public id variable.
 Ask AI


