Product asset workflows
Last updated: Feb-17-2026
This section outlines an example workflow for managing product assets. Use these recommendations as a guide and adjust the implementation as relevant to suit your company's needs.
Product asset workflows should be largely automated. Once you link Cloudinary assets with specific products, they can sync to the appropriate website components, already optimized and formatted for the ideal display.
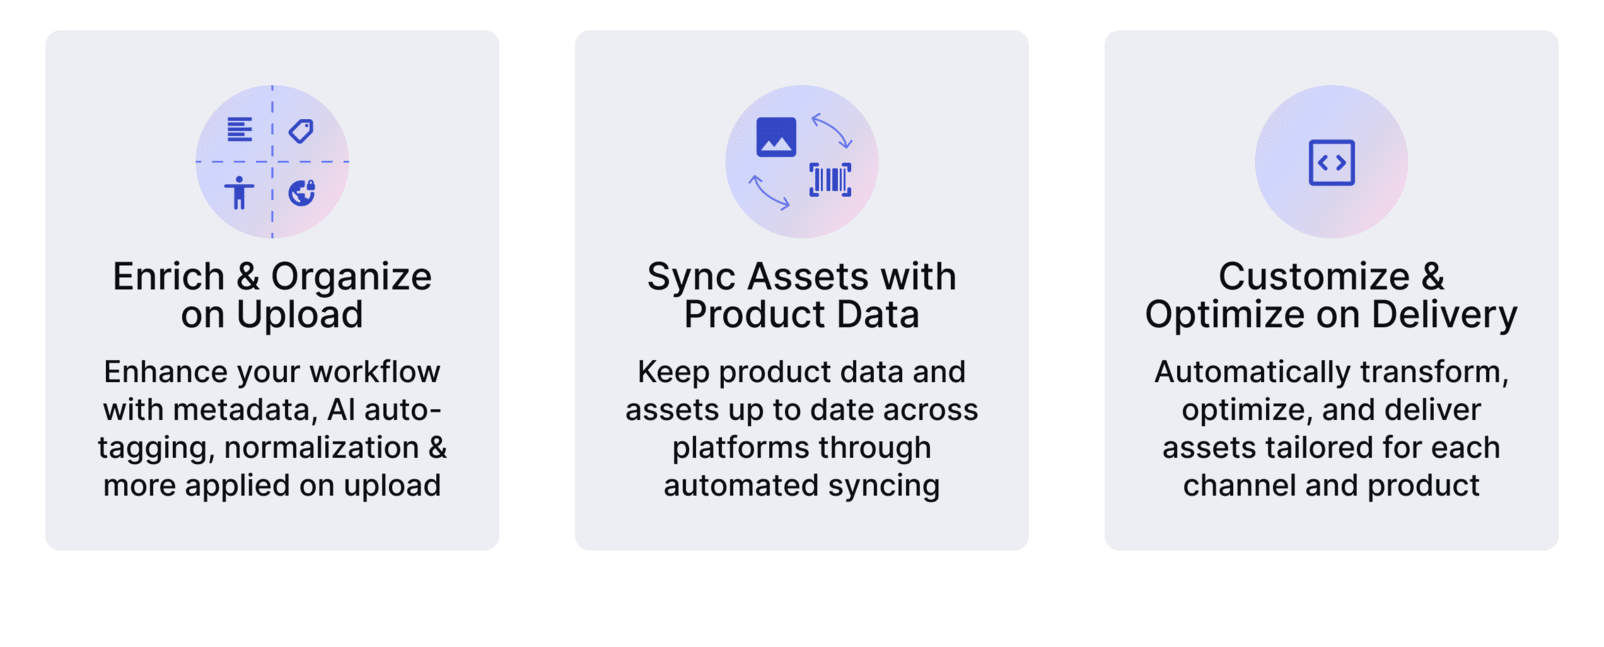
Below is a high-level recommended workflow for product assets:
Enrich and organize on upload
Upload assets directly to Cloudinary as your central source of truth for all images and videos via the upload method, automated system triggers, or batch processing. As part of the upload, apply metadata from your product database as well as automatically generated tags and moderation, normalization, etc. Cloudinary automatically generates public IDs and delivery URLs for the uploaded assets.
Step 1: Set up folders and permissions
Creating folders
Start by organizing your product assets into a clear folder structure. This improves searchability and overall asset management, and is especially important because permissions and governance in the Media Library are enforced via folder management.
We recommend starting with a root folder like products/, and organizing by category.
Here's a sample folder structure for your product assets:
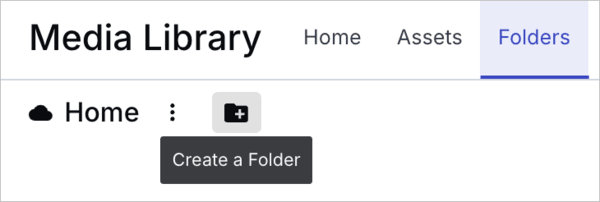
To create a folder:
- Click the Folders tab at the top of the Media Library to navigate to that page.
- Click the Create a Folder icon at the top left corner.
- To create a subfolder, navigate to the parent folder first.
Sharing folders with Media Library users
While developers on your team may have Admin user roles, you should assign Media Library user roles to content editors in your organization who work with assets within the Media Library. For more information on adding users and assigning roles, see User and group management.
Media Library users won't be able to view any content in the Media Library until you share folders with them. Once you do that, they'll be able to access the assets within the folder and its subfolders at the permission level you assign.
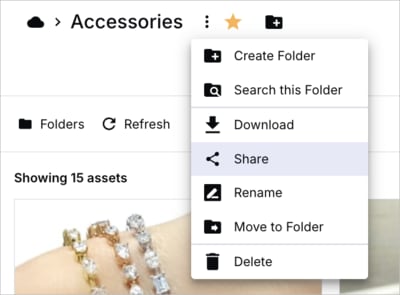
To share a folder:
- Select Share from the options drop-down next to the current folder path at the top of the Media Library

- Select the users and/or user groups you want to share the folder with, as well as the permission level for each.
For more information, see Folder management.
Step 2: Associate an asset with its product SKU
You might be able to retrieve essential metadata, such as SKU or unique product ID, and product information embedded within the asset files themselves (e.g., EXIF, XMP). Alternatively, you could pull this information from your PIM, database, or spreadsheet containing filenames, SKUs, and other relevant details.
Depending on your use case, you can associate the asset with its product SKU within Cloudinary using:
| Method | What it does | When to use it | Implementation |
|---|---|---|---|
| Naming conventions | Embeds SKU into the asset's public ID to link products across platforms. | Use this method only when you always associate each asset with only one product SKU. | Find out how to retrieve the product SKU: - If the SKU is part of the original file name, create an upload preset with - If you need to extract the SKU from another location, set the |
| Metadata | Stores SKUs in metadata fields, tags, PIM, or databases for flexible retrieval. | Use this method when you expect at least in some cases to associate a single asset with multiple product SKUs, or when public IDs aren't practical for SKU management. You might want to store the SKU in a metadata field even if assets are already linked to products using naming conventions to make them easier to find using search or filters. |
1 - Create a structured metadata field for storing SKUs. See Step 4. 2 - Set values for the SKU metadata field on your assets during upload. |
Step 3: Set up normalization
Normalization standardizes assets during upload, ensuring they meet your specific requirements for dimensions, format, and quality. This guarantees consistency across all product assets stored in your DAM and simplifies management.
This step entails creating named transformations to normalize product assets. You'll apply them on upload using an upload preset in Step 6.
You can configure named transformations either programmatically or using the Transformation Builder. The steps below describe how to use the Transformation Builder UI, which may be more convenient in many cases.
Some common normalization actions include:
| Normalization Action | What it Does | Considerations | Implementation |
|---|---|---|---|
| Background removal | Removes image backgrounds using AI. | Works well for large-scale operations. For finer results, use the Pexels add-on or FinalTouch. | Create a named transformation using the Transformation Builder. Apply the Background Removal action. Note: You first need to register for the Cloudinary AI Background Removal add-on. |
| Drop shadow | Adds realistic shadows to background-removed images. | Configures a virtual light source for natural shading. | Create a named transformation using the Transformation Builder. Apply the Drop Shadow action. |
| Cropping and resizing | Adjusts images to a specific aspect ratio. | Use g_auto or g_object to keep key elements in focus for all fill and crop resize methods.If preserving the full image, use |
Create a named transformation using the Transformation Builder. When cropping with Fill or Crop actions, select Auto or Object from the Focus on drop-down to keep key elements in focus. When using the Pad resize action, select the Generative Fill option from Background Type to expand the background naturally. |
| Trimming and removing sound | Shortens video clips and removes audio as needed. | Helps optimize video length and mute unwanted audio. | Create a named transformation using the Transformation Builder. Apply the Trim Video action to cut video clips. Click Quick Edit and enter |
| Changing video orientation | Auto-adjusts video orientation to keep the subject in focus. | Use g_auto to ensure proper alignment across different devices. |
Create a named transformation using the Transformation Builder. Apply Crop, Fill, or Pad resize actions. Make sure to select Auto or Object from the Focus on drop-down to keep key elements in focus. |
Example: Resize and remove background
The transformation applied to the normalized image on the right removes the background, fits the subject within a 1920×1080 box without distortion, and then crops it to exactly 1920×1080 using automatic centering (e_background_removal/c_crop,g_auto,h_1080,w_1920). This results in a transparent image with consistent dimensions, suitable for use in standardized layouts.
How to set up this named transformation
Using the Transformation Builder
Configure named transformations using the Transformation Builder UI following these instructions:
- Open the Cloudinary Console, click the Image product, then click New Transformation to access the Transformation Builder. TipYou can use sample assets or select your own in the Transformation Builder to preview how transformations look when applied.
- Select the transformations you want to apply from the Select Action area. You can also click Quick Edit to manually add transformation strings. See a complete list in the Transformation URL API reference.
Video Tutorial: Creating named transformations
Watch a short video that shows how to create named transformations in the Transformation Builder for normalizing product assets.
- Learn more about background removal and drop shadow effect in the Remove Image Backgrounds and Add Realistic Shadows to Products in React blog post.
- In the Transformation Builder, you can override automatic crops by clicking the edit icon on the image and cropping manually.
Step 4: Create metadata fields
Metadata can help system users, developers, or third-party stakeholders search for and retrieve assets for management or delivery. After you create metadata fields for your product environment, you can populate the fields by retrieving metadata from information within the uploaded files themselves or programmatically sync values between your assets and your product management platform. You can create the fields programmatically or via the Cloudinary Console UI.
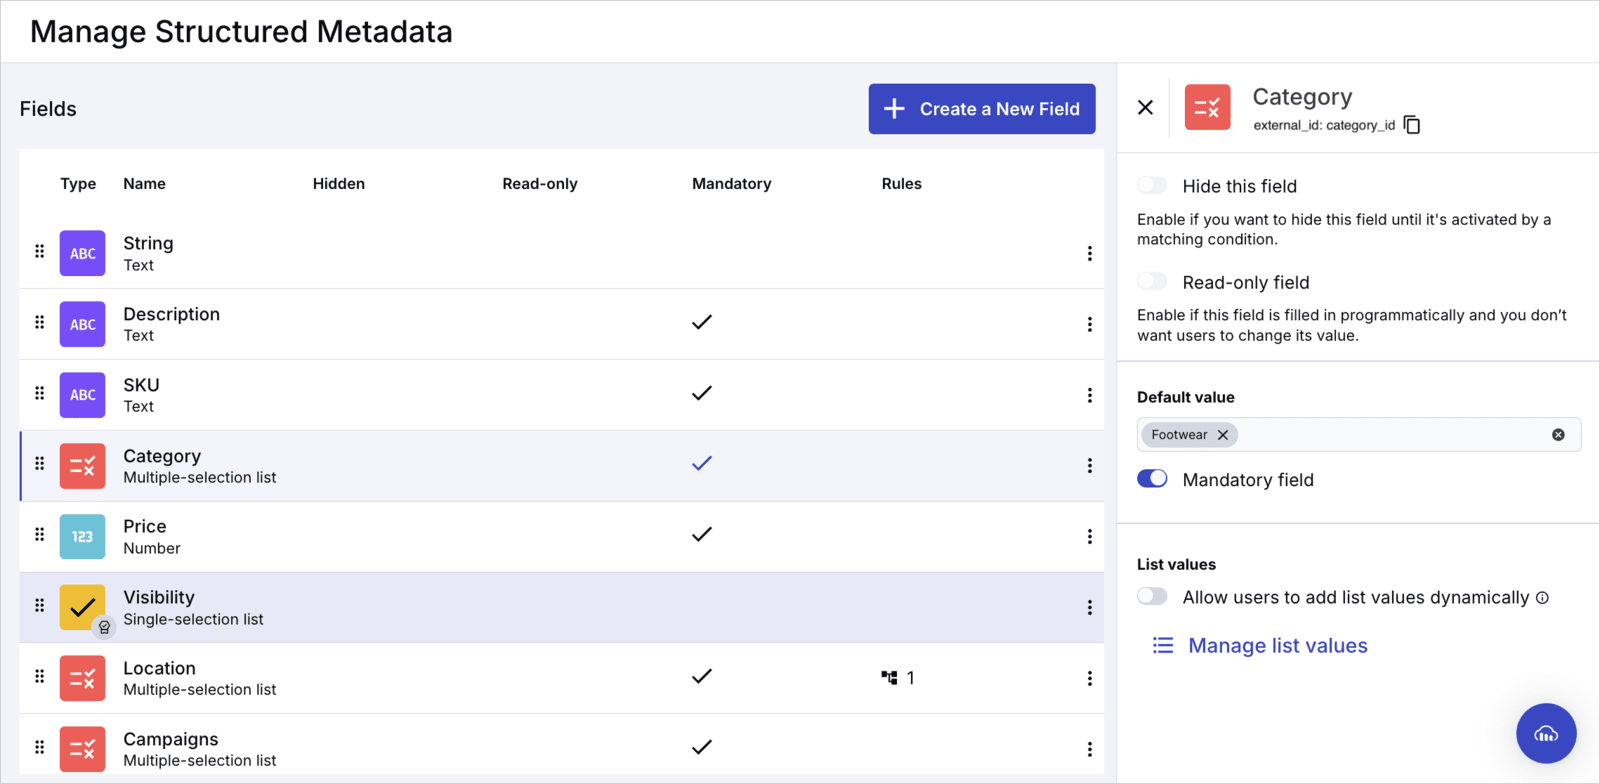
To define metadata fields in the Console:
- Go to the Structured Metadata page in the Console.
- Configure metadata. Consider creating:
-
SKU field of type
textwith external IDsku_id -
Expiration field of type
datewith external IDexpiration_date_id -
Visibility field of type
single selectwith external IDvisibility_idand list values Public and Private
-
SKU field of type
- The following options are available when creating and managing fields:
- Field types: Text, number, date, single-selection, and multiple-selection lists.
- Mandatory fields: Define required fields to ensure consistent metadata entry. (Make sure you set a realistic number of mandatory fields so your users don't get overwhelmed.)
- Default values: Assign default values to mandatory fields to prevent upload failures.
- List values: Specify predefined values for single- and multiple-selection fields.
-
Metadata rules: Set conditional rules (e.g., State field appears only if Country is US).
For more information, see Structured metadata.
Step 5: Register for add-ons
In order to enable some upload preset options, you first need to register for Cloudinary's add-ons. You'll then activate the selected add-ons using upload preset options in Step 6.
Here are some of the add-ons you may want to apply:
| Add-on | What it Does | Considerations | Implementation |
|---|---|---|---|
| Background removal | Remove backgrounds quickly and accurately to create transparent images that showcase the main subject. | Works well for large-scale operations. For finer results, use the Pexels add-on or FinalTouch. | 1 - Register for the Cloudinary AI Background Removal add-on in the Add-ons page. 2 - Enable Cloudinary AI Background Removal in Addons page of a new upload preset. |
| Google Auto Tagging | Automatically tags images using Google Vision AI. | Works well for general object recognition and categorization. | 1 - Register for the Google Auto Tagging add-on. 2 - Enable Google Auto Tagging in Addons page of a new upload preset. |
| Amazon Rekognition Auto Tagging | Detects objects and assigns tags using Amazon Rekognition. | Useful for AI-powered object detection and scene analysis. | 1 - Register for the Amazon Rekognition Auto Tagging add-on. 2 - Enable Rekognition Auto Tagging in the Addons page of a new upload preset. |
| Auto Moderation | Flags inappropriate content. | Ideal for content moderation and brand safety. | 1 - Register for the Rekognition AI Moderation and Rekognition AI Video Moderation add-on. 2 - Enable Rekognition AI Moderation (for images) or Rekognition AI Video Moderation (for videos) in the Addons page of a new upload preset. |
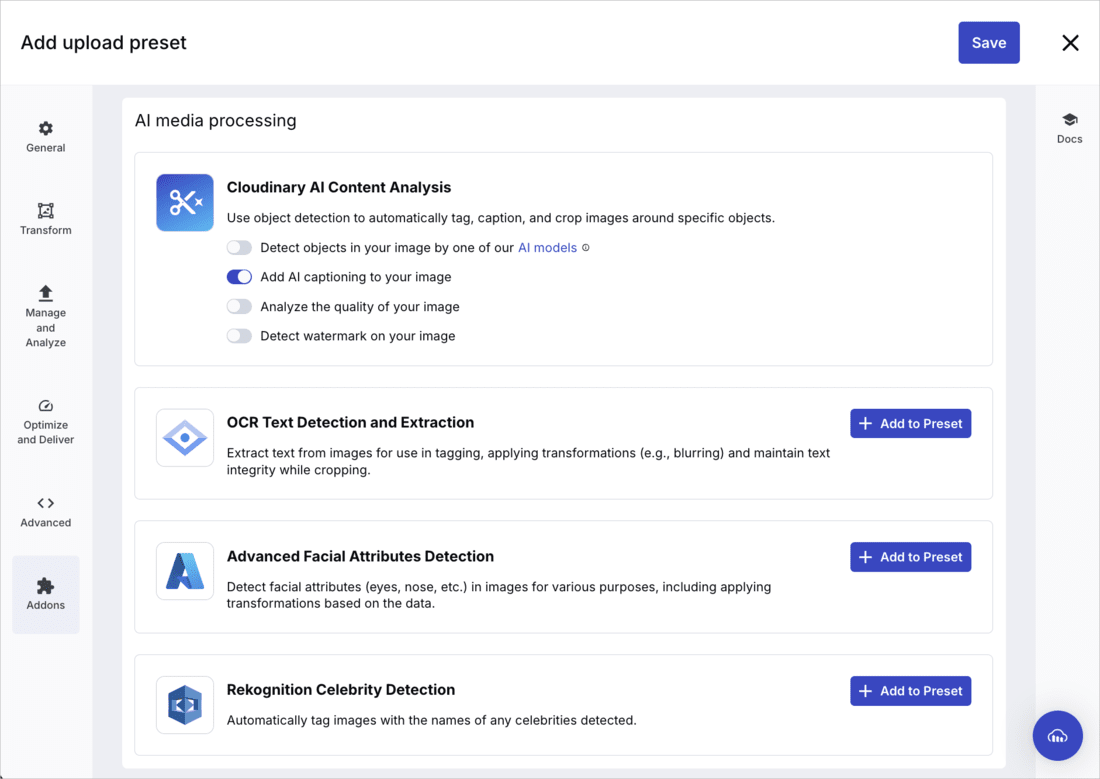
| Cloudinary AI Content Analysis | Generates image captions and auto-tags assets. | Useful for automatic alt text and SEO improvements. | 1 - Register for the Cloudinary AI Content Analysis add-on. 2 - Enable Add AI captioning to your image for the Cloudinary AI Content Analysis add-on in the AI media processing section in the Addons page of a new upload preset. See Step 6 for full upload preset configuration instructions. |
| Google Video Intelligence | Labels objects and scenes in videos. | Ideal for video content classification. | 1 - Register for the Google Video Intelligence add-on. 2 - Enable Google Automatic Video Tagging in the Addons page of a new upload preset. |
| Video Transcription and Translation | Generates video transcriptions and translates them into multiple languages. | Enhances accessibility, SEO, and multi-language support. | 1 - Register for the Video Transcription and Translation add-on. 2 - Enable Video Transcription and Translation in the Addons page of a new upload preset. |
| Cloudinary AI Vision | Allows you to ask questions or make requests about the content of an image. | Use Cloudinary AI Vision to automatically decide which crops to apply to images by asking questions such as "Is the clothing item floating without a model in the image?" or "Does the image have the top of the main subject (model or product) cropped?". | 1 - Register for the Cloudinary AI Vision add-on. 2 - Call the call the |
Step 6: Use an upload preset for normalization, auto-tagging, access control, alt-text generation, and optimization
An upload preset enables you to centrally define a set of upload options, ensuring consistency and efficiency when uploading assets. It applies the options you set up in the previous steps, as well as other best practices for metadata, access control, normalization, accessibility, and optimization.
To create an upload preset to apply upload options:
Navigate to the Upload Presets tab of the Upload Console Settings page and click Add Upload Preset.
Use the table below to apply recommended upload preset options, see how they align with best practices, and learn how to implement them.
| Option | How it Supports Best Practices | Implementation |
|---|---|---|
| Naming and folder location | Enforce naming conventions such as SKU association with the asset. Enforce governance within the organization and improve discoverability by uploading assets to meaningful folder locations. |
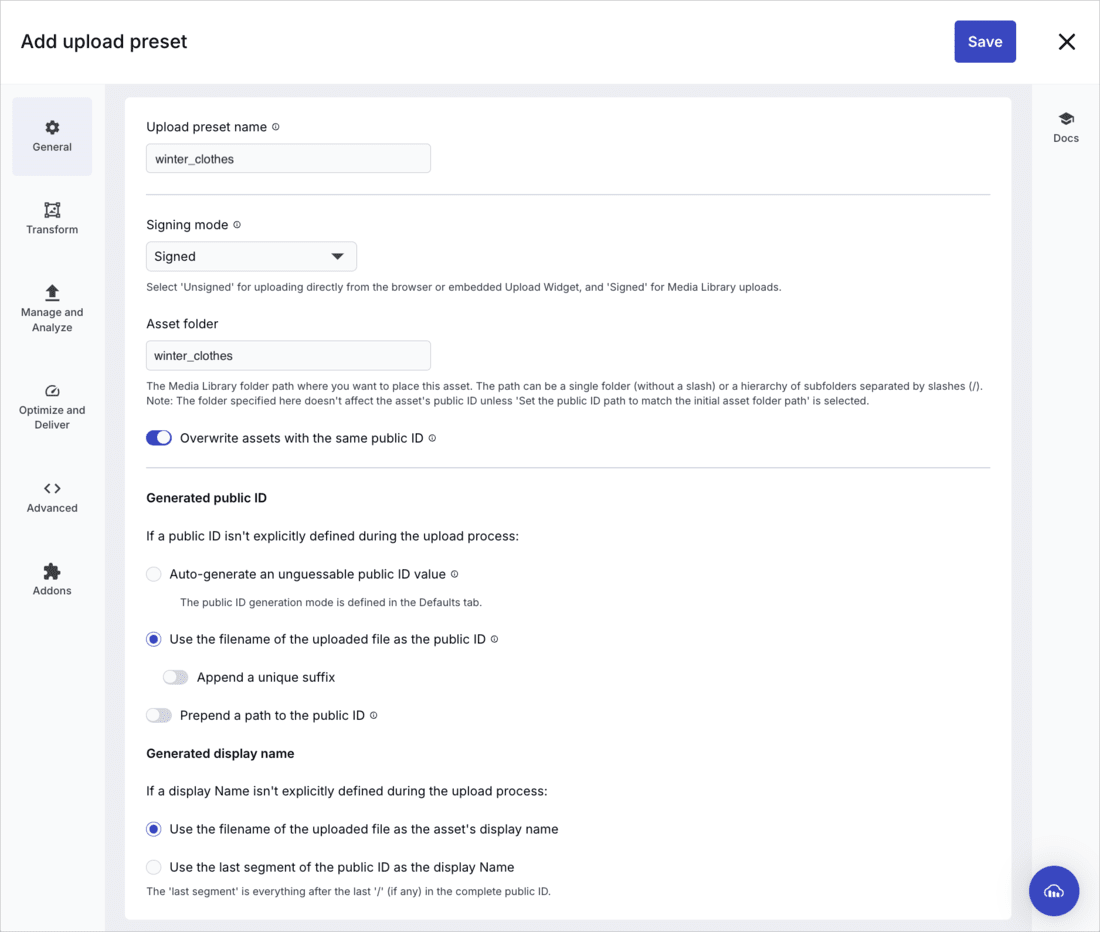
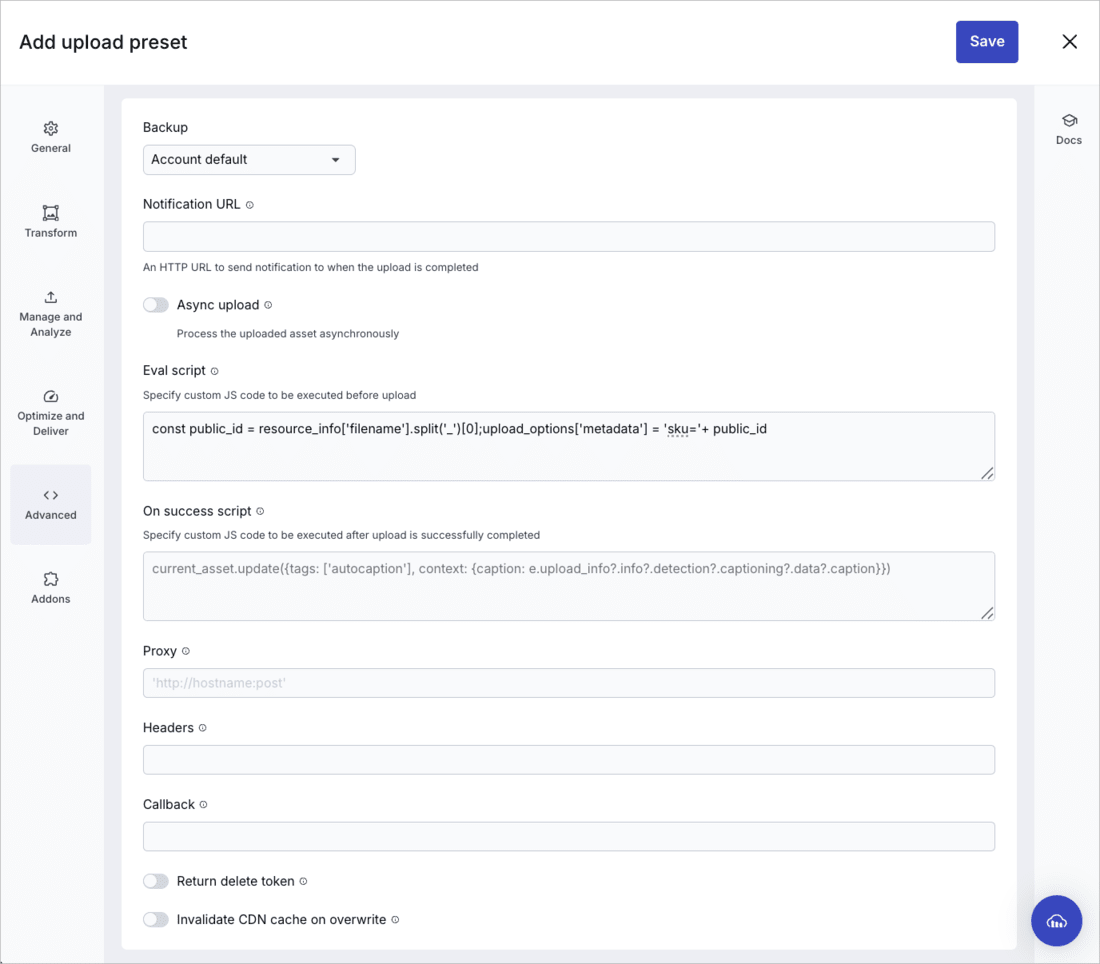
In the General tab of the new upload preset: - Enter the name of the Asset folder you want to upload to. - Select Use the filename of the uploaded file as the public ID to enforce naming conventions when the uploaded file contains the SKU. Note: If the SKU isn't part of the uploaded file's name and the SKU needs to be part of the public ID, assign the public ID directly in the upload call. For more information, see Step 7. |
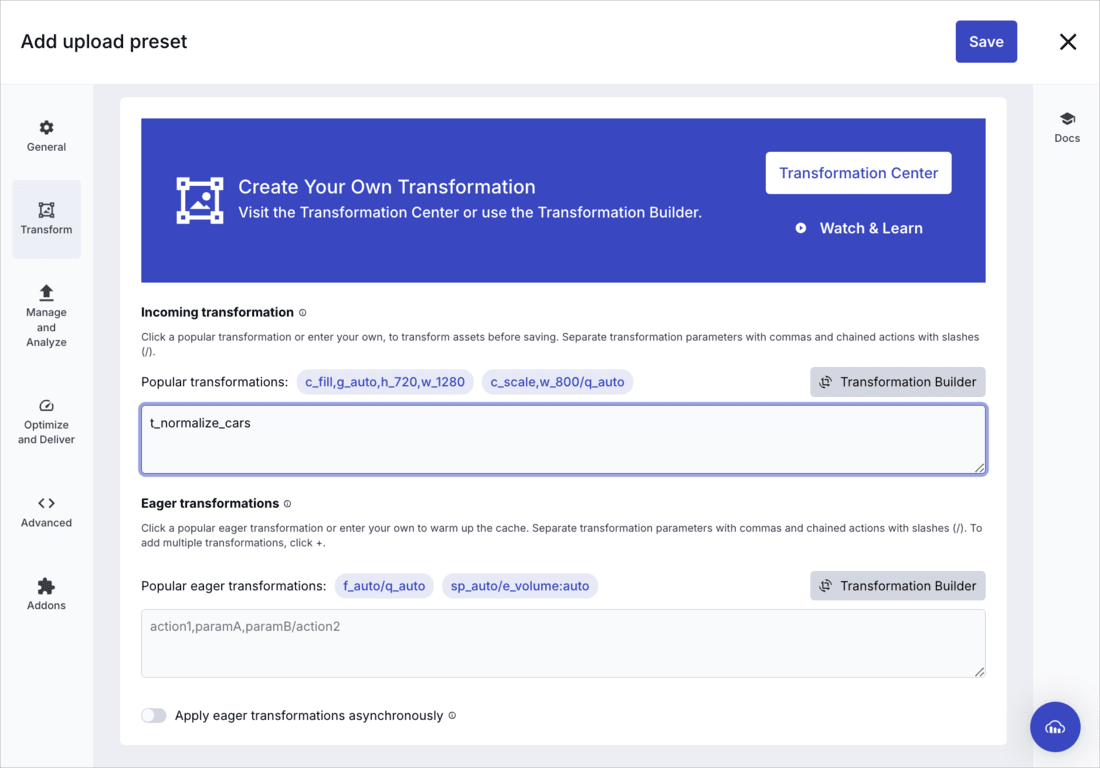
| Normalize assets | Apply named transformations as incoming transformations to normalize the assets you store in Cloudinary. | In the Transform tab of the new upload preset, enter the name of the named transformation preceded by t_:
Note: Instead of saving the normalized version of the asset in Cloudinary, you can save the original and generate a derived asset modified for later use. Do this by entering the named transformation as an Eager transformation, instead of Incoming. |
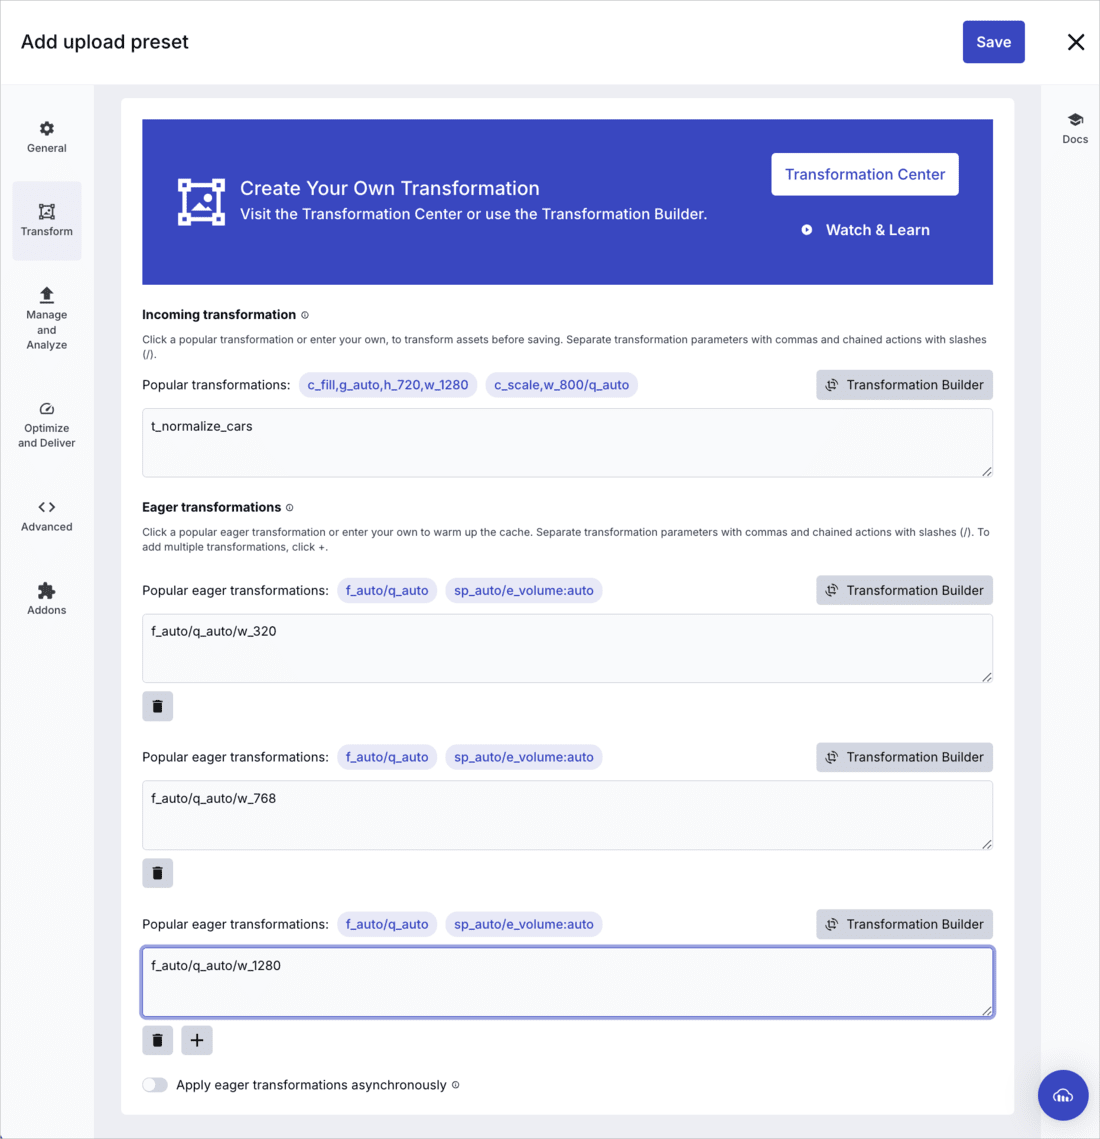
| Improve image and video performance | Prepare responsive images for various viewports and use auto-format and quality settings to make sure your website loads quickly. | In the Transform tab of the new upload preset, add f_auto/q_auto as Eager transformations for various viewport sizes, e.g., w_320, w_768, w_1280, w_1600.
|
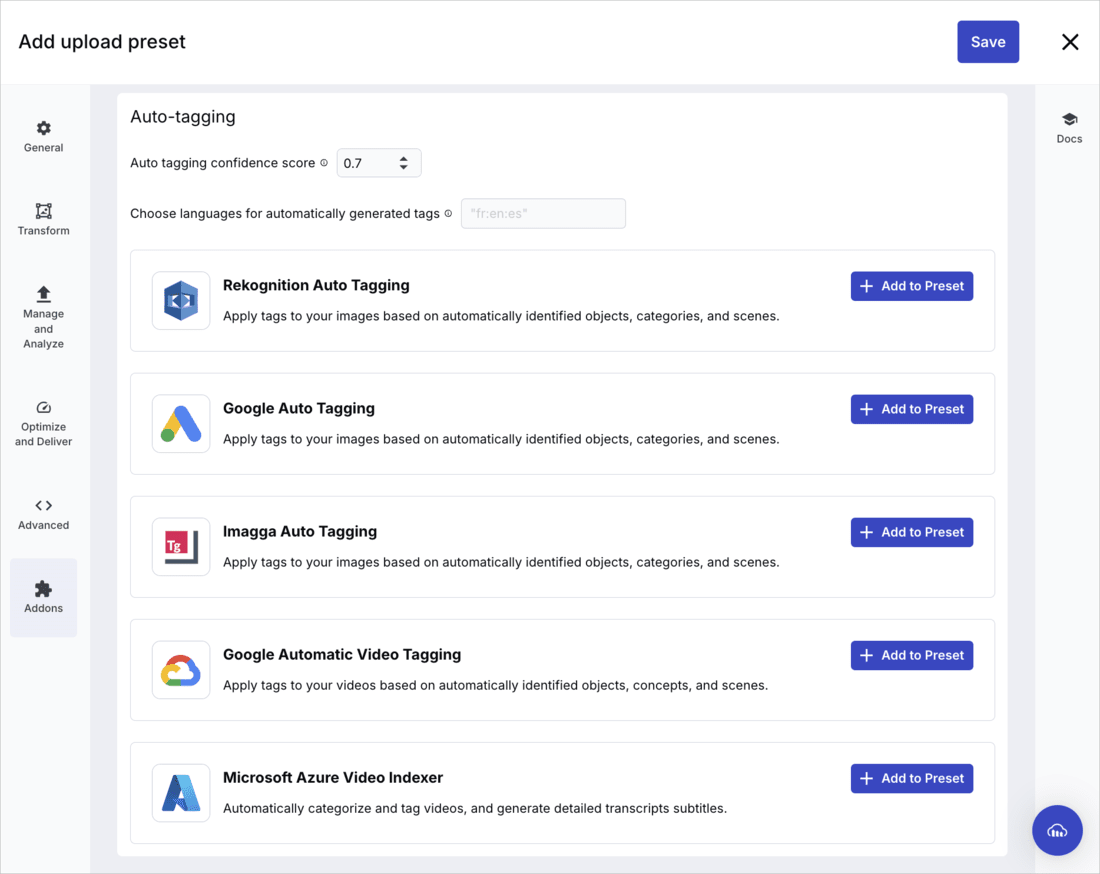
| Enhance searchability with auto-tagging | Categorize assets accurately for faster search and retrieval while reducing manual effort. | In the Addons tab of the new upload preset, select the auto-tagging add-on(s). Make sure you're registered for those add-ons, as described in Step 5. |
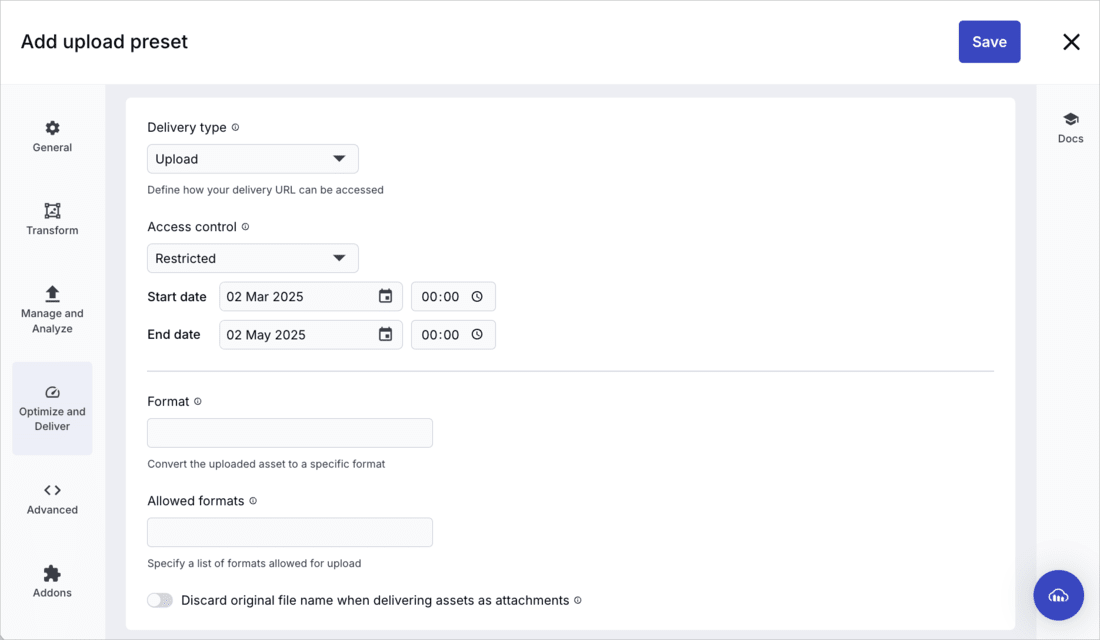
| Restrict access to assets with time based availability | Ensures sensitive assets are only available when needed. | In the Optimize and Deliver tab of the new upload preset, set Access control to Restricted, with an optional date range for unrestricted availability. |
| Auto-generate captions | Use these captions as alt text to make images accessible to visually impaired users and improve SEO. | In the Addons tab of the new upload preset, select Add Al captioning to your image from the Cloudinary Al Content Analysis add-on. Make sure you're registered for the Cloudinary AI Content Analysis add-on, as described in Step 5.
To add the caption to a previously created structured metadata field called Caption (whose external_id is
After the upload, retrieve the structured metadata field value for an asset and assign it to its alt text when rendering it in your HTML code. |
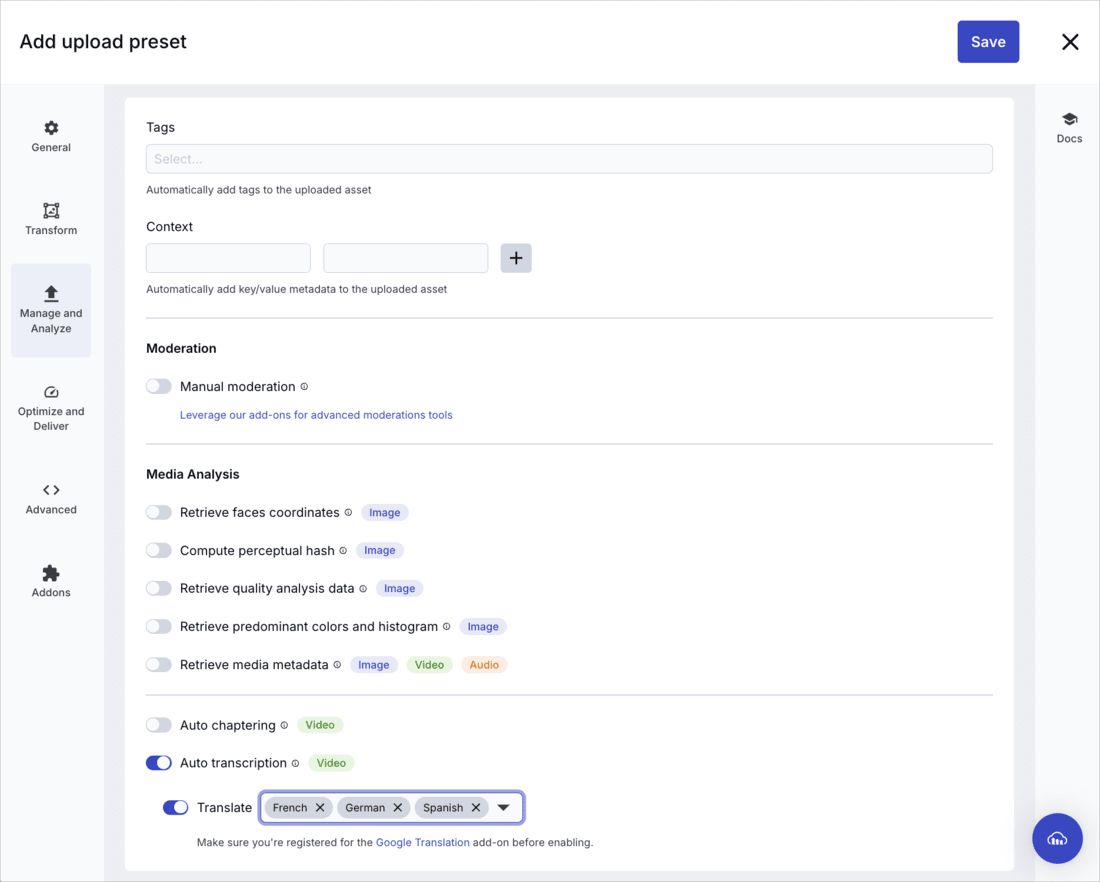
| Generate video transcription and translations | Use video transcription and translation to make images and videos accessible to deaf and hard-of-hearing users and expand reach to multilingual audiences. | In the Manage and Analyze tab of the new upload preset, turn on Auto transcription and select the languages you want to provide. Make sure you're registered for the Video Transcription and Translation add-on , as described in Step 5. |
- Remember to click Save at the top left corner.
Step 7: Upload with an upload preset and metadata field values
Upload assets to Cloudinary with the upload preset applied, use:
- The upload method of the Upload API for single asset or batch uploads.
- The migrate command of the Cloudinary CLI for batch uploads. Use this method for initiating uploads automatically from another source.
- The Media Library for manually uploading one or multiple assets, or a folder structure.
Example: Upload using the Upload method
Use the upload method to upload an asset using the product_images preset. In this example, metadata values are set for the following structured metadata fields:
SKU (
sku_id)Expiration date (
expiration_date_id, set to 2 months from today)Visibility (
visibility_id)
Retrieved the SKU from your database or PIM using the get_sku() function. Assign the SKU value to the metadata field, and include the SKU in the public ID as a prefix, followed by a generated suffix.
Example: Batch upload with the CLI
Batch upload using the migrate command:
- Create an upload mapping to transfer assets from your source domain
https://your-source-domain.com/media/uploads/to Cloudinary’sproduct_assetsfolder
- Run this command to migrate all the assets listed in the `url_file.txt` to the `product_assets` folder in your Cloudinary product environment, showing verbose output. The `product_assets` upload preset, which has the same name as the upload mapping, gets applied automatically:
- You can update metadata programmatically using the explicit method.
Example: Upload using Media Library
Upload assets via the Media Library, applying upload preset options and adding metadata:
Default upload preset: You can set up Media Library Upload Preset Defaults for your images and videos. Select an upload preset that will apply to all uploads performed from the Media Library, whether the upload is done by dragging and dropping into the Media Library or via the Upload Widget by clicking the Upload button.
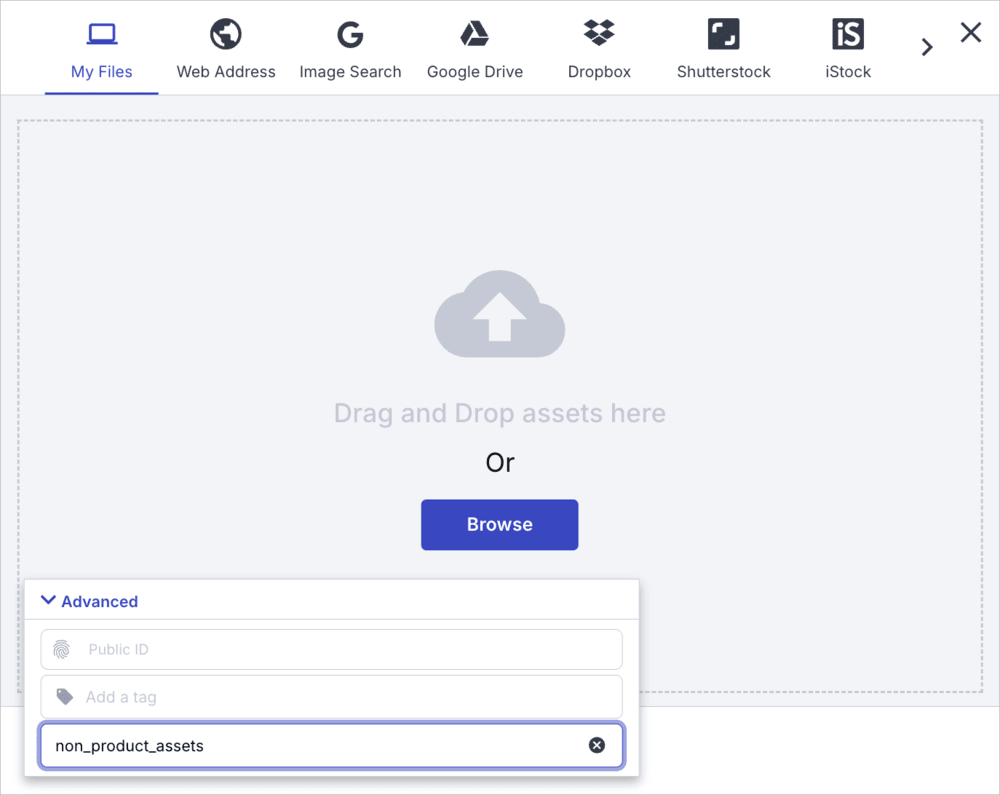
Upload preset selection: For flexibility in selecting upload presets, you can click Upload to launch the Upload Widget, then select an Upload Preset in the Advanced section and select the appropriate preset from the Upload Preset drop-down.
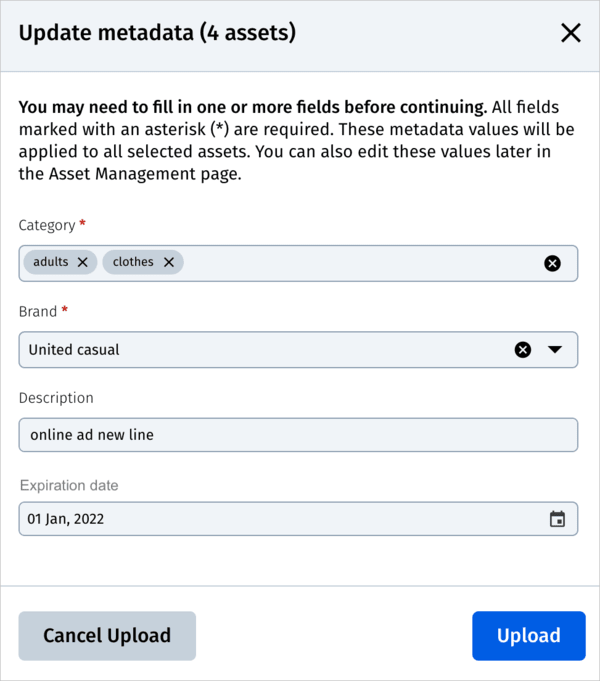
- Require metadata on upload: In the Upload page of the Preferences, select Always for the Request metadata on upload. When that setting is enabled, Cloudinary prompts filling in metadata field values before finalizing the upload.
Sync assets with your product data
After uploading your assets to Cloudinary, ensure they're linked to the other elements within your tech stack. Use product-identifying details (like SKU or product ID) in the asset's public ID or metadata for seamless integration.
Sync assets using a PIM integration
For businesses utilizing a PIM (Product Information Management) system, product information often exists in the PIM before adding assets to Cloudinary. Cloudinary serves as the central source of truth, allowing PIM systems to pull asset data, such as public IDs and delivery URLs directly from Cloudinary.
Key benefits of PIM integration:
Automatic syncing: Cloudinary delivery URLs or public IDs are stored in the PIM, enabling seamless product publishing with Cloudinary assets.
Consistent metadata: Cloudinary retrieves and syncs product metadata from the PIM to ensure consistency.
Bi-directional updates: Changes in the PIM automatically update in Cloudinary, and vice versa, ensuring the latest assets are always used.
Akeneo and Syndigo are examples of Cloudinary-integrated PIMs. See Integrations for a complete list.
Sync assets without a PIM integration
If you don’t use a PIM and instead manage product information through a database or spreadsheet, you can create a custom connector between Cloudinary and your system.
Essential components of a custom integration
| Action | Purpose | Example |
|---|---|---|
| Set up webhook notifications | Receive real-time updates when API calls and Media Library actions complete. | Configure a webhook to notify your system whenever a new asset gets added. |
| Save public IDs/URLs | Store asset identifiers in your database or spreadsheet for future reference. | Store Cloudinary public IDs alongside product SKUs in your database. |
| Use MediaFlows for automation | Automate metadata updates and asset syncing between Cloudinary and external systems. | Set up an automation that updates asset tags in Cloudinary based on changes detected in your product database. |
| Daily batch sync | Check for updates and synchronize metadata between Cloudinary and your system. | Use MediaFlows to run a scheduled job every night that syncs updated asset metadata. |
| Bi-directional sync | Export asset public IDs and URLs from Cloudinary and import product information into Cloudinary. | Automatically sync product descriptions from your database to Cloudinary metadata fields. |
| Read-only fields | Prevent Cloudinary metadata fields from being overwritten by external sources using the restrictions parameter within the metadata field structure. |
Lock the Cloudinary SKU metadata field, as it receives a value by importing metadata from your database. |
Additional considerations for integration
Make sure your connector is robust and handles all possible scenarios, such as asset deletion. Sync deletions from Cloudinary to your PIM or database.
-
Here's an example of a personalized flow that can help you manage metadata sync between Cloudinary and your system.
- Use a structured metadata field called Status.
- Set a value for the Status field dynamically:
- If all of the asset's required metadata is import successfully from your PIM or database to Cloudinary, set the Status field to Metadata complete.
- If any required fields are missing, set Status to Requires data.
- Create a saved search in Cloudinary to quickly find assets whose Status field's value is Requires data to manually complete the missing fields more easily.
Sample app: Syncing without a PIM integration
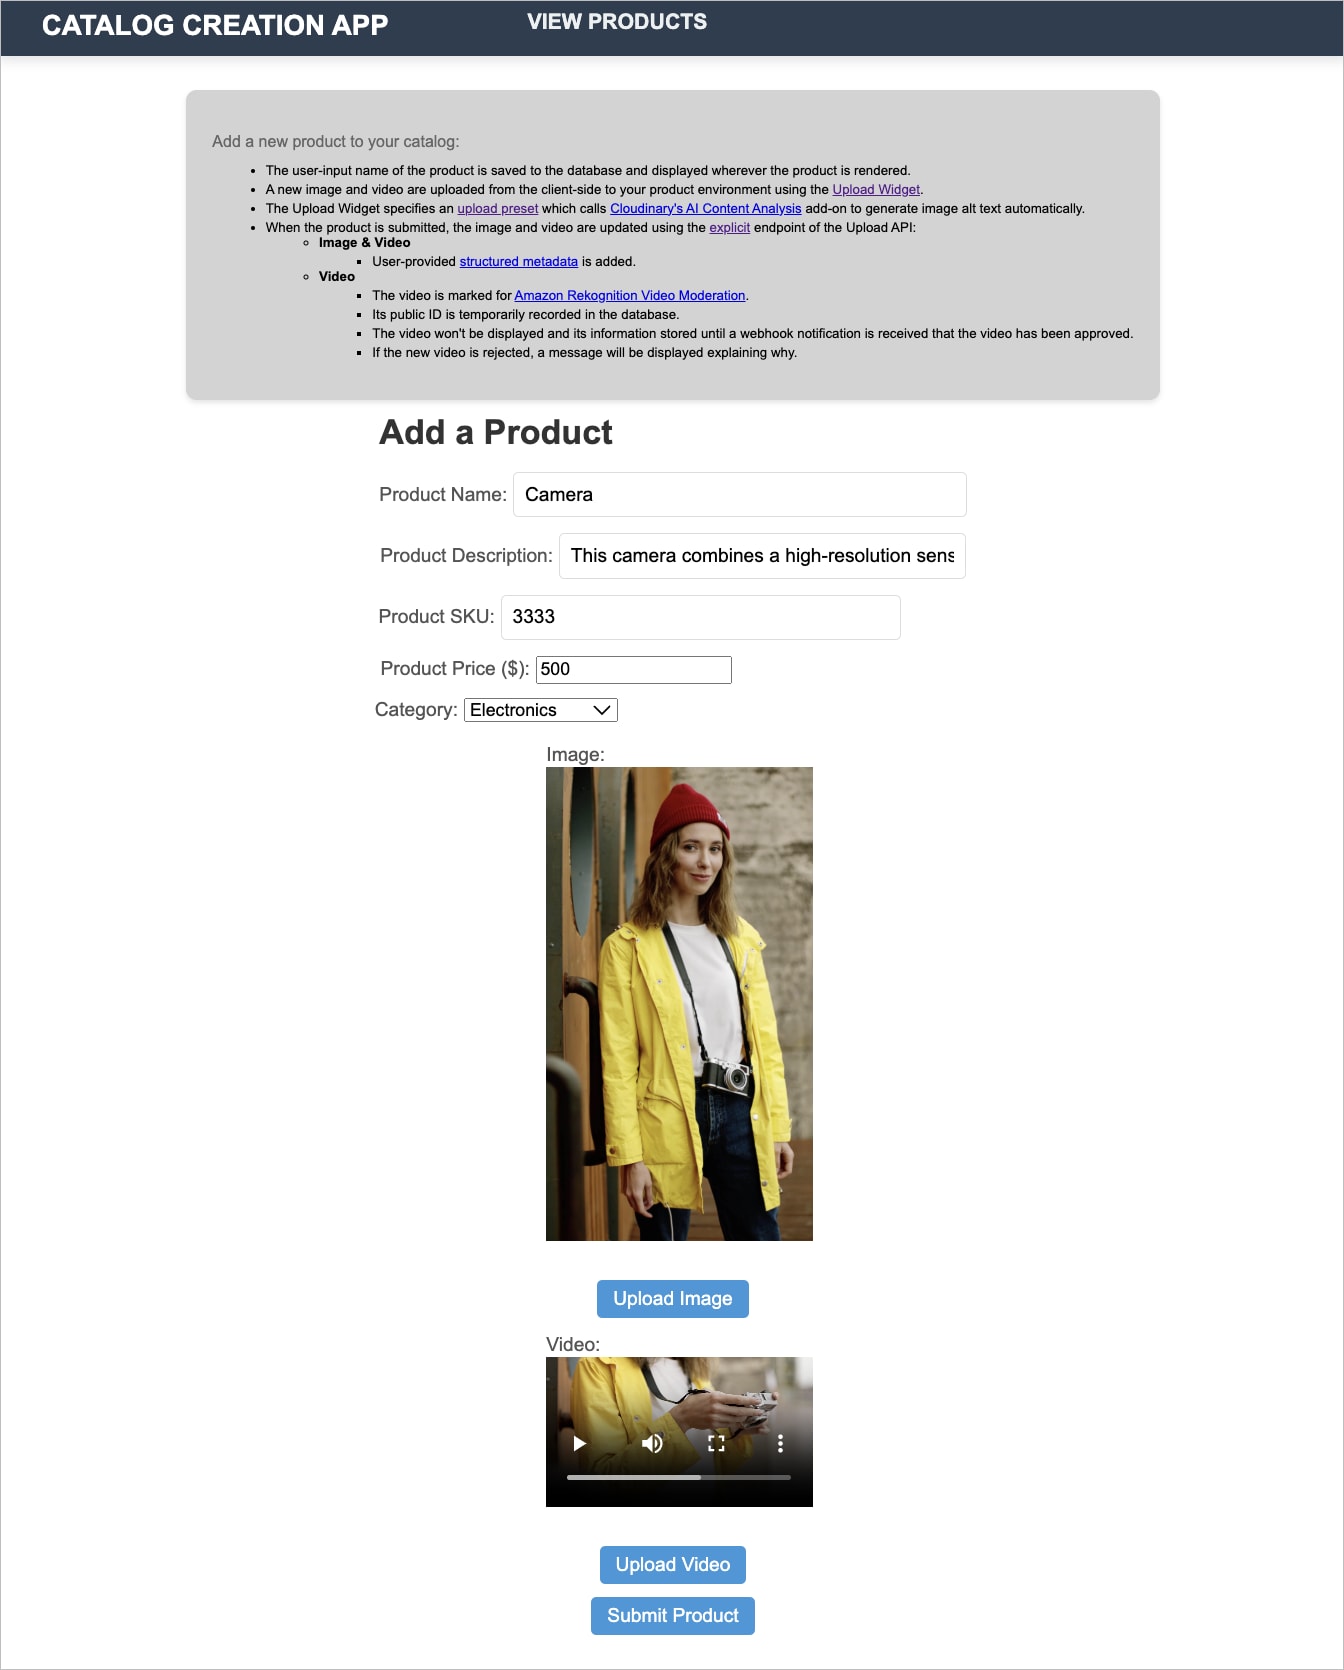
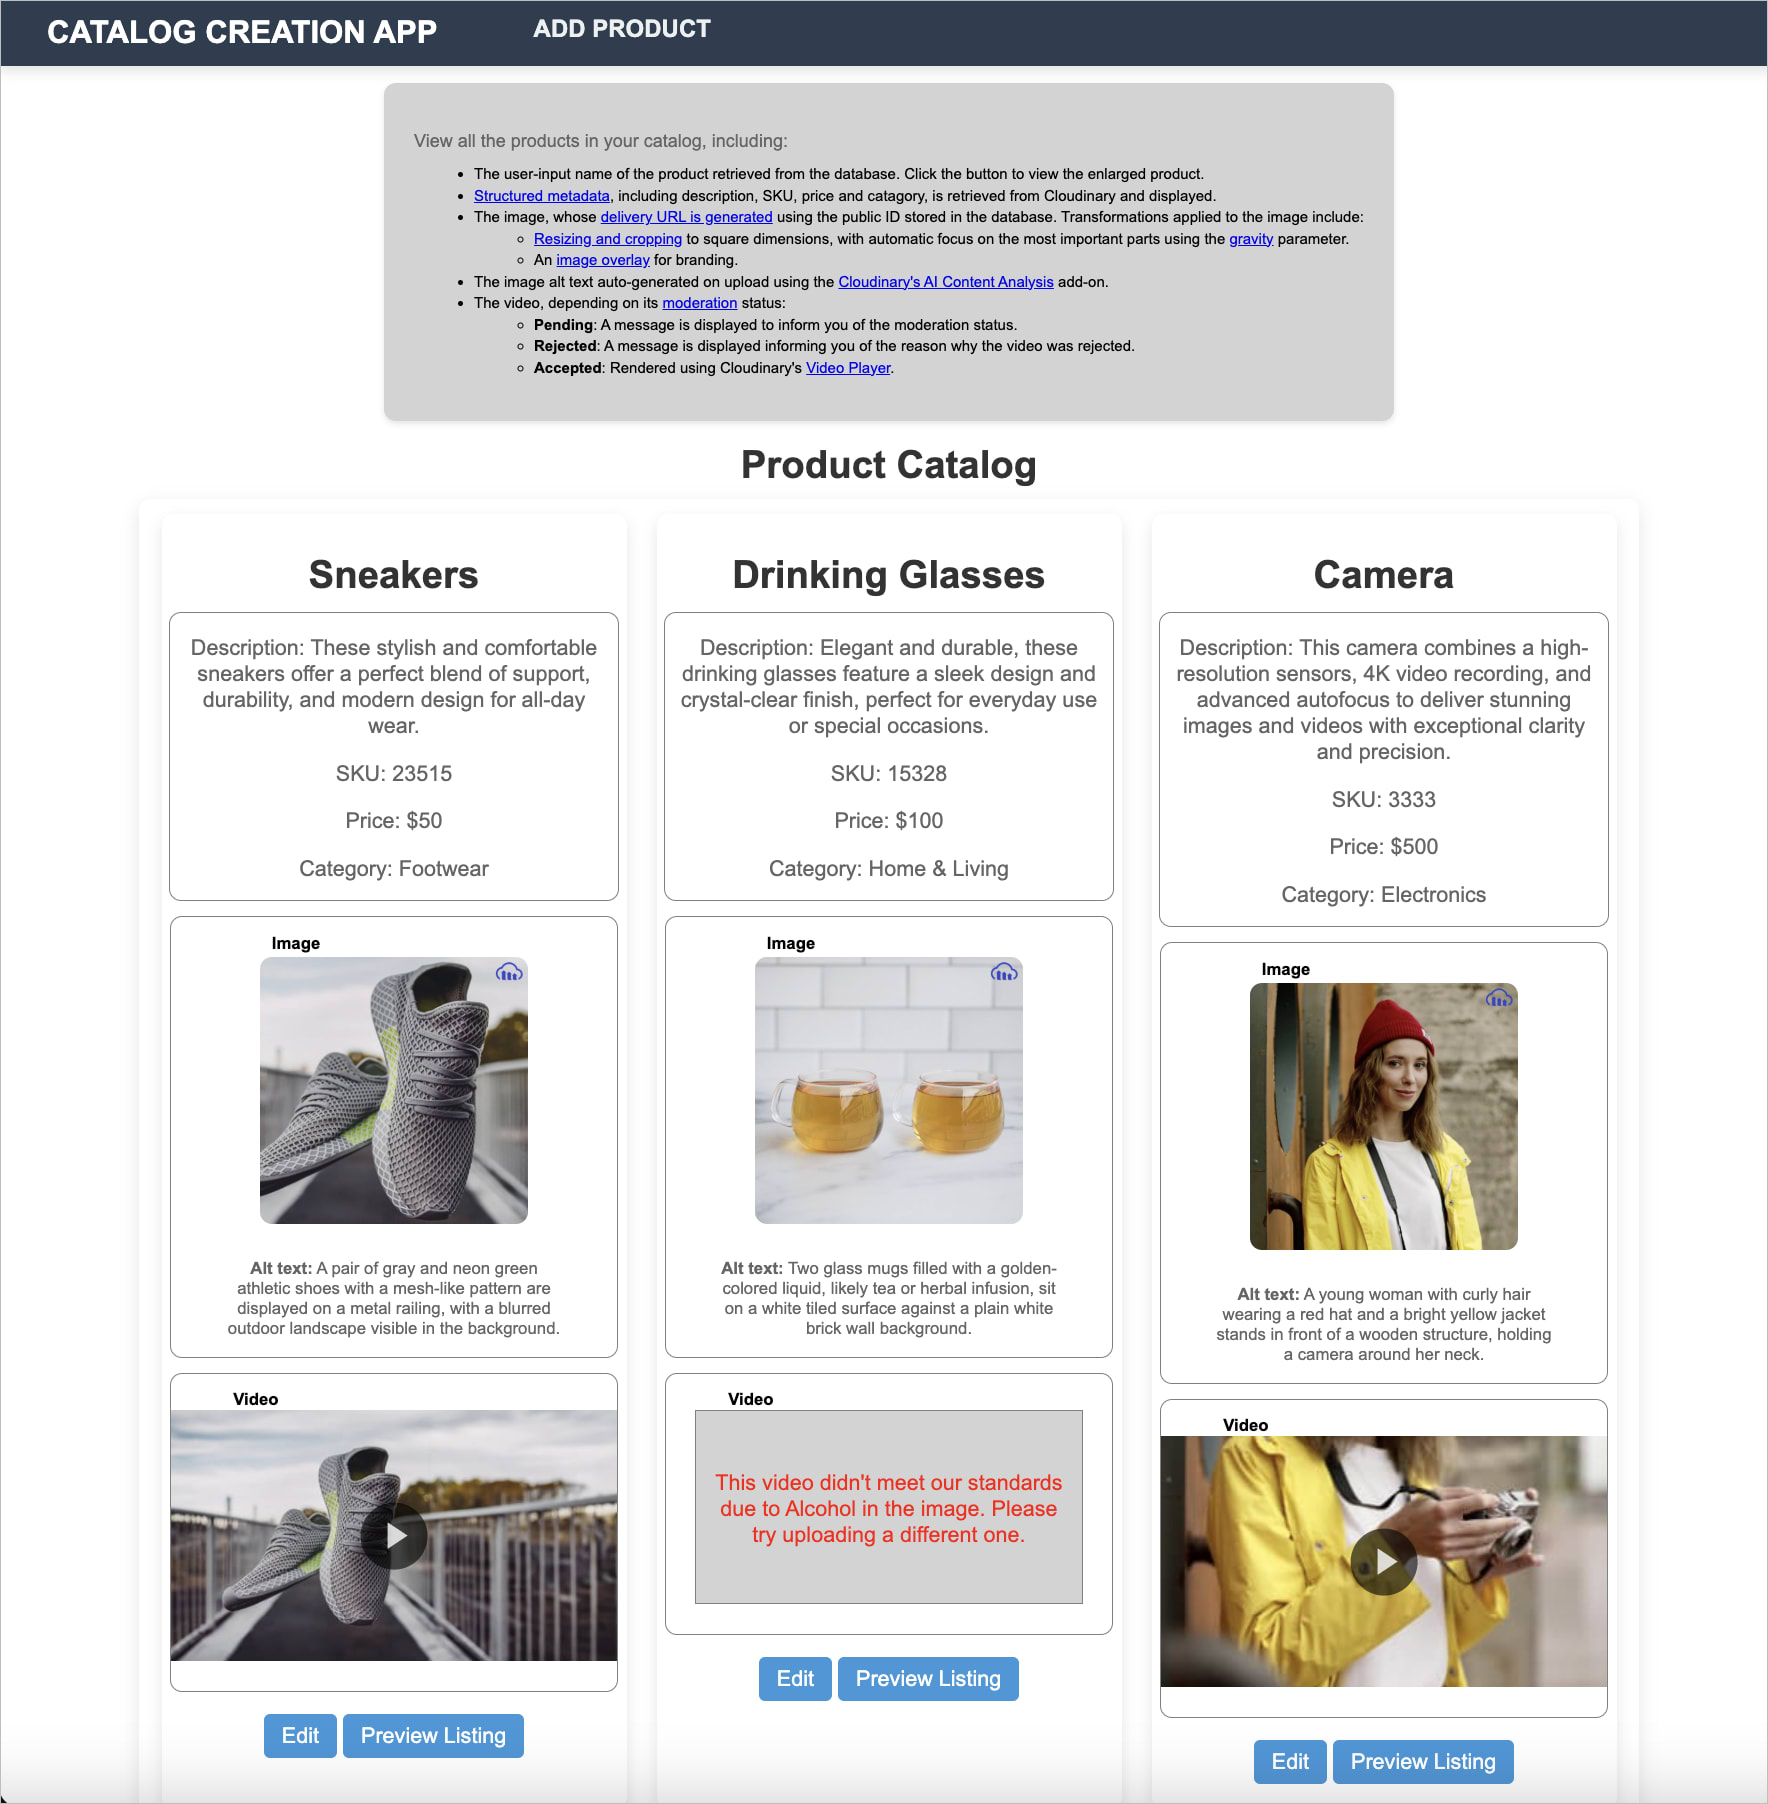
This PHP sample app adds products to a database and displays them in a product catalog with normalized images and videos. Videos undergo asynchronous moderation and are processed via webhook upon approval.
While this example provides a strong foundation, a real-world implementation would require modifying the process to retrieve assets and metadata programmatically instead of relying on user input, as well as enabling bulk uploads for efficiency.
Customize and optimize on delivery
Whether you've stored the original asset in your product environment or a normalized version, when delivering product assets to your website, you may need to adjust, customize, and optimize them. For example, you might need to adjust the size or aspect ratio based on whether the asset appears on a Product Detail Page (PDP) or Product Listing Page (PLP). Or, you might want to overlay a sale badge or other promotional elements.
Create named transformations programmatically or using the Transformation Builder. We recommend using named transformations over direct transformations as they shorten URLs for better SEO, are easy to reuse, and are simpler to apply when given meaningful names.
Once you've created a named transformation, you can:
-
Apply it directly to transform an asset. For example, the following example applies the
clothing_salenamed transformation to thewoman-in-shirtimage, applying the sales tag:
Associate it with frontend components. Matching assets to product SKUs automatically places images and videos in the right spot on your website. Linking named transformations to frontend components ensures each asset gets processed to fit design requirements.
- If a transformation is short and not going to be reused, you can apply it directly to the asset instead of creating a named transformation.
- You can use variables in the transformation, whether you apply them directly or as named transformations. For example, if you want to localize text overlays or switch out generative AI prompts for specifying background requests or objects for removal. For more information, see the Transformation reference and User-defined variables and arithmetic image transformations.
For more information about creating named transformations to customize assets on delivery, see Customize and optimize on delivery.
Deliver product assets to your e-commerce website
Once you've organized assets in Cloudinary and linked them to your products, delivering them to your e-commerce website becomes an automated process. Whether using a pre-built integration or a custom implementation, you can use Cloudinary to dynamically optimize and serve product images and videos based on product data and display requirements.
| Method | What it does | Best for |
|---|---|---|
| Using an integrated front end | Cloudinary integrates directly with certain e-commerce platforms and headless CMSs, allowing automatic asset retrieval and display. Integrations provide a built-in way to apply optimization and transformations on delivery, using the named transformations you set up. |
E-commerce stores built on platforms like Shopify, Salesforce Commerce Cloud, or commercetools. For a full listing, see Integrations. |
| Using a non-integrated front end | Developers can programmatically fetch assets using Cloudinary’s APIs and SDKs, applying real-time transformations for optimization using named transformations. | Custom-built websites or apps that don’t use a Cloudinary integration—for example, static sites, SPAs, or composable storefronts using manual asset delivery. |
In both cases, you can use the Product Gallery Widget to deliver product assets dynamically on Product Detail Pages (PDPs). The Product Gallery Widget provides an interactive viewer that enhances product display with automatic image retrieval, video support, and 360° spin sets.
Using an integrated front end
If you’re using an e-commerce platform or a composable, headless front end with built-in Cloudinary integration, follow the platform’s configuration and setup instructions to display your assets efficiently.
The examples below highlight a few popular integration options, but Cloudinary supports a growing number of platforms. To explore all available integrations, see the Integrations page.
-
E-commerce platform integration examples
- Shopify: Utilize Cloudinary’s MediaFlows integration for seamless product asset delivery and rendering on Shopify stores, ensuring assets display as expected.
- Salesforce Commerce Cloud: Automate asset delivery using Salesforce Commerce Cloud Cartridges, ensuring efficient Cloudinary asset handling within your storefront.
-
Composable storefront integration examples
- commercetools: Dynamically manage product assets for headless e-commerce experiences, providing flexibility in asset delivery.
- Salesforce Commerce Cloud Headless Cartridge: Enable Cloudinary image and video management through Salesforce’s headless commerce for seamless API-driven asset delivery.
Example walkthrough
This fully functional demo below showcases the commercetools extension, offering insights into setting up a storefront and displaying product assets effectively.
Using a standalone front end
If your platforms don't include a ready-made Cloudinary integration, you'll need to implement your own solution to render your Cloudinary assets on your front-end.
Use Cloudinary's SDKs to seamlessly integrate assets (and optionally the Product Gallery Widget) into headless front-end applications (such as React, React Native, Android, etc.). Dynamically assign assets to website components using product-match workflows.
Step 1: Schedule publishing
Automatically initiate the process of publishing assets using MediaFlows or cron jobs, ensuring your assets are always up-to-date on your website without manual intervention.
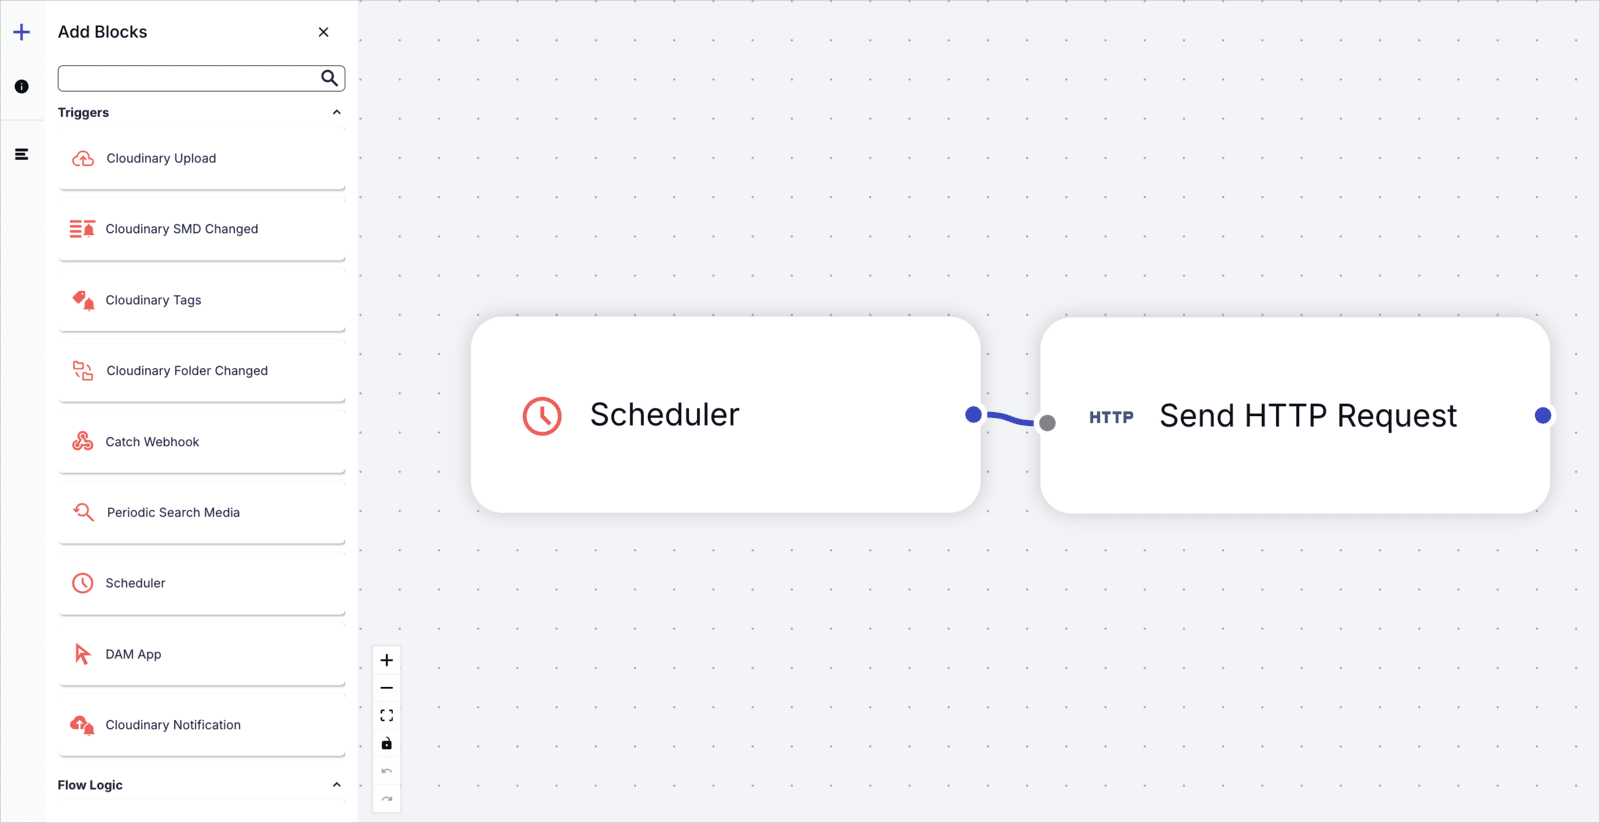
Here's an example MediaFlow that sends an HTTPS request to update your front-end with any new or updated Cloudinary assets any on a schedule, such as once a day:
Step 2: Optimize and transform assets according to website location
Use named transformations to dynamically modify product images based on their display location (e.g., PDPs, PLPs) while ensuring optimal format and quality. Once created, a named transformation can be applied repeatedly on delivery without additional setup.
Here's an example of programmatically creating and applying a named transformation (pdp_product_images) that applies cropping, resizing, format conversion, and quality adjustments:
Step 3: Search, retrieve, and render product assets
To display the correct assets on your website, retrieve each asset by its SKU (or another product identifier). You can store the SKU as part of the public ID or within the asset’s structured metadata, as described above in [put the section name/link here]. This approach ensures each asset matches the correct product and display location, such as PDPs or PLPs.
The following example creates a delivery URL for an asset using the SKU stored in the metadata field. It applies the pdp_product_images named transformation to optimize the image for a PDP:
Enhancing product asset display with the Product Gallery Widget
Cloudinary’s Product Gallery Widget is a ready-to-use, interactive viewer that simplifies product asset presentation. It requires only JavaScript, making it easy to integrate into any web framework while eliminating the need for custom gallery development.
Benefits:
- Seamless integration: Embed a responsive, media-rich product gallery.
- Automatic asset population: Retrieves product images and videos based on tags.
- Customizable layouts: Adjust styles, transitions, and navigation.
- 360° spin sets: Enable interactive product exploration with rotational image sets.
| Factor | Considerations |
|---|---|
| Page Performance | - Asset Optimization: Apply Cloudinary’s transformations, such as f_auto and q_auto, to ensure images and videos are delivered in the most efficient formats and quality for each device and browser. This reduces file sizes and improves load times. - Widget Impact: While the Product Gallery Widget offers valuable interactivity and enhances the product display, it introduces additional resources that may affect page load times. Evaluate the benefits of the widget's features against the potential impact on your site's performance. |
| Customization | Modify layouts, navigation, and transitions to align with your design requirements and provide a cohesive user experience. |
Implementation:
For integrated front-ends, check your integration's documentation for specific instructions on embedding the Product Gallery Widget.
For custom front-ends, include the remote JavaScript file and initialize the widget with:
For business-critical apps, you're advised to specify the version of the Product Gallery JavaScript file and not use latest, particularly if your implementation includes customizations.
See the Product Gallery changelog for available versions and register for notifications to stay informed of new releases. Only update the version numbers in your code after testing new releases.
Other delivery channels
Besides delivering non-product images on your website, you can also deliver to the following channels:
Social media: Optimize images for different platform size and format requirements.
Third-party stakeholders: Ensure compliance with background color or file format constraints and protect your assets by watermarking.
Email campaigns: Maintain quality within file size and resolution limitations.
Market places: Adhere to specific format, background, metadata, and naming rules.
For more information, see Multi-channed content delivery.
 Ask AI
