Face-detection based transformations
Last updated: Feb-20-2026
Cloudinary provides face-detection algorithms for automatically applying transformations according to the detected faces within an image.
Here are examples of some popular use cases that you can accomplish using transformations based on detected faces (combined with other transformations). Click each image to see the URL parameters applied in each case:
 Generate
profile photos
detected faces
 Blur and crop
based on
detected faces
 Overlay products on
specified facial attributes
- Face-detection functionality detects whether faces exist and the coordinates of those faces (or other facial landmarks) in photos. This is not the same as facial-recognition technology, which refers to the ability to recognize which specific people are shown in a photo. While Cloudinary does not provide built-in facial-recognition features, you can combine Cloudinary functionality with other AI technologies to address face recognition needs.
- If you find that any of the face-detection features described below do not give desired results, contact our support team who can enable a different face-detection algorithm for you to try.
- You can override the coordinates saved by the automatic face-detection functionality using custom face coordinates.
Face-detection based cropping
Cloudinary supports built-in face-detection capabilities that allow you to intelligently crop your images. To automatically crop an image so that the detected face(s) is used as the center of the derived picture, set the gravity parameter to one of the following values:
-
face- the region of the image that includes the single largest face (g_facefor URLs). -
faces- the region of the image that includes all the faces detected (g_facesfor URLs).
For example, the image below of a model was uploaded to Cloudinary:

To create a 200x100 version with the fill cropping mode to keep as much as possible of the original image, and using the default center gravity without face detection (for comparison):

Now adding the face gravity parameter to correctly fill the requested dimensions:

To create a 200x200 thumbnail focused on the face of the woman, select the thumb crop mode and face gravity:

You can also automatically crop exactly to the region determined by the face-detection mechanism without defining resize dimensions for the original image. The following example uses the crop mode together with face gravity for cropping the original image to the face of the woman:

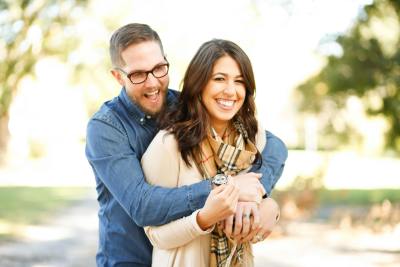
For examples with multiple faces, the following image, showing a happy couple, was uploaded to Cloudinary:

You can specify the thumb crop mode and face gravity to create a 150x150 thumbnail centered specifically on the largest face in the image:

To create a thumbnail focusing on all faces in the image, specify faces as the gravity instead of face:

You can also use the fill cropping mode together with faces gravity to correctly fill an image with your desired dimensions:

Position overlays on detected faces
To automatically position an overlay over the detected face(s) in an image, set the gravity parameter to one of the following values:
-
face- places an overlay over the single largest face in the image (g_facefor URLs). -
faces- places an overlay over each of the faces in the image (g_facesfor URLs).
For example, adding an overlay of the purple-mask image over both of the faces detected in the young-couple image, where each mask is resized to the same width as the detected face with the region_relative flag:

Returning the coordinates of facial landmarks
You can use the getinfo flag together with a face-detection gravity option to return the coordinates of facial landmarks via a completely client-side operation. Using this information, you can, for example, calculate the x and y offsets to specify the exact position of an overlay on a face, or you could pass the data back to other functions in your application.
For example, you can get the facial landmark coordinates in this image by using the getinfo flag together with a crop and a gravity option that detects a face. In this example we have used g_face, but we could have also used g_auto:face, or even just g_auto (as the g_auto default behavior is to apply g_auto:faces).
This returns:
The coordinates of the landmarks are relative to the top left of the original image. You can use this data to position an overlay with a gravity of north_west using the relevant returned coordinates as the x and y offsets. Specifying an offset of 0,0 positions an overlay with its top left corner in the 0,0 position of the base image, so if you want to center the overlay on a particular coordinate, you need to adjust the coordinates by half of the width and height of the overlay.
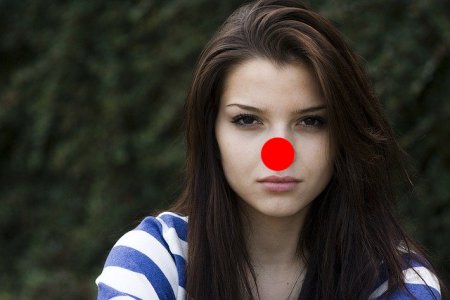
For example, to position a red nose, resized to a width and height of 48 pixels, take the coordinates of "nose_tip": {"x": 395,"y": 231}, and subtract half the width of the overlay (24 pixels) and three-quarters of height of the overlay (36 pixels) to leave an x-offset of 371 and a y-offset of 195. In this case, we want the overlay to be slightly higher, rather than centered on the tip of the nose, to make it look like she is wearing the red nose.
Putting all these parameters together you can overlay a red nose on the girl as follows:

Position overlays avoiding detected faces
You may want to detect a face to avoid positioning an overlay on it. In this case, you can use g_auto:face_avoid together with the getinfo flag to find the area of the image that is least likely to include a face. Then, use these coordinates when adding the overlay.
For example, start with a URL that gets information about the part of the image to avoid:
The best area to focus on (avoiding the face) is given in the returned g_auto_info key:
You can use this information to position your overlay. Here, the text overlay is positioned with a slight offset from the returned x-coordinate (5px, rather than 0px), and is resized to fit the returned area accordingly (in this case 313px x 211px to take into account the 5px offset):

Effects with face detection
To apply a blur or pixelation effect to the automatically detected faces in an image, use the effect parameter and set it to one of the following values:
-
blur_faces- Automatically blur all detected faces in the image: the strength of the blur effect is determined by an optional extra value (Range: 1 to 2000, Default: 500). For example,e_blur_faces:100uses a mild blur effect with a strength of 100. -
pixelate_faces- Automatically pixelate all detected faces in the image. The width of the pixelation squares is determined by an optional extra value (Range: 1 to 200, Default: 5). For example,e_pixelate_faces:3uses pixelation squares 3 pixels wide.
For example, to automatically pixelate both of the faces detected in the young-couple image with pixelation squares 9 pixels wide:
Advanced facial attributes detection
With the Advanced Facial Attributes Detection add-on, you can extend the Cloudinary built-in features that involve semantic photo data extraction, image cropping and the positioning of image overlays. When using the add-on, your images are further processed and additional advanced face attributes are automatically extracted. Cloudinary can then use these additional details to smartly crop, position, rotate and overlay images according to the position of the detected faces or eyes.
The advanced facial detection is applied by setting the gravity parameter to one of the following values:
-
adv_face- detects the single largest face in the image (g_adv_facefor URLs). -
adv_faces- detects all of the faces in the image (g_adv_facesfor URLs). -
adv_eyes- detects all the pairs of eyes in the image (g_adv_eyesfor URLs).
For example, to automatically overlay the image glasses over the detected eyes in the young-couple image. The glasses are resized to 170% the width of the detected eyes by adding the region_relative flag:

See the Advanced Facial Attributes Detection documentation for more information and examples on using the add-on.
Zoom level
When using either the crop or thumb cropping modes and setting the gravity parameter to one of the face-detection values, the resulting image is delivered at a default zoom level. To control how much of the original image surrounding the face to keep, use the zoom parameter (z for URLs). This parameter accepts a decimal value that sets the new zoom level as a multiplier of the default zoom setting: a value less than 1.0 zooms out and a value greater than 1.0 zooms in. For example, z_0.5 halves the default zoom to 50% and zooms out to include more of the background around the face, while z_2.0 doubles the default zoom to 200% and zooms in to include less of the background around the face.
Examples with the uploaded image called woman:
- Original image (scaled down):

- Cropped with face detection and default zoom:

- Cropped with face detection and zoom set to 130%:

- 150x150 thumbnail with face detection and default zoom:

- 150x150 thumbnail with face detection and zoom set to 70%:

For more examples on using the zoom parameter see the article on How to control the zoom level with automatic face-detection based image cropping.
Facial recognition (open source)
Cloudinary does not provide built-in facial-recognition features. However, you can combine Cloudinary functionality with other AI technologies to address face recognition needs.
For example, the Cloudinary Solutions team built an open-source library that can learn and then auto-tag faces based on a privately maintained mapping between faces and names. This functionality could be used for internal applications, such as auto-mapping employee head shots to employee profile pages or tagging students in school event photos on a university website.
This open-source library uses an Amazon Rekognition lambda function, which is triggered by the notification webhook that's sent when photos are uploaded to a specified folder in Cloudinary, and afterwards uses Cloudinary's Amazon Rekognition Auto-Tagging add-on to automatically tag photos if they contain faces learned from that list.
This blog post walks you through the steps of using this open-source library to create your own private facial recognition auto-tagging app.
 Ask AI


