User and group management
Last updated: Feb-20-2026
There are many types of users who play a part of any Assets (Digital Asset Management) workflow. You can set access and permission levels via user roles, user groups, and folder and collection permissions in line with your data and asset governance policy.
When planning your governance policy, consider which processes or workflows are important to your business, which users need access to which assets and resources, and what actions each user needs to perform.
Once you've analyzed your organization's governance needs, you can set access and permission levels for each user in the following ways:
User roles: When you define users in Cloudinary, you assign a role to each user. These roles control the areas of the Cloudinary Console that a user can access or modify.
User groups: The majority of your creative team probably works primarily in the Media Library. When you assign users to the Media Library user role, you can streamline your workflow by defining folder access permissions to user groups, which can include many users, as opposed to defining those permissions for one Media Library user at a time.
-
Folder and collection permissions: Within the Media Library, folders and collections provide a layer of security for the assets they contain. You can grant users and user groups permissions to specific folders and collections at varying levels, from full management control to view-only access.
Depending on their permission levels, users can then, in turn, share folders with other user groups or individual users, and invite teammates to collections, at varying levels of access permissions.
- Every user who accesses the Console requires a separate seat license.
- Users and user groups are configured on the account level, so you can manage them from within any of your product environments.
- Users with the Master admin role have access to all product environments. Users with all other roles can be given access to all or to only selected product environments.
Check out the Introduction to Cloudinary Assets pathway in the Cloudinary Academy for free self-paced courses on DAM topics.
Recommended workflow
It's important to carefully plan your setup so that your folder structure and the assets each folder contains correspond accurately with your users and groups and the folders they'll be able to access.
It's recommended to follow a process similar to the following:
First understand the steps in the workflow and plan your Assets setup as described, then implement the steps in the same order. Follow the links for more information on each topic:
-
Define user groups: Think about the different teams in your organization. For example, do you have Designers? Marketers? Content managers? Your groups should represent teams of users who need to access the same assets.
- Create folder structure: One of the main considerations when creating a folder structure is who gets access to each folder and the assets within it. Keep in mind that permissions cascade from folder to subfolder, meaning that if you grant a certain level of access to a folder, you can't restrict that access from any of its sub-folders. The Cloudinary Assets product provides an effective way to find your assets via powerful search capabilities and an advanced system for assigning metadata, so there's no need to design a deep folder structure to organize and categorize your assets. You can focus on using folders to set permission levels.
- Add assets to folders: You've already planned who can access each folder. Add assets to the folders that set the right access levels for them.
- Share folders (and optionally collections) with user groups: For each folder, grant the permission level for each user group that you want to share it with.
-
Add and configure users: Consider each one of your users and assign roles and other permissions appropriate to their intended use of the Media Library:
- Users with an Admin role: These users always have full access to all folders and assets in the Media Library, so granting folder permissions doesn't apply to them.
- Users with the Media Library user role: When you assign Media Library users to groups, the users automatically receive the groups' permission levels.If you do create a new user before setting up the folder structure, adding assets, and setting folder permissions for groups, that user may log into Cloudinary before receiving permission to view any content. In this case, the Media Library appears completely empty for them.
- Share folders (and optionally collections) with individual users: Grant folder permissions to individual Media Library users, if you have users who need permissions to folders that their groups don't have.
User group configuration
If you plan to create users with the Media Library user role, then it's recommended to first create all the user groups you expect to work with. For example, if you have different teams working on different product lines, you may want to ensure that only teammates from a particular product line can access folders related to those products or you may want to create a variety of dynamic collections to make it easy for relevant groups to find and view assets relevant to their tasks.
- You can assign user groups one of several access permission levels for each of the folders in your Media Library, and can separately receive varying permissions to work with each of the available collections. Consider the way you expect to sort your assets in folders and collections, and the different types of users who may be accessing those folders and collections, to determine the groups you need. For more details, see Access control via folders and Access control via collections.
- A user can belong to more than one group. In that case, if the permissions conflict between two groups, or between those for a group and those assigned to a specific user, then the higher level (less strict) permission apply.
- In the User Management page of your the Console Settings, accessible by clicking the gear icon in the Console options sidebar, you can create and delete user groups, view the number of members in each group, and edit group details. While editing, you can rename groups, view their member lists, search for members by name or email, and add or remove members.
Access permissions to assets via folder sharing
You can control access to assets by sharing folders (and thus their contents) with selected users or user groups at varying levels of access permissions, from full management control to view-only access. Conversely, you can prevent access to a folder's contents by not sharing that folder with a specific user or user group at all.
As an Assets administrator, it's your responsibility to set up the folder structure and initially grant users permissions to the folders at the appropriate levels.
Keep in mind that, depending on the permission levels you've granted, users may, in turn, be able to share folders with other user groups or individual users at varying levels of access permissions. This means that additional users would receive permissions that you didn't grant to begin with.
Users with the following roles (and permissions) can also share folders:
- Any of the admin roles
- A Media Library user role with Can Manage permissions on the folder.
Folder sharing and permissions video tutorial
This tutorial walks you through the steps involved in this workflow.
This video is brought to you by Cloudinary's video player - embed your own!
Use the controls to set the playback speed, navigate to chapters of interest and select subtitles in your preferred language.
Tutorial contents
After watching this overview video, continue reading the sections below to learn all of the details and considerations related to folder sharing and permissions.
How to share folders
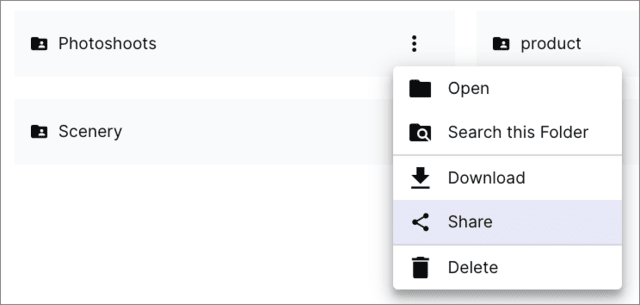
To share one or more folders:
- Select one or multiple folders using one of the following methods:
-
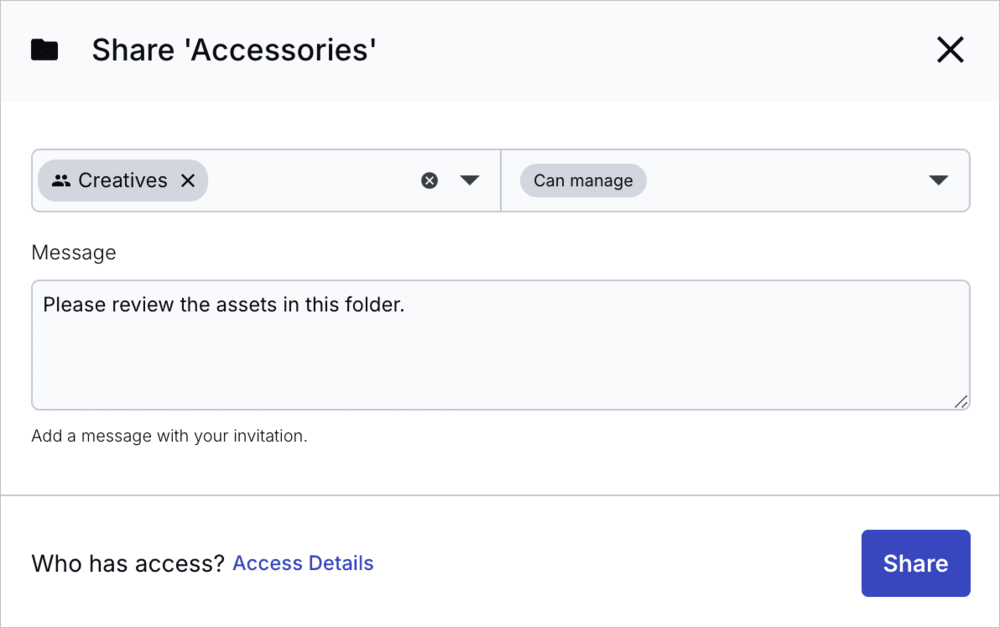
Select the users and/or user groups you want to share the folder(s) with, as well as the permission level for each.
An email notification is automatically sent to anyone you've shared with who hasn't opted out of receiving emails in the My Profile page of the Console Settings.
-
Make changes using the Share dialog box:
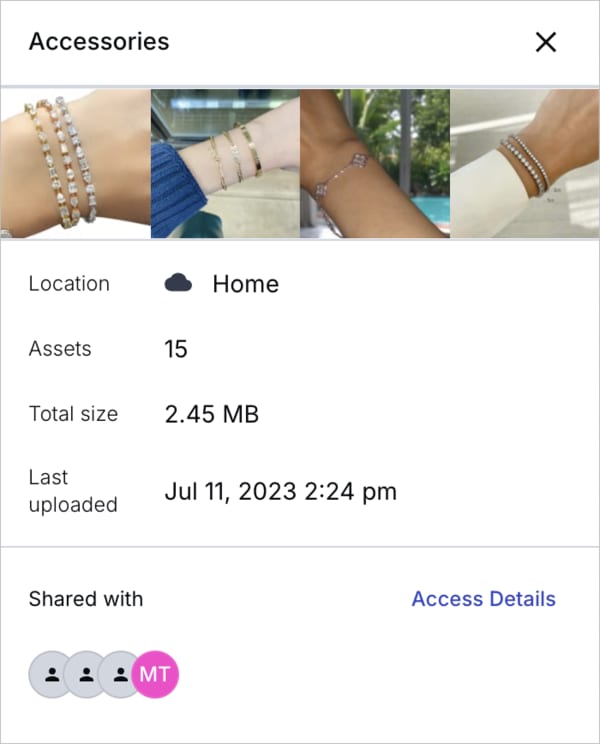
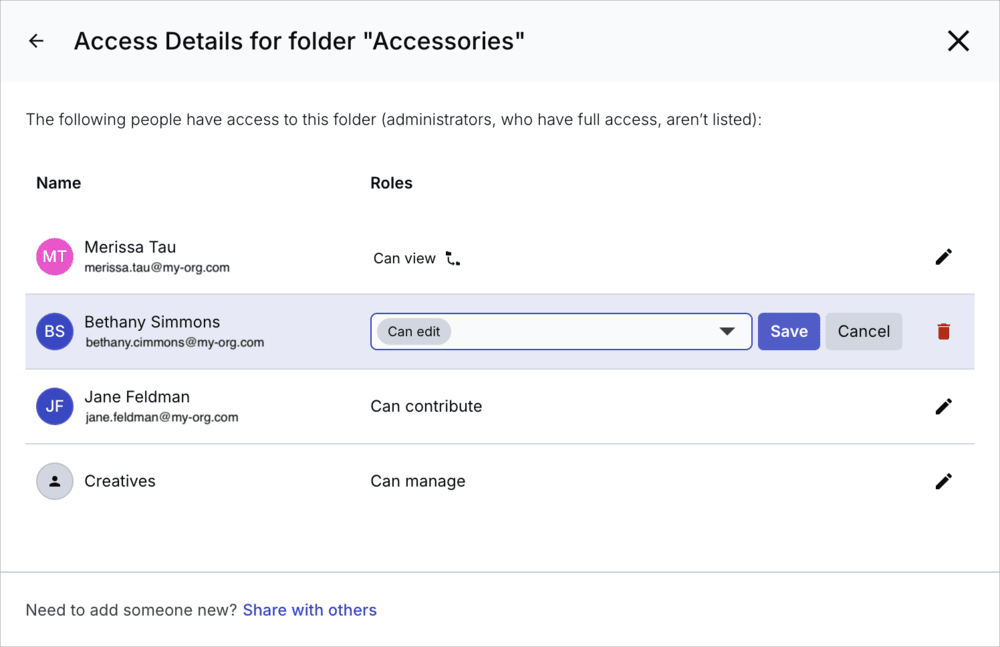
To adjust or remove access levels for users who already have access:
-
Do one of the following:
-
Make changes using the Access Details dialog box:
Folder permission levels
When you, and other Media Library users with the relevant permissions, select to share a folder, you can set one of the following permission levels (applies to the folder and all its sub-folders): Can view, Can contribute, Can edit, Can Manage.
The table below summarizes the permissions available to each level:
| Can View | Can Contribute | Can Edit | Can Manage | |
|---|---|---|---|---|
| View assets | ✔ | ✔ | ✔ | ✔ |
| View who else has access | ✔ | ✔ | ✔ | ✔ |
| Download assets | ✔ | ✔ | ✔ | ✔ |
| Edit transformations1 (via Edit Transformation page or directly in browser URL) |
✔ | ✔ | ✔ | ✔ |
| Comment on assets | ✔ | ✔ | ✔ | ✔ |
| Search (including Advanced Search)2 | ✔ | ✔ | ✔ | ✔ |
| View version history | ✔ | ✔ | ✔ | ✔ |
| Upload assets | ✔ | ✔ | ✔ | |
| Create sub-folders | ✔ | ✔ | ✔ | |
| Overwrite existing on upload | ✔ | ✔ | ||
| Edit assets3 (including original asset, tags, structured and contextual metadata, rename, move to another folder) | ✔ | ✔ | ||
| Restore previous versions | ✔ | ✔ | ||
| Moderate assets4 | ✔ | ✔ | ||
| Delete assets | ✔ | |||
| Delete the folder | ✔ | |||
| Share the folder | ✔ |
- Editing transformations does not have any impact on the original asset, but any new transformations that are generated are counted against your monthly transformation quota.
- Search results will include only assets where the user has at least Can view permissions.
- Users with Can Contribute permissions can use the Add a tag option in the Media Library upload widget while uploading, and, depending on admin preferences, may be prompted to fill in metadata fields before uploading. However, those users cannot add tags to existing assets.
- Media Library users with the Moderate asset administrator permission can access the Moderation page and moderate assets in folders that they have Can Edit or Can Manage permissions to. Media Library users will only be able to see the assets that they have permission to moderate from the moderation queue.
Folder sharing guidelines and best practices
When planning your folder sharing strategy, consider the following:
-
Sharing rights:
- Users that have the Media Library user role with Can manage permissions for a folder can share that folder and its sub-folders. Users with lower level permissions cannot share a folder.
- Any user in a role other than Media Library user, Reports, or Billing can access, share, and manage all folders and assets in the Media Library.
- Only a user with the share permissions mentioned above can see which user groups a folder is shared with, and how many users are in each of those groups.
- Users that have the Media Library user role with Can manage permissions for a folder can share that folder and its sub-folders. Users with lower level permissions cannot share a folder.
Sharing with multiple groups: You can share a folder with multiple users and user groups at the same or at different levels.
-
Permissions on subfolders:
- When you share a folder at a certain level, that permission level cascades down to all subfolders under it.
- You can increase the permission level for a particular user or group in a sub-folder of a folder they already have access to, but you can't decrease their permission level.
For this reason, it's recommended to minimize permissions given to Media Library users at high-level folders, and especially on the Home (root) folder. -
Best practice: If you're setting up folder permissions for a new product environment where no assets are yet in production, it's recommended not to store assets directly in the Home (root) folder, and to avoid sharing the Home folder with all or most Media Library users or user groups.
- If you don't share a folder (nor any parent of that folder) with a particular user or group at all, those users won't be able to see that folder or the contents inside it. Even when performing a search on all folders, the results include only folders where the user has at least view permissions. Similarly, if you don't share any folders with a particular user or user group, then those users won't have access to any assets in the Media Library. Exception: If assets from a particular folder are also part of a collection, and a user group or users who otherwise don't have access to that folder receive an invite to that collection, those users are still able to view and download (but not modify) the assets in that collection.
Multiple user groups and permission levels: If a user belongs to multiple groups, and each of those groups has the folder shared with it at different permission levels (which are higher than the permissions they may have received individually), then the highest of those permission levels applies to the user.
Access control via collection sharing and permissions
Collections often represent a group of assets targeted for a particular purpose, and are a dynamic way to create conceptual groupings of assets, regardless of their folder structure. Collections provide a convenient way for users to collaborate with others either inside or outside of the organization regarding the compiled set of assets.
You can use collections to provide users access to assets in your product environment at different permission levels. A Media Library user that has access to assets by virtue of collection permissions only can never modify the original assets. However, minimum permissions to a collection include viewing and downloading.
Keep in mind that, depending on the permission levels you've granted, users may be able to share collections with other user groups or individual users at varying levels of access levels, granting additional users permissions that you hadn't assigned to begin with, or create collections on their own. Media Library users may also be able to share collections externally via public links.
Users in an admin role can create new collections, view and download, invite teammates to, and publish all collections.
-
However, as an Assets administrator, you can restrict Media Library users from performing some actions:
- Media Library users can create their own collections only if you've assigned them Create collection permissions.
-
Media Library users can invite teammates and publish a collection only if both conditions exist:
- You assign the user Share collection permissions.
- The user is the creator of the collection or you or another user with relevant permissions has granted Can manage permissions on the collection they want to share.
- For more information on what users can do with collections, see Collection management.
- For instructions on how to create and add assets to collections, see Create and add assets to collections.
Setting user permissions via collections
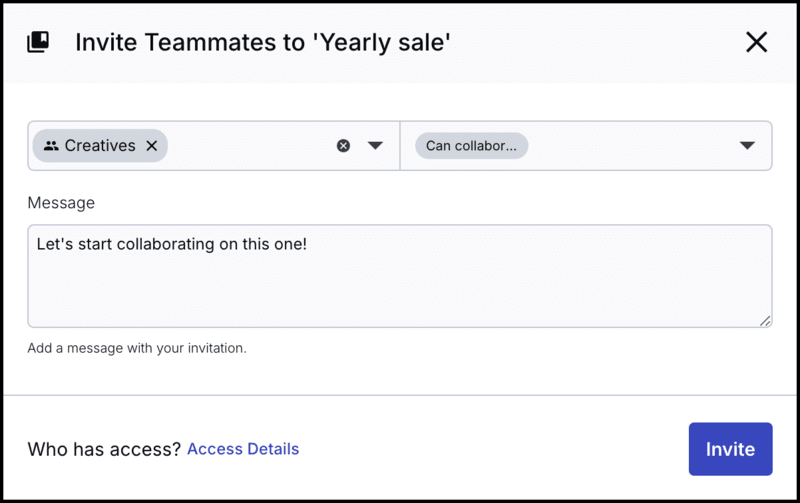
To share a collection internally, invite teammates (Media Library users or user group members) to it. Along with initially inviting teammates to collections, you can later adjust or remove access levels for users who were already invited.
Your teammates can see the collection that they've been invited to and the collection creator's name in the main Collections view, as shown in View collections available to you.
To invite teammates to collections:
-
Open the Invite Teammates dialog box:
- From the main Collection view, right-click or click the (3-dots) options menu of a collection and select Invite.
- From the main Collection view, select a collection and click Invite teammates in the Preview pane. (If the Preview pane is closed, click the Open Preview Pane toggle button to display it.)
- When viewing the contents of a collection, click the Share drop-down button and select Invite.

-
Select the users and/or user groups you want to invite to your collection, as well as the permission level for each.
An email notification is automatically sent to all the invitees who haven't opted out of receiving emails in the My Profile page of the Console Settings.
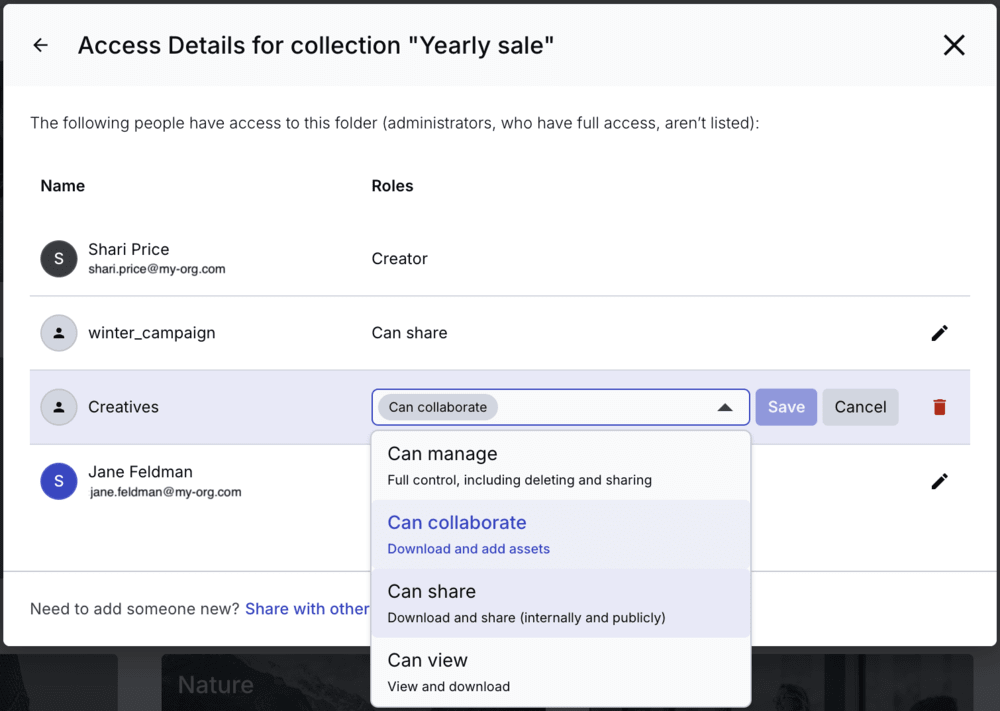
To adjust or remove access levels for users who were already invited:
- Open the Access Details dialog box by clicking Access Details from the Invite Teammates dialog box or from the collection's Preview Pane.
- Click the pencil edit icon next to the permissions you'd like to change and delete or switch permissions.

Collection permissions
When inviting teammates to collections, you, and Media Library users with relevant permissions, can set one of the following permission levels:
Can view, Can share, Can collaborate, Can manage.
The table below summarizes the permissions available to each level:
| Can view | Can share | Can collaborate | Can manage | |
|---|---|---|---|---|
| View assets in the collection1 | ✔ | ✔ | ✔ | ✔ |
| Download assets in the collection | ✔ | ✔ | ✔ | ✔ |
| View who else has access | ✔ | ✔ | ✔ | ✔ |
| Invite teammates to a collection2 | ✔ | ✔ | ||
| Publish a collection2 | ✔ | ✔ | ||
| Add assets to the collection | ✔ | ✔ | ||
| Remove assets from collection | ✔ | |||
| Rename the collection | ✔ | |||
| Delete collection | ✔ |
- Anyone with Can view or higher permissions to a collection can view (but not otherwise modify) all assets in that collection, even if they don't have Can view permissions for the folders containing those assets.
- Even if a user group or Media Library user was invited to a collection at Can manage level permissions, the user must also have Share collection permissions (set by an administrator) in order to invite teammates or publish the collection.
Collection sharing guidelines and best practices
-
Depending on the user's collection sharing permissions, Media Library users may be able to take actions that can affect asset access in the following ways:
- Viewing and downloading assets: Media Library users that receive invites to collections can view and download assets in those collections, even if they don't have permission to access those assets via their folders.
- Inviting teammates to collections: May expose assets in the collection to other users that couldn't access those assets originally.
- Publishing the collection via a link to a generated web page: Exposes assets in the collection externally.
- Creating a collection: May expose assets in the new collection to internal users that couldn't access those assets originally, as well as to external stakeholders, if the new collection is then shared.
- Adding assets to collections: Potentially exposes assets that you might not want to expose. For example, if assets from a particular folder are part of a collection, and a user group or users who otherwise can't access that folder receive an invite to that collection, those users are still able to view and download (but not modify) the assets in that collection.
- Removing assets from collections and deleting collections: Assets may become unexpectedly unavailable to internal or external stakeholders. For example, if a user deletes a collection that's part of a Media Portal, the collection is no longer be available to external stakeholders via the portal.
You can restrict a Media Library users' ability to Create collections and/or Share collections internally and externally when you configure the user.
User configuration
The My Profile page of the Console Settings, which you can navigate to by clicking the gear icon in the Console Options sidebar, includes your personal user profile details, email preferences, and two-factor authentication setup. Account users with any role can update personal information here.
As a user with a Master admin or Admin role, you can also configure settings that impact all account users as well as the option to add or modify individual users and permissions:
- You can view and manage all account users, including adding users, removing users, changing their roles, and more.
- You can activate SAML login for your organization from the Account Security page of the Console Settings.
Root user
The Root User is automatically created in a Cloudinary account as the first user and holds permanent, full administrative access. This user is essential to account management, is clearly marked in the interface, and is the only user who can cancel the account. The Root User is subject to the following restrictions:
Can't be deleted, disabled, force-logged out, or have its password revoked
Can't be assigned to roles
Is always assigned to all product environments
Having a root user ensures there is always a reliable point of authority with full access to manage and maintain the account.
Managing users
You can manage account users in one of the following ways:
- Via the Invite New Users Console option
- From the User Management page within your Console Settings
- Automatically, using SAML provisioning with any SAML-compliant identity provider
- Via a script, using the Provisioning API
Adding users
You can add up to five users at a time (depending on how many users your plan allows) by either:
- Using the Invite New Users Console option
- Clicking the Invite button from the User Management page within your Console Settings
For each user, you can set:
-
E-mail: After creating a new user, that user will receive an email that requires confirmation to this address. This email address is also used for logging in to Cloudinary. NoteIf you'd like to prevent users with email addresses on your domain from signing up for separate free accounts, which would prevent you from adding them to your main account as a user, please contact support.
- Role: Controls which areas the user can access and which operations they can perform in those areas. For details, see Role-based permissions below.
The following permission levels apply to all new users with common roles, as described below. If you want your new users to have different permissions or levels of access, you need to complete a separate form for each:
-
Product environment access1: If your account includes more than one product environment, you can define which product environments all the new users can access.
- Users with the Master admin role always get full control in all product environments, so this option is displayed only when you're adding at least one user with a role other than Master admin.
- By default, users are granted access (at the same role level) to all product environments, even if your account has more than 30. If you'd prefer to limit access, clear the checkbox to manually select up to 30 product environments.
Additional options for users with the Media Library user role: User groups: User groups are displayed only when you're adding at least one new user with the Media Library user role, which is typically assigned to Assets (Digital Asset Management) users who manage content in the Media Library. All new Media Library users are assigned to the user groups you select. This section displays all user groups that have already been defined. For details, see User group configuration.
-
User permissions: User permissions are displayed only when you're adding at least one new user with the Media Library user role, and all new Media Library users receive the user permissions you select. This section includes the following permissions:
- Create collection: Enables a Media Library user to create non-dynamic collections.
-
Share collection: Enables a Media Library user with Owner, Can share or Can manage permissions on a non-dynamic collection to share that collection both internally and externally.NoteWithout these permissions, a Media Library user can still view or contribute to collections shared with them, but they can't create collections or share collections with others, even if they are assigned Owner level permissions for a collection.
These permissions allow Media Library users to create and share only non-dynamic collections to help protect against unintended asset exposure. For more information about dynamic collections, see Dynamic collections.
-
Show delivery URL: Allows a Media Library user with Can edit or Can manage folder permissions to edit the asset's public ID. It also sets the main action on the card to Copy Delivery URL, which users can change individually.NoteDepending on your setup, the Show delivery URL permission might not be available in your product environment. If it's not, Media Library users will be able to edit the public ID with only Can edit or Can manage permissions on the folder. To add this permission and control public ID editing, contact support.
-
Moderate asset: Enables the Media Library user to moderate assets in any folder that they have Can Edit or Can Manage permissions to. NoteTo enable Media Library users to access the moderation queue, contact support.
- Create proof: Enables Media Library users to start a new proof and manage proofs they created. This permission is available only for Enterprise plans with the creative approval premium feature enabled. For more information, see Manage Creative Approval proofs.
Updating users
To update details for an individual user, including user name, email, and permissions, select Edit from the kebab menu at the end of a specific user's row on the User Management page in your Console Settings. A form opens that allows you to update the information for a single user at a time. Cloudinary re-sends the user an invite, which is especially useful after updating a user's information.
To modify the product environments assigned to a user, click the entry in the Product Environment column to open the Assign Product Environments form.
- If a user is a Master admin, the value in the Product Environment column is All, indicating full access. You can't edit this value without first changing the user's role.
- You can assign a user access to All product environments, even if your account has more than 30. If you prefer to restrict access, you can manually select up to 30 specific environments.
For a full explanation of user permissions you can update, see Adding users.
Resetting user passwords
You can initiate a password reset for an individual user to ensure account security.
To initiate a password reset, select Reset Password from the kebab menu at the end of a specific user's row in the User Management page within your Console Settings. This action:
- Immediately terminates the user's active session.
- Invalidates the old password, rendering it unusable for login. The user must set a new password to regain access.
- Triggers an email containing a link that allows the user to set a new password. Alternatively, users can initiate the password reset process themselves by clicking on the Forgot your password link on the login page.
Users undergoing a password reset are marked with a specific status in the User Management table, clearly indicating that they are in the process of changing their password. This makes it easy to identify and manage such users.
Force immediate logout
You can initiate a force logout for an individual user to ensure account security. This feature is particularly helpful when you prefer not to require a password reset, or for users logged in via Google, GitHub, or SAML, who lack passwords, making it impossible to link session termination with a password reset.
To force a user to logout, select Force Logout from the kebab menu at the end of a specific user's row in the User Management page within your Console Settings. This action terminates the user's active session within ten minutes.
Deleting users
To delete a user, select Delete from the kebab menu at the end of a specific user's row in the User Management page within your Console Settings.
When a user leaves your organization and needs to be removed from your system, certain information about them must still be retained. This includes details like the collections they created and the assets they uploaded.
To address those needs, user deletion is handled in the following ways:
- The deleted user's status is changed to Inactive. This status is permanent, and the user can't be reactivated.
- Throughout the user interface, a label indicating Inactive is displayed wherever the deleted user is mentioned.
- Deleted users no longer count against your account's user quota.
- You have the option to reuse the deleted user's email and assign it to a completely new user.
- In the Activity Reports, actions performed by a deleted user are still attributed to them.
- Collections the deleted user created, assets they uploaded or replaced, and comments they made are still attributed to them.
- In the Assets, Collections and Moderation views, it's still possible to filter content by a deleted user.
Managing additional user subscriptions
You can see the maximum number of users that you're eligible for via your base plan in the panel on the right side of your Account Settings page of the Cloudinary Console. If you need to increase your user limit, you can upgrade your plan by clicking the Change Plan button.
Alternatively, you can purchase additional user subscriptions over and above your plan's limit. If you've reached the maximum number of users allowed for your plan, a banner will appear in the User Management page within your Console Settings. Click the Change user limit link displayed in the banner. You can extend your limit by up to 20 additional user subscriptions, with no need to switch plans.
Afterwards, you can increase or decrease the number of additional user subscriptions on your account anytime.
For additional help, or to add more than 20 additional users, contact support.
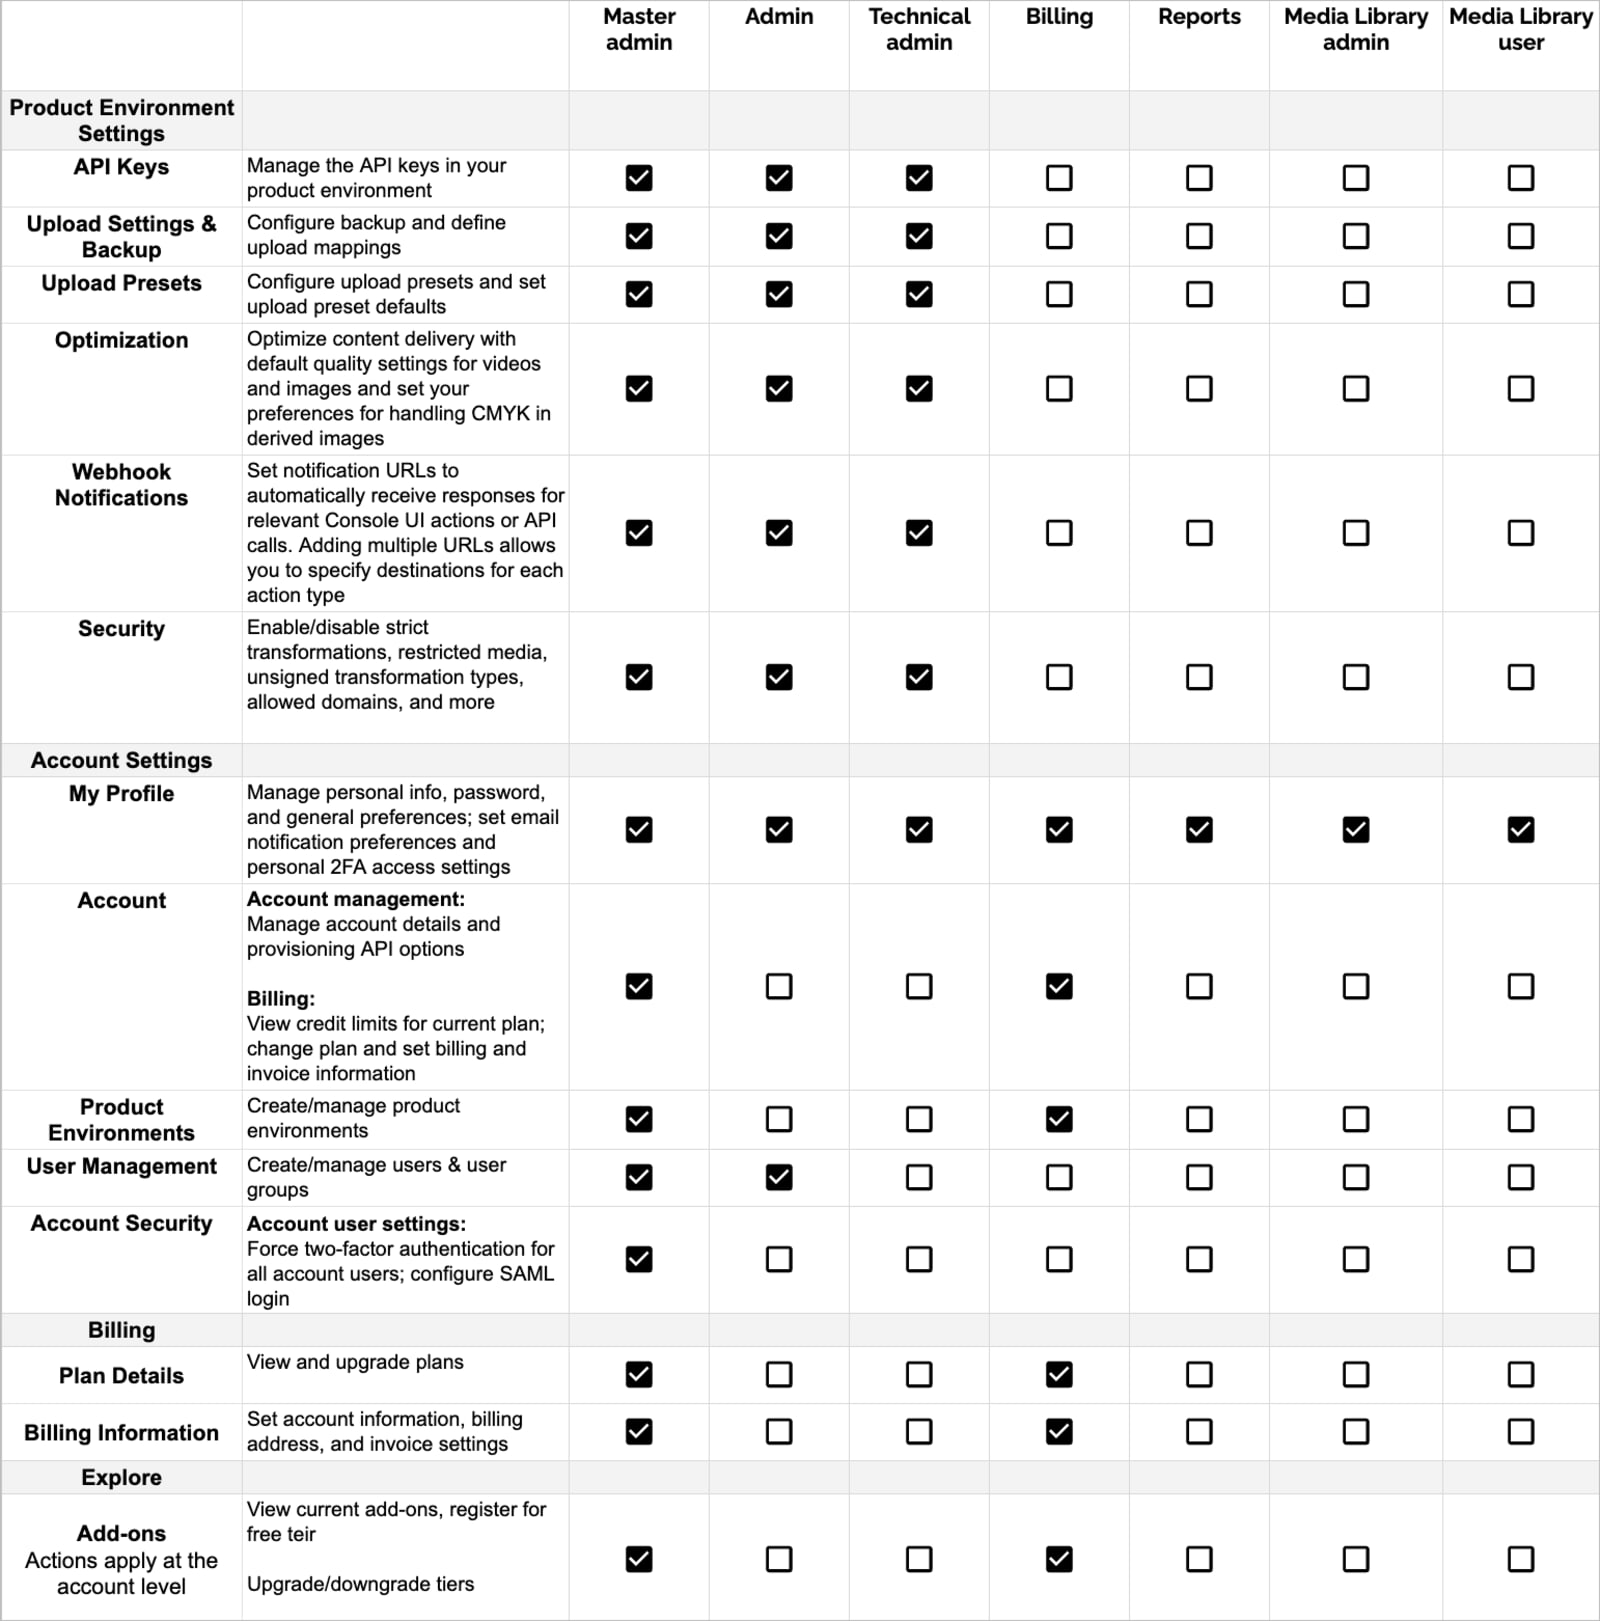
Role-based permissions
Each user in your Cloudinary account is assigned a role. This role defines the operations a user can perform, the areas of the Cloudinary Console that they can view or change, and the settings they can control.
Whereas Master admins have access to all product environments, users with other roles can be set to have access to all or only specified product environments. Users have the same role in all product environments they have access to.
Below are tables summarizing the permission details for each role, divided by Console areas:
- The Assets digital asset management product
- Account and product environment Console Settings
Permissions for the Assets digital asset management product
1 In the Assets Free plan, the Getting Started page isn't available.
2 The Dashboard is unavailable in the Assets Free plan. For more options and information, contact us.
3 The Activity Reports feature is a premium offering for Assets Enterprise plans, and its availability depends on your account setup. The feature is unavailable in the Assets Free plan. For more information, see Assets activity reports.
4 In the Assets Free plan, you can access the Transformations page only via the Manage Transformations option in the Image product.
Additional Assets role considerations and guidelines
- If you don't add a Media Library user to any groups and/or if you haven't shared any folders with those groups or directly with that user, the user won't see any content in the Media Library.
- The Media Library user role replaces the now obsolete 'Contributor' and 'Viewer' roles. For users with these roles, Cloudinary has made the following adjustments to ensure that the access permissions these users previously had remained unchanged:
- Users in either of these roles have been automatically migrated to the Media Library user role.
-
Viewer and Contributor user groups were automatically created and these users are now included in the relevant group.
- These two user groups have permissions to the Home folder at the corresponding level (Can view or Can contribute). For more details, see Folder sharing and permissions.
Permissions for Console Settings
SAML/SSO login
Find the option to activate SAML (SSO) login in the Account Security page of the Console Settings:
SAML Login: This option enables the administrator to activate SAML (SSO) login. This can enable users in your organization to log in using the same authentication system that they use for other SSO-supported applications. If you activate this option, you can globally select whether to Enforce SAML login or to allow users to choose whether to log in either via the SSO application or via the Cloudinary Console login window. If you choose the latter ('Enforce' is disabled), then when creating new users, you can optionally select Send invitation email for that user. When selected, that user receives an email inviting them to create a Console password.
- If your account has SAML (SSO) login enabled and you use the Media Library Widget or one of our Integrations, you must allowlist the domain
console.cloudinary.com. If you need assistance, contact Support. - If you also use the SAML Provisioning feature, make sure the Two-Factor Authentication user setting (2FA) is Disabled. You can configure two-factor authentication through your IdP, if required.
- The two-factor authentication (2FA) user setting is ignored when using SAML login to log in to Cloudinary, as the SSO IdP is trusted.
- Even if you set Enforce SAML login to Enabled, any user created with the Master admin role will automatically get an invitation to set a Console password and will be able to log in directly to the Console, if needed.
 Ask AI


