Editing and transformations
Last updated: Feb-20-2026
Cloudinary offers a selection of transformation tools to cater to various needs and preferences. You can choose the tool that best aligns with your specific circumstances.
This table describes the various options:
| Option | Description | Considerations |
|---|---|---|
| Transformation Templates | A set of pre-defined transformations that you can apply to an asset. | ✅ Simplifies your workflow by eliminating the need to repeatedly specify individual transformations when applying the same ones ✅ Ensures consistency by always applying the same set of transformations ✅ Easy to apply with one click ✅ Allows you to preview before downloading it or opening it in a browser window 💡 If you want to add or modify a transformation template, ask your administrator |
| Media Editors | Separate image and video editors that allow you to make basic edits on your images and trim your videos. |
Each editor: ✅ Allows you to freely apply your own edits to individual assets ✅ Enables overwriting the original asset or saving as a new original ✅ Offers a real-time preview of the changes you make ✅ Provides a user friendly interface |
|
Transformation and Asset Details Editor OR |
Both provide user interfaces for transforming original assets or applying additional transformations to assets that have already undergone previous transformations |
Transformation and Asset Details Editor: ✅ Enables viewing backed up versions and derived assets, and overriding automatic image quality ✅ Supports all transformations Advanced Editor |
| Studio | An intuitive, user-friendly interface for applying transformations and AI-driven actions to multiple images | ✅ Easy and pleasant to use ✅ Simplifies your workflow by allowing you to apply transformations in bulk ✅ Provides the ability to create templates, download variations, or open them in a browser ✅ Makes Cloudinary's powerful AI capabilities super accessible 💡 Some actions are subject to subscription limits or count against your monthly quota |
| Video Player Studio | Generates code for creating and customizing a Video Player instance on a website | ✅ Accessible from the context menu of a video asset in your Media Library ✅ Simplifies developer workflows by automatically generating code ✅ Provides an easy-to-use interface for customizing the code for the Video Player instance ✅ Opens with a selected video, but the code can be applied to any video to reproduce similar results |
| Derived assets | View an asset’s derived assets, generated when you apply a transformation programmatically or open the asset in a browser. | ✅ Makes it easy for developers to access and reuse derived asset URLs ✅ Helps streamline storage management by exposing what's already been generated |
Check out the Introduction to Cloudinary Assets pathway in the Cloudinary Academy for free self-paced courses on DAM topics.
Transformation templates
- The transformation templates feature is a premium offering for Assets Enterprise plans, and its availability depends on your account setup. If transformation templates is not yet enabled for your account and you'd like to enable it, please contact your Customer Success Manager.
Assets Free plans:
- This feature isn’t included in the Media Library available with the Assets Free plan, which offers basic management. It's part of the Media Library for Assets Enterprise plans.
- To learn more about the features available in the Assets Free plan and how they can support development workflows, see Media Library for Developers.
- For upgrade options or more information, contact us.
Applying a transformation template to an asset generates a transformed asset, which is a copy of the original, modified according to the pre-defined transformations set in the transformation template.
Your organization likely has standards for formatting, sizing, watermarking, cropping assets, etc. If you're repeatedly making the same adjustments to your assets, then transformation templates can reduce repetition in your workflow, while ensuring that organizational standards are met.
Several transformation templates are provided by default. Your administrator can replace these with their own, up to a maximum of 60, by:
- Saving transformations created in Studio as templates.
- Setting named transformations as transformation templates.NoteIf you can't preview assets when applying a certain transformation template, it may be because:
- The template wasn't defined correctly (for example a video template with a transformation that's only valid for images).
- The template contains a transformation that's not supported for preview.
If a template can't be previewed, ask your administrator to make sure the template was set up correctly.
In either case, you can still download the asset or open it in a new tab.
Previewing transformed assets
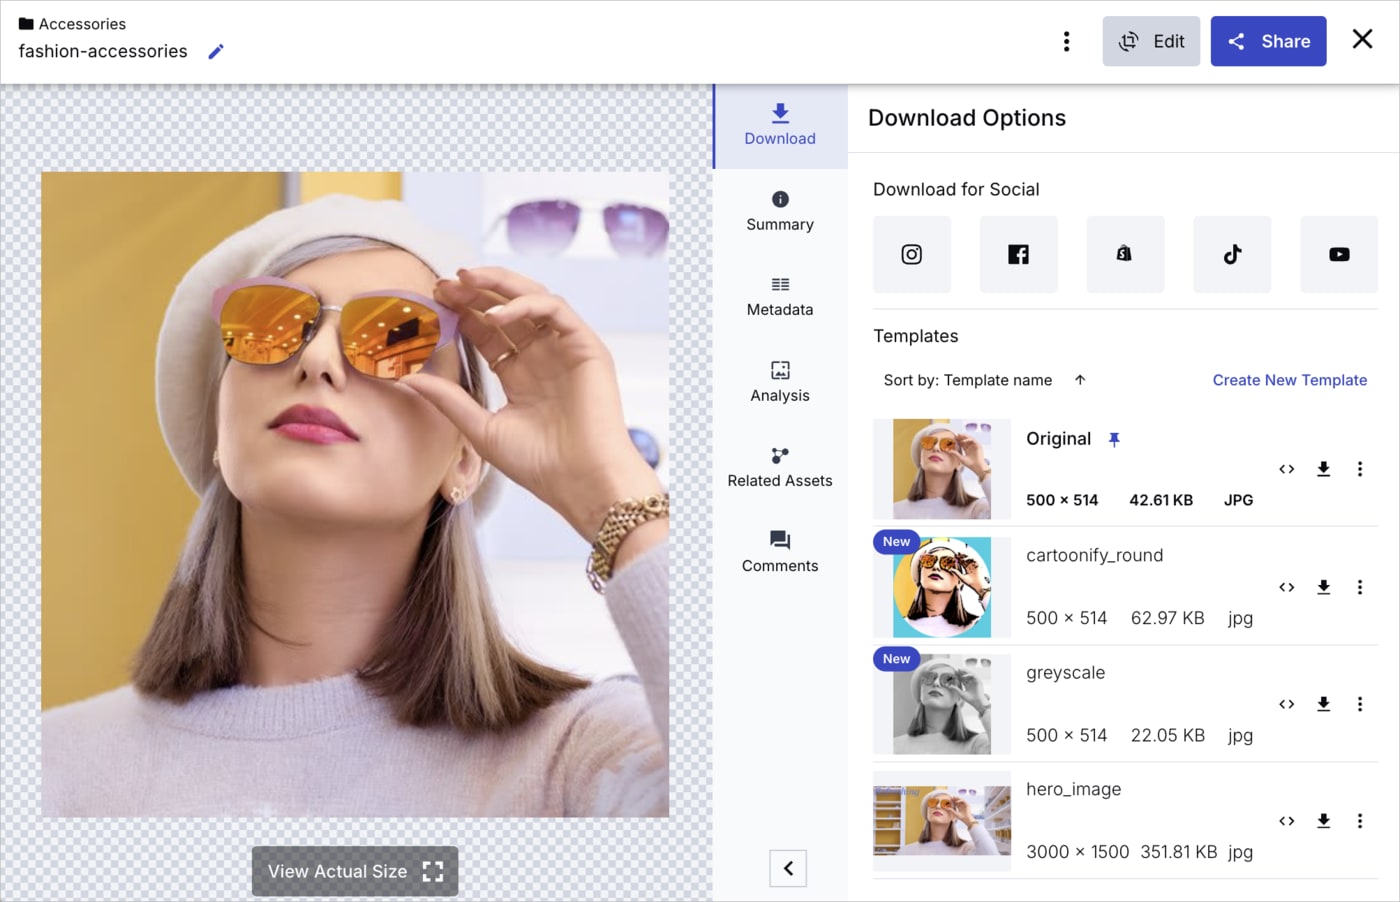
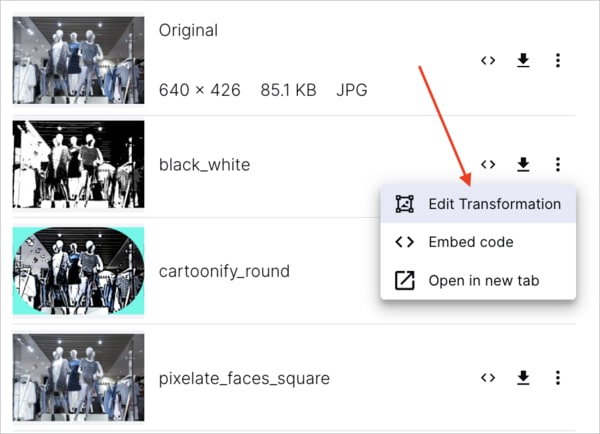
In the Download Options tab of the asset management drill-down page, several transformation templates are listed, enabling you to see how the selected asset would look with those transformations applied.
You can click the template thumbnail to preview the transformed asset. For any displayed transformation template, you can perform operations such as opening the transformed asset in a new tab, downloading it, copying the URL, or further editing it in the transformation editor or Advanced Editor.
Downloading a single transformed asset
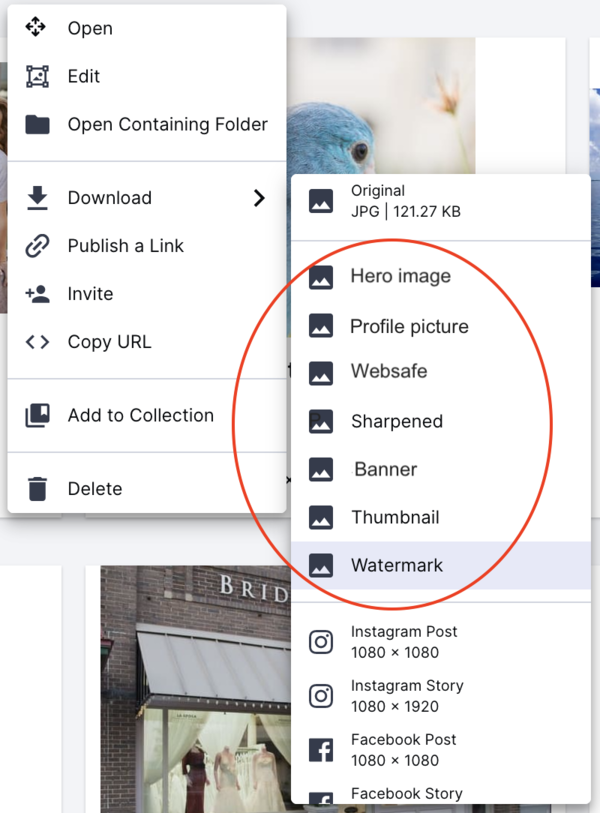
In the Assets, Folders, Collections, and Moderation Media Library pages, you can download a single asset in several different forms, including its original and with a transformation template applied. From the (3-dots) options menu on the asset, open the Download nested menu and click on the transformation template you want to apply on download.
Downloading transformed assets in bulk
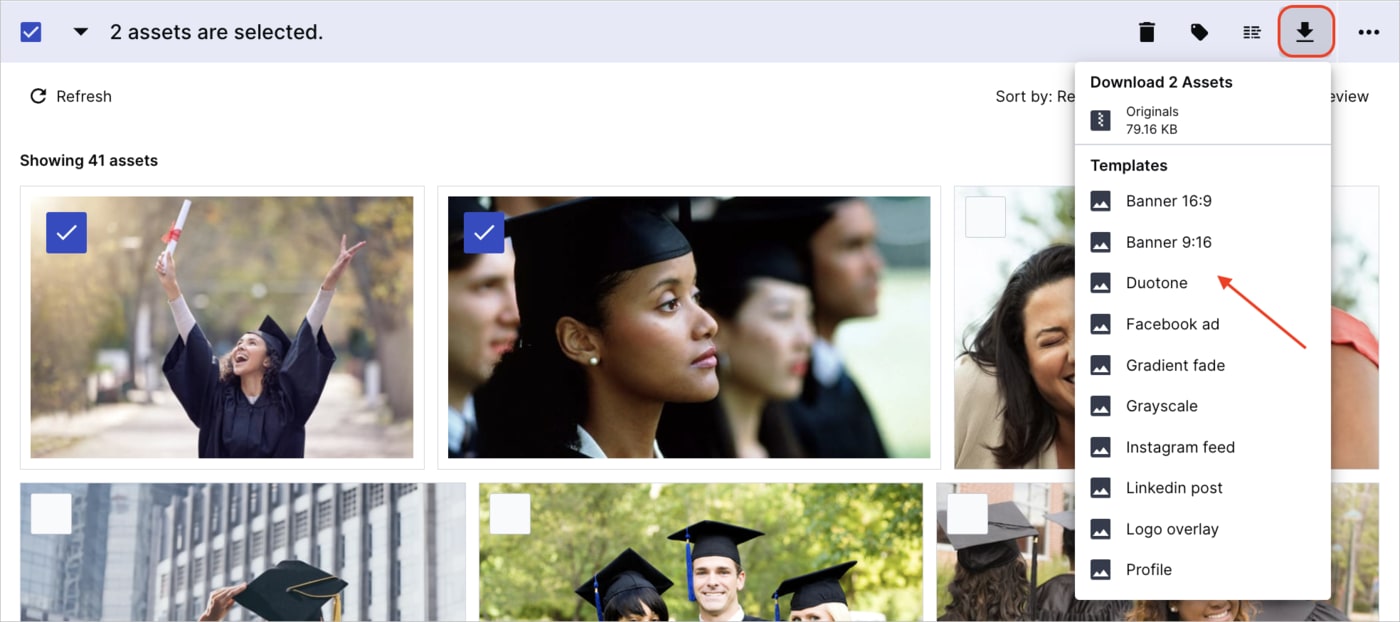
In the Assets, Folders, Collections, and Moderation Media Library pages, you can download multiple assets together, with the same transformation template applied. Select the desired assets and hover over the Download icon in the assets toolbar. All the available transformation templates are listed under Templates. Choose one to generate a ZIP file with transformed assets.
Media Editors
From the asset management drill-down page, you can navigate to a Media Editor for editing images and trimming videos.
When you're finished with your edits, you can either:
- Download the edited version without modifying the original.
- Click Save to overwrite the original asset with your edited version while keeping its metadata. If backups are enabled for your product environment, then you'll be able to easily revert to a previous version if needed.
- Save the edited version as a new asset with the same metadata and in the same folder as the original. You can use the public ID and display name (not supported in product environments using the legacy fixed folder mode) that were generated for you based on the original asset with a random suffix added, or you can enter your own. The public ID must be unique.
Edit images
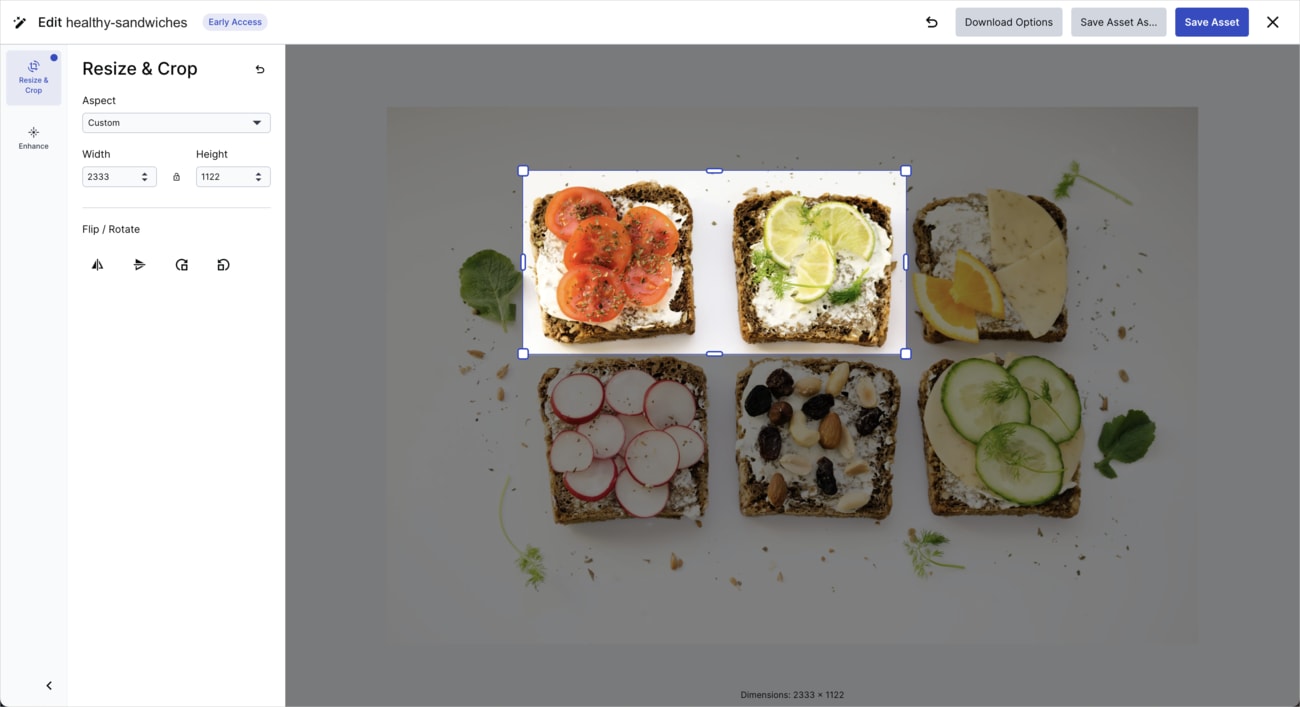
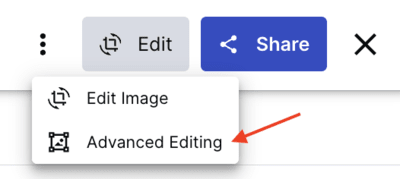
When an image is displayed in the asset management drill-down page, you can click the Edit pull-down button and select the Edit Image action to open the Studio interface for a single asset.
From this view, you can easily crop an image based on one of the available crop pre-set aspect ratios, manually set a required crop width and height, or just manually resize the image using the crop handlebars. You can also choose to flip or rotate the image. In addition, you can apply enhancements to the image, such as adjusting colors, contrast and brightness, and highlighting edges and fine details.
The options in the Media Editor enable you to easily make these simple modifications without an external editing tool or the need to request a designer's assistance.
Trim videos
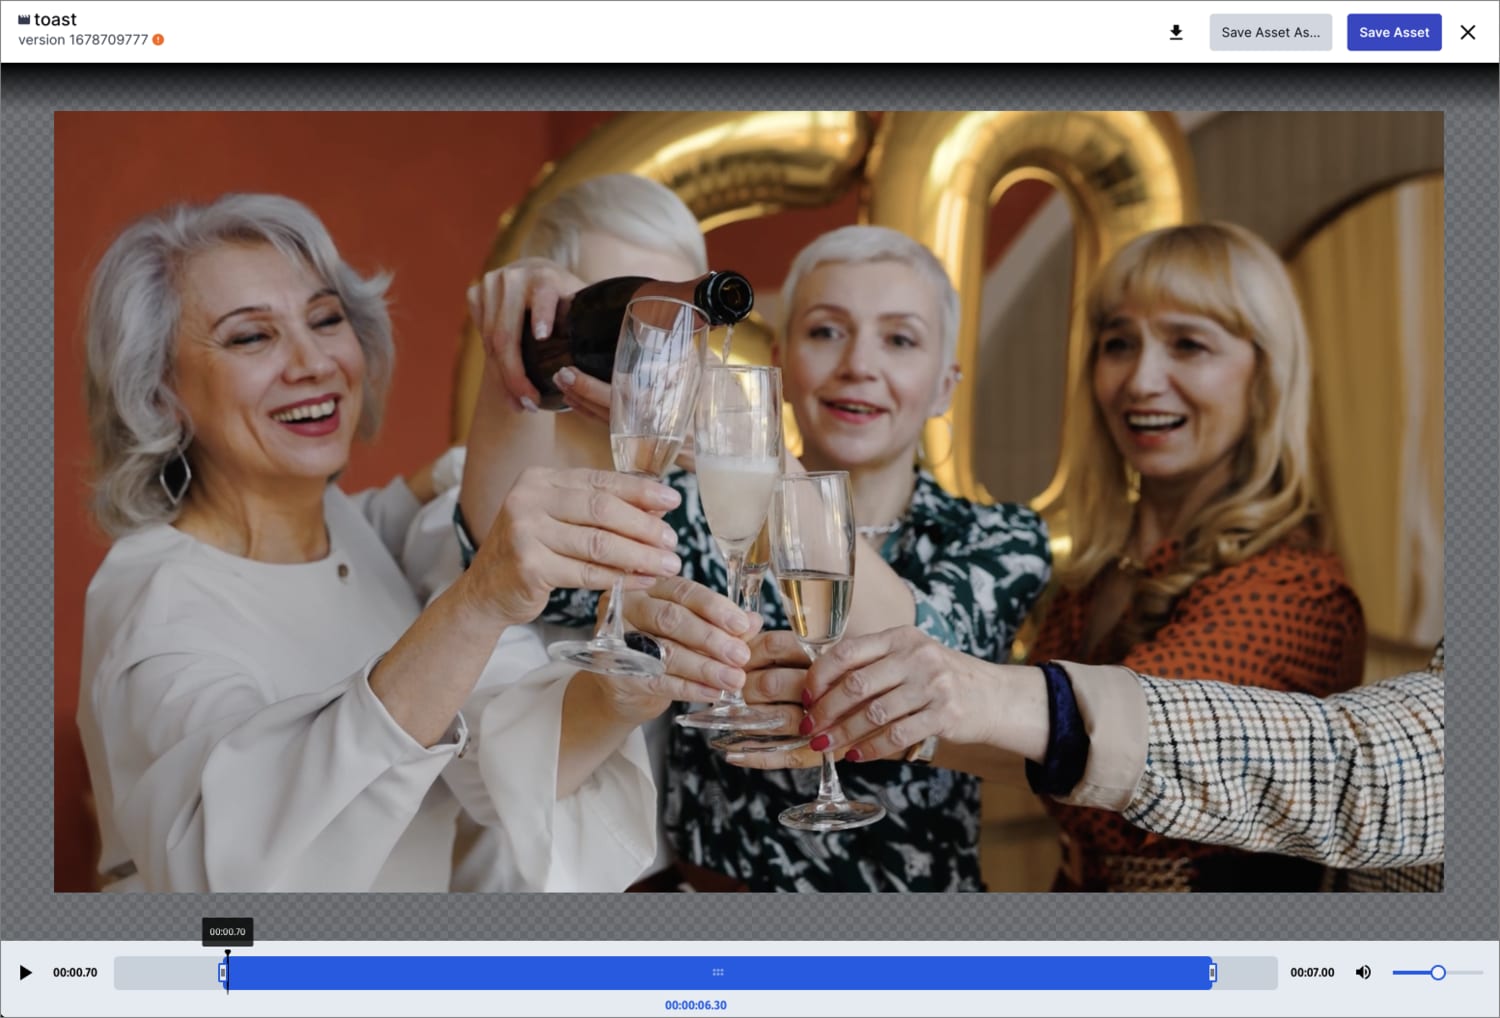
When a video is displayed in the asset management drill-down page, you can click the Edit pull-down button and select the Trim Video action to open the Media Editor for videos.
From this view, you can easily take off part of the beginning or end of a video clip. Move the left or right handles of the slider to trim your video.
Transformation and Asset Details Editor
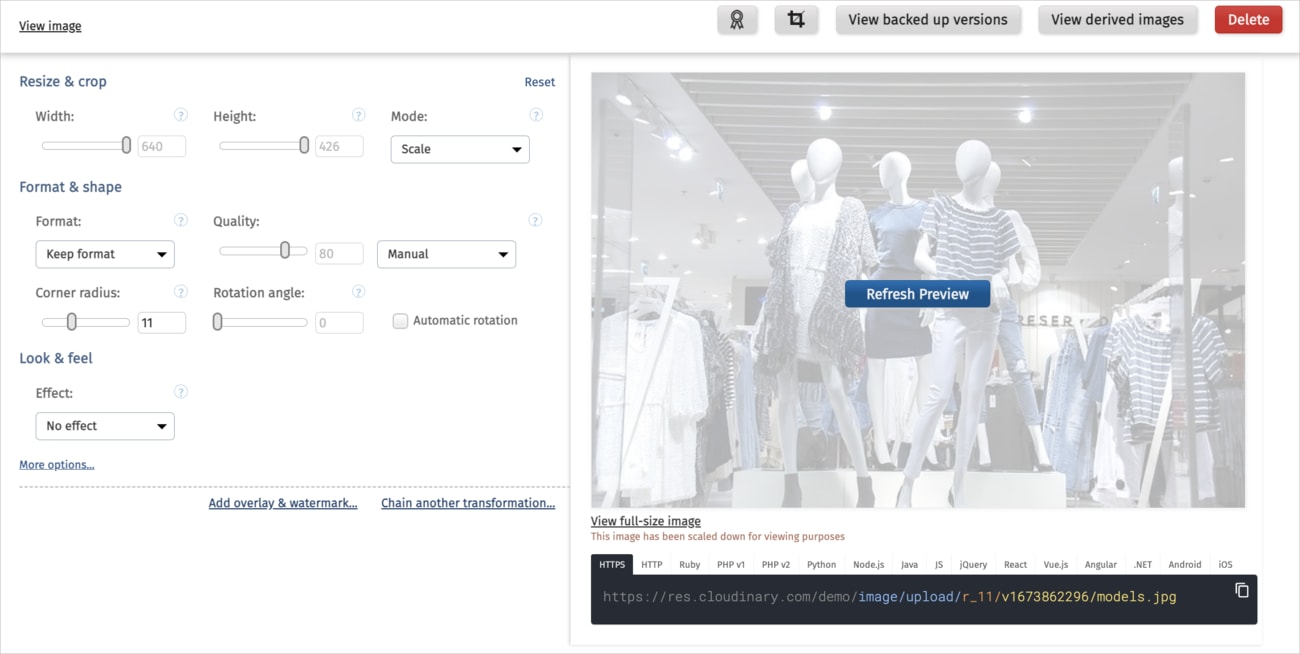
The Edit page enables you to experiment with the various transformations available for the selected image or video using simple UI elements in the transformation editor and to view and edit asset details.
- Depending on your account setup, and if your administrator enabled the Transformation Builder (Beta) for early access, you'll have access to the new Advanced Editor (Transformation Builder) instead of the Transformation and Asset Details Editor.
Assets Free plans:
- This feature isn’t included in the Media Library available with the Assets Free plan, which offers basic management. It's part of the Media Library for Assets Enterprise plans.
- To learn more about the features available in the Assets Free plan and how they can support development workflows, see Media Library for Developers.
- For upgrade options or more information, contact us.
To open the Edit page:
Navigate to the Download Options tab on the asset management drill-down page. Select Edit Transformation from the (3-dots) option menu next to the original asset or a listed transformation template. If you chose a template, its transformations apply in the editor, allowing you to add more transformations as needed.
Using the transformation editor
The most common transformations are displayed on the page. There are 3 additional links you can click to create more complex transformations:
- More options: Set additional transformations or transformation flags.
- Add overlay & watermark: Specify another asset in your Media Library to add as an overlay (or underlay) on the current asset, and specify transformations to apply to the selected overlay asset. You can also click the More options link within the overlay section to access additional transformations for the overlay.
- Chain another transformation: Chaining enables you to define another set of transformations that will be applied on the result of the first set.
When you change settings on any of the transformation controls, a button is displayed on the preview prompting you to refresh the preview so that you can see the new variation of your asset. In most cases, it makes sense to first set all the transformation settings you want to apply, and only then refresh the preview. When you refresh the preview, the transformation code displayed below the preview is also updated, enabling you to copy the transformation URL or the transformation code for any SDK.
If you use the asset variation outside the Media Library (open in a browser tab, download, etc.), a derived asset is generated from the original asset based on applied transformations. It doesn't change the original asset, nor is it treated as a new asset in your Media Library. You can view all derived assets that were generated from a particular asset by clicking the View derived image/video button at the top of the Edit page.
- When you modify a transformation and refresh the preview to view the resulting variation of the asset, you're not billed for previewing it. However, if you use the variation outside the Media Library (for example opening it in a new tab or downloading it) a 'derived asset' is generated and counted as part of the total number of transformations used during your billing cycle.
- Because transformations do not impact the original asset, users with the Media Library user role can generate transformations, even if they have only Can View or Can Contribute permissions for the folder where the asset is stored.
- The options on this page enable you to apply most of the available transformations, but not all of them. Some of the more complex transformations with many possible option values can be applied only using the delivery URL API.
For details on all available transformations and how they are used within delivery URLs, see the Image transformations and Video transformations guides.
Editing asset details
From the Edit page, users with a role that includes edit permissions for the asset can adjust data that's stored with your asset, including:
-
Add or edit face or custom coordinates. These coordinates are used to determine the area of focus for cropping, overlays, and other transformation features when the
gravityparameter is set toface/facesorcustomin a delivery URL. -
Set an override quality level for a specific asset. The absolute quality level set here will be used for that asset instead of Cloudinary's auto-quality algorithm when
qualityis set toautoin a delivery URL. - List, preview and restore backed up versions. With backup enabled, uploaded assets are copied to a backup location and version history is maintained if an asset is overwritten or deleted. You can preview previous versions, even for deleted assets, helping you to choose which version to restore.
- View derived images: View and mange variations of the original asset, created by applying transformations and opening the resulting assets outside the Media Library. You can delete, download and view derived assets. Also, re-use base transformations by adding them to transformation templates (previously known as presets).
Users with an Admin role or with Can Manage permissions for the relevant folder can also Delete the asset.
Advanced Editor (Transformation Builder) early access
If the Transformation Builder (Beta) is enabled for early access by your administrator, you can utilize the Advanced Editor (Transformation Builder) to create variations of the selected image or video. Create variations of your asset by applying transformations using the user-friendly UI elements.
Assets Enterprise plans:
- The Advanced Editor (Transformation Builder) is a premium offering for Assets Enterprise plans, and its availability depends on your account setup. If the Advanced Editor (Transformation Builder) opt-in option isn't available to your administrator in the early access section of the Media Library Preferences and you'd like to enable this feature, contact your Customer Success Manager.
Assets Free plan:
- This feature isn’t included in the Media Library available with the Assets Free plan, which offers basic management. It's part of the Media Library for Assets Enterprise plans.
- To learn more about the features available in the Assets Free plan and how they can support development workflows, see Media Library for Developers.
- For upgrade options or more information, contact us.
To open the Advanced Editor with multiple images:
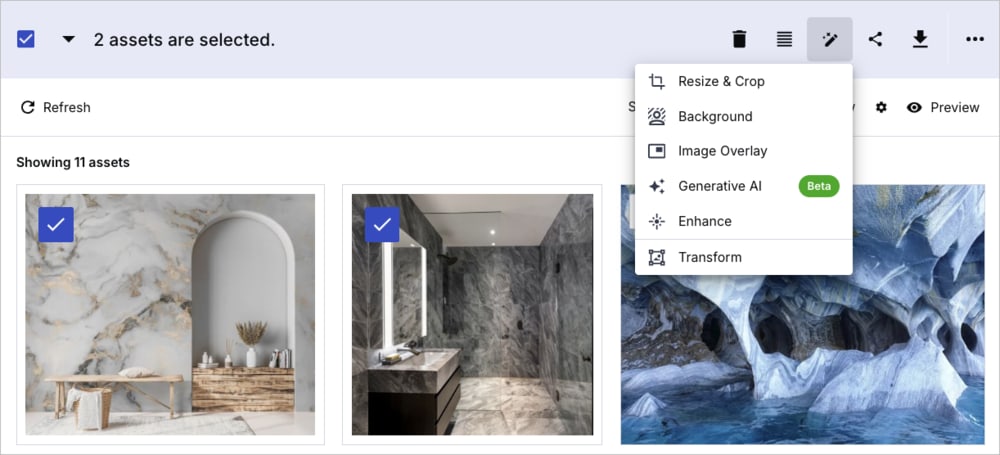
Select multiple images and hover over the Edit icon in the assets toolbar. From the drop-down menu, select Transform.
To open the Advanced Editor with a single asset:
From the asset management drill-down page, select the Advanced Editing action from the Edit pull-down button on the asset management drill-down.
OR
Navigate to the Download Options tab on the asset management drill-down page. Select Edit Transformation from the (3-dots) option menu next to the original asset or a listed transformation template. If you chose a template, its transformations apply in the editor, allowing you to add more transformations as needed.
The new Transformation Builder offers the same capabilities as the Transformation editor with an improved, simple and easy to use interface, and has support for most common transformation actions. If the transformation action you are trying to apply is not listed, you can add an Additional Transformation action to specify your transformation.
The additional functionality offered by the new Transformation Builder can streamline your workflow. Previously, when applying transformations to an asset using the Transformation Editor, you were only able to preview it, download it, or open it in a new tab. Now, with the new Transformation Builder, you can also easily save the asset variation to change/overwrite the original asset in the Media Library. In addition, you can save an image variation as a new asset.
The following sections help you get started with the Transformation Builder, and show how to work with several transformations. Follow the steps shown in the animations, or follow the written instructions below each animation. The written steps walk you through the process shown in each animation, with some additional clarifications.
How to apply transformations:
| To open the Transformation Builder, from the Manage page, select Advanced Editing (Transformation Builder) from the Edit Image drop-down (or, you can select Advanced Editing from the (3-dots) options menu of the asset you want to edit). | |
| Click Start Creating. | |
| If it's the first transformation you're adding, select a transformation from the Select Action pane. | |
| Depending on the action you select, there may be additional options that you can set. (You can click Discard changes to revert any transformations that you haven't yet applied.) | |
| If you've already added a transformation, you can add another transformation by clicking Add Action from the Transformation pane to display the Select Action pane. | |
| Click Apply to add the new transformation to the URL and preview the asset with transformations applied. (Click Apply and Close to also close the Select Action pane.) |
How to delete a transformation:
From the Transformation pane, open the (3-dots) options menu next to the transformation you want to delete and click Delete.
How to apply an image overlay:
| From the Transformation pane, click Add Action. | |
| From the Select Action pane, select Image Layer. | |
| Enter the Public ID of the image you want to overlay, and set the other available options (Type, what to Focus on, Placement, X/Y Offset, and Blend Mode), and apply those settings. | |
| To further format the overlay if it's, for example, too big, select Add Layer Action. | |
| From the Select Action pane, select the transformation you want to apply to the image overlay, set any additional options for that transformation, and click Apply to add the new transformation to the overlay and preview the applied transformations. You can repeat the last two steps to add more transformations to your overlay until it looks how you want it to. |
How to apply an unlisted transformation:
| From the Transformation pane, click Add Action. | |
| From the Select Action pane, click Additional Transformations. | |
| Add the string that specifies the transformation you want to add. Follow the examples to enter a valid transformation, or look up the available transformation options with examples and syntax details in the Transformation reference. |
How to copy the URL, download, or save your transformation:
Once you're satisfied with the variation you've generated by applying your desired transformations, save the changes you made to overwrite the original asset keeping the original metadata, download your derived asset, or copy the URL to the derived asset and open in a new tab. If you're working with an image, you can save the variation as a new original in the same folder and with the same metadata.
Studio (images only)
Studio is a user-friendly interface for applying transformations and AI-driven actions to multiple images simultaneously. Generate variations for download, or for delivery using the transformed images' URLs.
Original Studio
This version of Studio is a premium offering for Assets Enterprise plans, and its availability depends on your account setup. If Studio isn't yet enabled for your account and you'd like to activate it, please contact your Customer Success Manager.
You can create variations by either starting from scratch with your own transformations or using pre-defined transformation templates set up by your administrator. Using templates may be preferred, as they may enforce specific standards established within them. You can also start by applying a template and then adding further transformations in Studio.
Administrators can additionally create and save templates, and modify templates that aren't marked as View only. Templates can be applied outside of Studio when downloading an image from the asset's (3-dots) options menu or the Download Options tab of the asset management drill-down page.
Keep in mind that transformations or templates applied in Studio generate variations without altering the original asset. This means that Studio access is available even to users with view-only permissions.
Getting started with Studio
You can start with an empty Studio instance, or you can choose single or multiple images to open in Studio for immediate transformation. The transformations and AI-driven actions you select will be applied to all images open in the Studio interface.
Moreover, you can seamlessly Add more images to the Studio interface at any time, and any past or future actions you apply in Studio during that session will be carried over to these additional images, as well.
To open an empty instance of Studio:
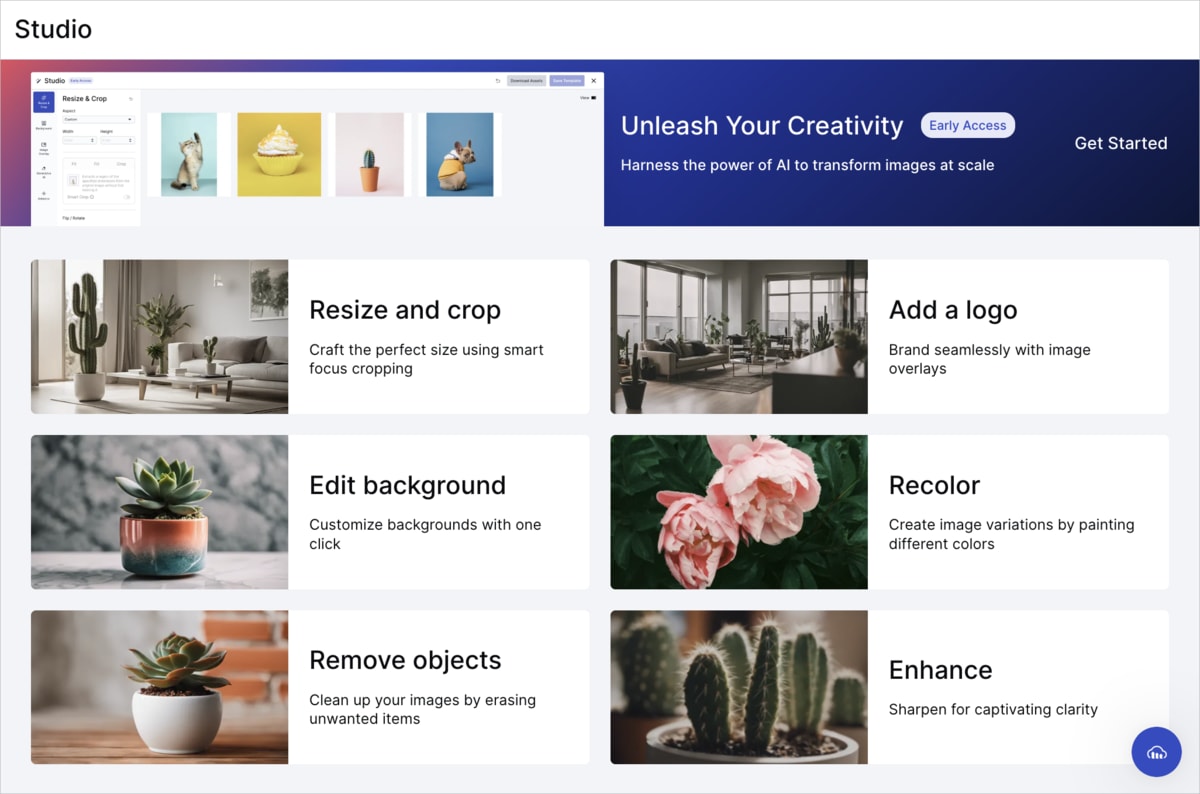
Choose Studio in the Product Navigation menu and select the action you want to perform. Inside Studio, you'll receive a prompt to add images and begin transforming.
To open Studio for multiple images:
Select multiple images and hover over the Edit icon in the assets toolbar. From the drop-down menu, choose the tool you want to apply (besides the Transform option, which opens the Transformation Builder):
To open Studio for a single image:
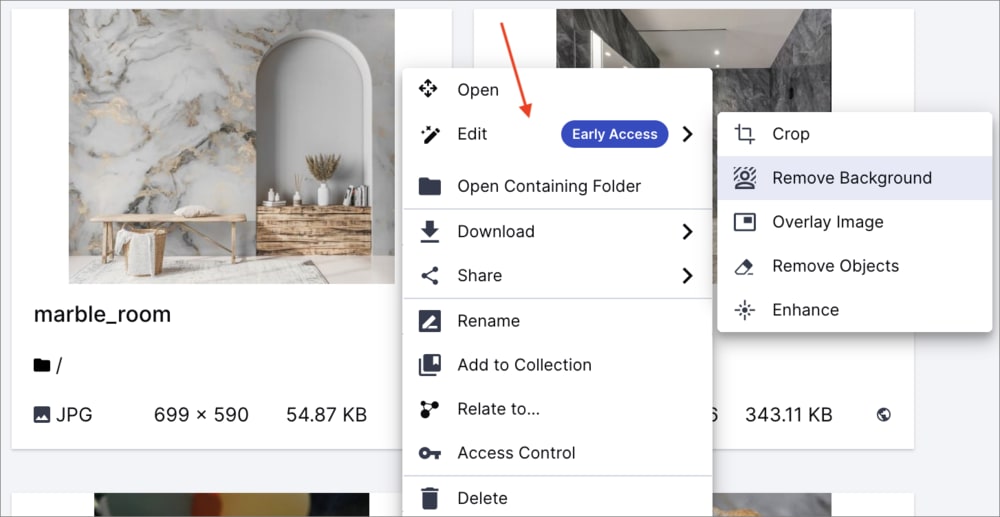
Hover over Edit from the (3-dots) options menu on the image itself and select the action you want to start with from the nested menu:
Applying AI actions and transformations
Studio enables you to perform any of the following transformation actions on the images that are open in Studio:
-
Resize & Crop: Choose a standard or custom aspect ratio, then adjust the width and height. Pick from three cropping modes:
- Fit: Resize the image to fit within the bounding box while preserving the original aspect ratio. This option adds padding between the image and the bounding box, which you can customize using Generative Fill to automatically extend the image in that area using generative AI. You can also navigate to Studio's Background action to color the padded area or use your own image in the background.
- Fill: Resize the image to fill the specified dimensions without distortion, which may result in cropping.
- Crop: Extract a region of the specified dimensions from the original image without initial resizing.
- For both Crop and Fill, you can activate the Smart Crop option to automatically focus on the most interesting area, preventing the loss of essential parts of the image during cropping.
- Flip and rotate: Flip and rotate your images with one click.
-
Background: First, effortlessly remove the background from your chosen image(s). Then, optionally apply a drop shadow and select a background color or image.ImportantBackground removal counts against your transformation/add-on quota when applied within Studio. If using the add-on and you've reached your monthly cap, contact your administrator to upgrade your subscription.
- Image Overlay: Add an overlay image of your choice from your product environment. Customize its width, placement in one of the four corners, and opacity.
- Generative AI: Restore and mend imperfections, and recolor, remove, or replace elements in your images as specified by entering a prompt.
- Enhance: Instantly improve your image by adjusting colors, contrast, brightness, and sharpness. Highlight edges and fine details for a visually enhanced result.
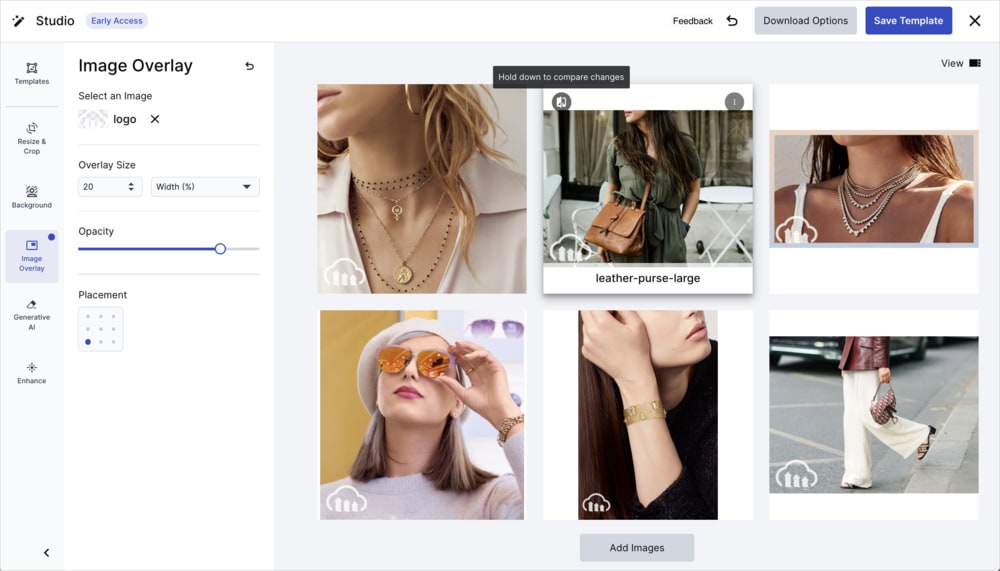
Here's an example of a transformation that consists of several actions: cropping to a width and height of 40 px and adding an overlay image:
You can toggle between two views. One shows the images in a grid layout and the other pins one of the images in the center with the others showing as thumbnails. Click any thumbnail to pin it in the center.
You can also compare the asset variation created in Studio with the original assets. Press and hold the button to view the original asset, and release it to see the asset with your applied transformations.
Working with transformation templates
A transformation template is a set of pre-defined transformations that can be applied to assets across various contexts, including within Studio.
To apply templates to images open in Studio, click on Templates and then select one from the available options. If you don't have any templates yet, ask your administrator to create one for you.
To deselect the template, click the reset button next to the Templates title.
While working on a template, you can switch to a different one. However, this action will discard the transformations applied by the original template.
-
You may use transformation templates as a base and then add further transformations, as described in the previous section.
- When applying a template and adding your own transformations, ensure you follow that sequence. Selecting a template will overwrite any previous edits you made.
Once satisfied with your asset variations, download or deliver the generated image variations from Studio, as outlined below.
- Administrators can use Studio to create new templates and edit existing ones within Studio.
- Alternatively, administrators can create templates available in Studio using the full range of Cloudinary transformation options by designating named transformations as transformation templates.
- Transformation templates that are marked as View only can be applied to images but can't serve as a base for further transformations. This applies to all templates that weren't created by your administrator in Studio, but were originally created as named transformations set as transformation templates.
Using your asset variations
When you're satisfied with your transformations, you can:
- Download the asset variations you created as a ZIP file.
- Download the delivery URLs of your variations as a CSV file.
- Copy the URL of an individual variation from its kebab menu.
Transformation actions applied within Studio don't count against your monthly quota. However, when you download or open the image with its delivery URL in a new browser, a derived asset is generated and counted as part of the total number of transformations used during your billing cycle. If you're downloading a large number of assets, be mindful of your usage. Consider upgrading your plan with your administrator's assistance if you've reached the limit.
New Studio
This version of Studio is available for accounts on Assets Free plans, created after 15th December 2025. It will be rolled out to all customers over the coming weeks.
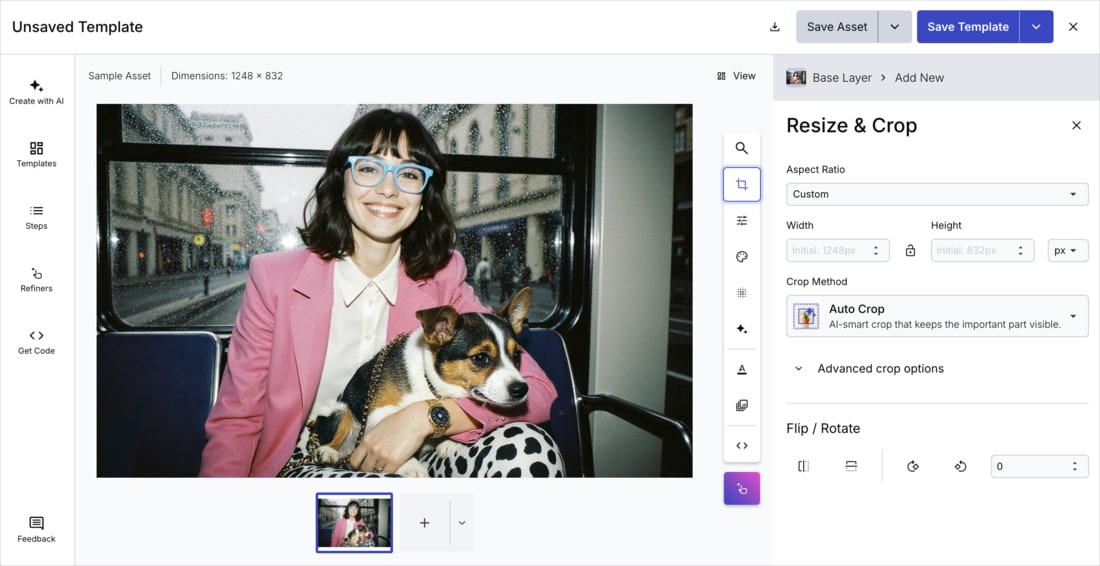
You can use this Studio to build transformations, refine AI-generated versions of images, save transformations as named transformations and transformation templates, and apply them to one or more images.
After you've applied a transformation to an image, you can save the transformed asset as a new asset in your Media Library, or overwrite the original image. You can also decide not to save the transformed image, but to apply the transformations to the delivered asset, keeping the original intact.
Similarly, you can apply the same transformation to multiple images and save them as new assets in bulk, or overwrite them all at once.
The following sections describe how to use this Studio.
Open Studio
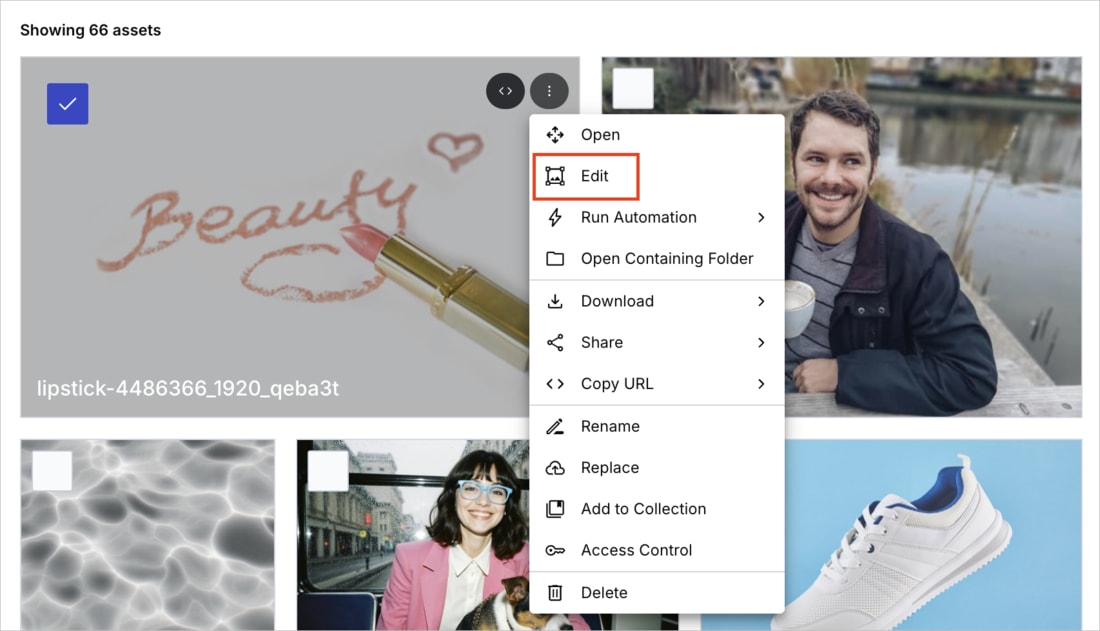
To open Studio for a particular image, in the Media Library, select Edit from the (3-dots) options menu on the image itself.
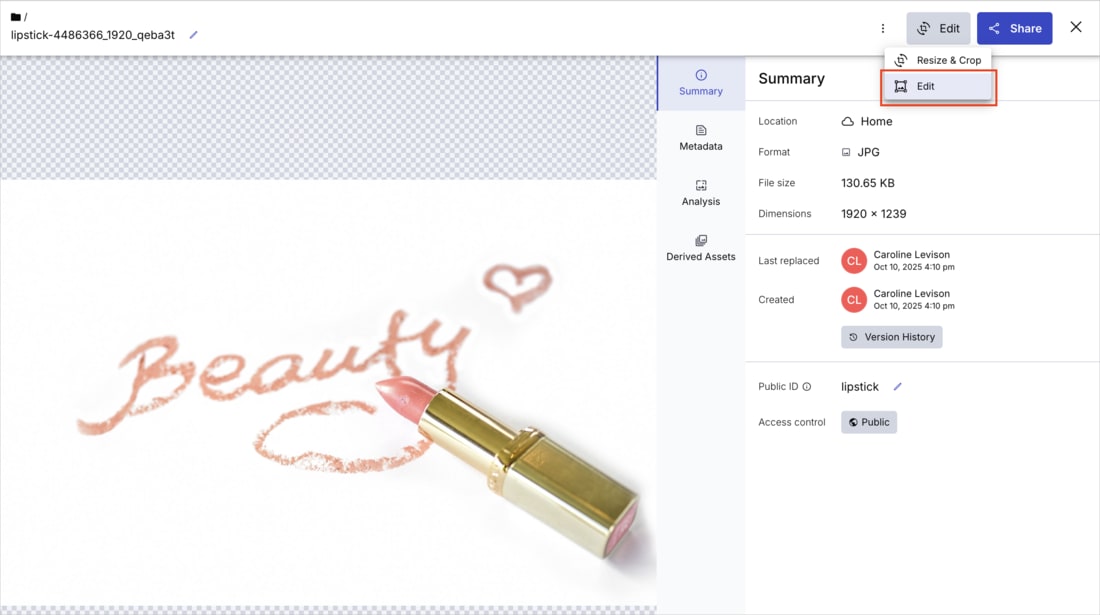
Alternatively, in the drill-down page, click Edit from the Edit drop-down button.
Apply transformations
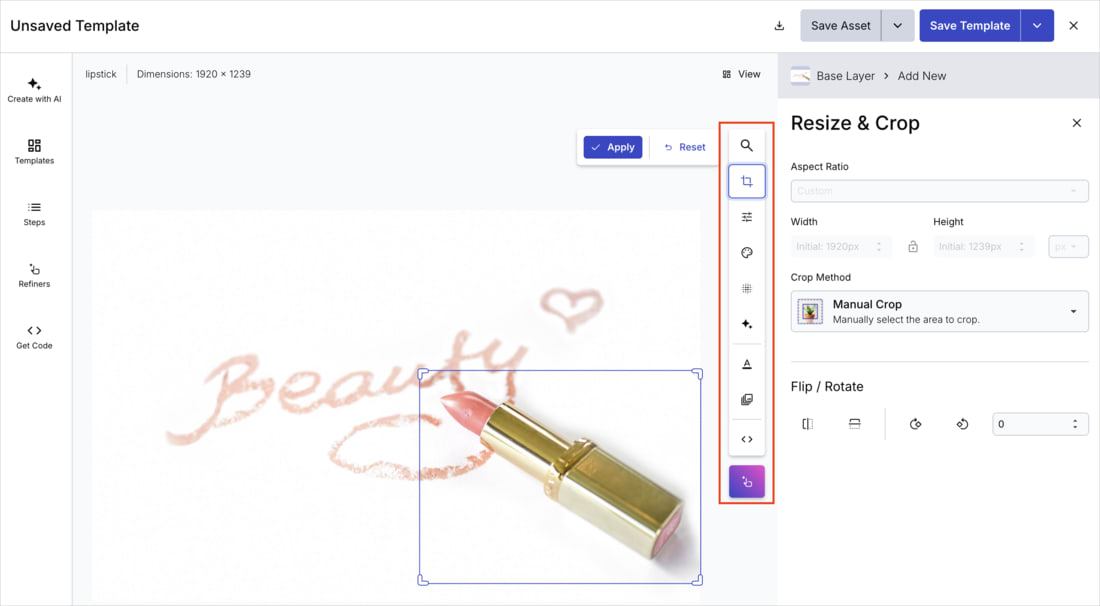
You can apply transformations to your image by manually selecting options from the transformation bar.
Choose from options in the following categories:
- Resize & Crop: Change the dimensions of your image by scaling, cropping to specific aspect ratios, or extracting regions of interest, and flip or rotate your image.
- Adjust: Fine-tune brightness, contrast, saturation, and other color properties, round corners, trim empty space, and set opacity.
- Background & Border: Specify a background color for padding or transparent areas of your image, and add a border with a specified width and color.
- Effects: Apply artistic filters, blurs, pixelation, color shifts, and other visual effects to stylize your image.
- AI Transformations: Use AI-powered features such as background removal, content extraction, upscaling, generative fill, generative background replace, generative remove, generative recolor, generative replace, drop shadow, AI image enhancer, and generative restore.
- Text Layers: Add text overlays with customizable fonts, colors, sizes, and positioning to annotate or brand your image.
- Image Layers: Overlay other images such as logos, watermarks, or decorative elements onto your base image.
- Custom Syntax: Enter transformation parameters directly using Cloudinary's URL-based transformation syntax for advanced customization.
- Image Refiners: Use refiners to fine-tune your AI-powered transformed images, for example those with background removal, generative fill, and generative background replace, plus set your own focus areas.
You can also use the search at the top of the bar to find the transformation you're looking for.
Steps
Studio saves each transformation applied to the preview image as a step. You can change the order of the steps, disable, and delete them. If you disable a step, its associated transformation is temporarily removed from the preview until you re-enable it.
To see all the steps, click Steps in the left panel.
You can also see the URL transformation syntax required to deliver the image shown in the preview, or choose your preferred language from the drop-down selection to see the code for that SDK.
Refiners
Depending on which AI transformations you've used, you'll see different refiners available in the Refiners panel.
In the Background Removal Refiner, for example, you can clean up any parts of the background that weren't removed, or restore parts that were.
Learn more about transformation refiners.
Get Code
In the Get Code panel you can specify optimization and delivery settings. These are settings that don't change the preview image, but do impact the delivered image. You can also copy the URL or SDK code with these settings applied.
Create with AI
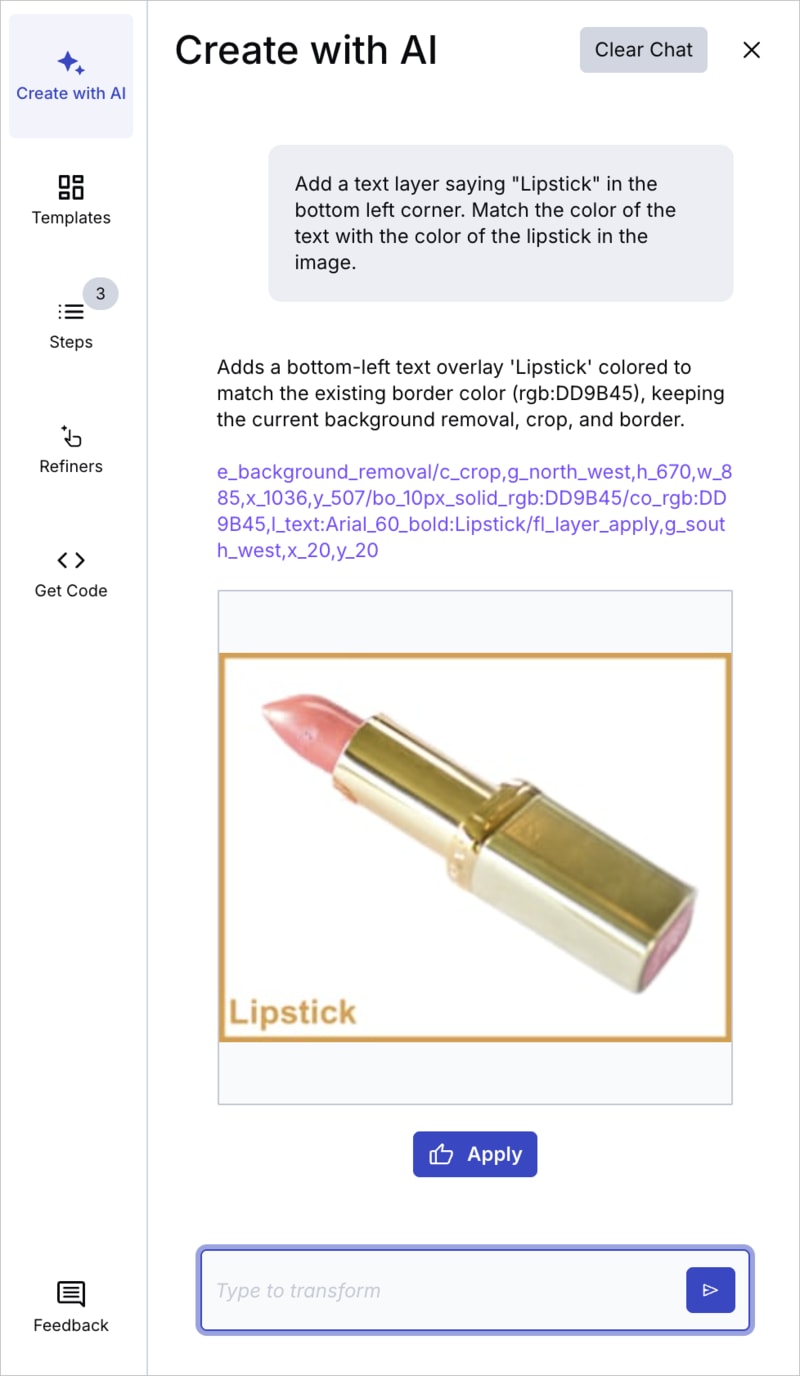
In the Create with AI tab, you can use natural language to describe how you want to edit the image. The chat suggests the transformations to apply with a preview of how the image looks with them applied. You can then choose to apply the suggestions to the preview image and automatically add them to the steps.
Templates
Templates are a saved set of steps. Saving a template automatically creates a named transformation and makes it available as a transformation template in the Media Library.
Saved templates appear in the Templates tab. This allows you to apply the same transformations to other images and are available any time you re-enter Studio.
Anyone who has access to transformation templates in your product environment also has access to these templates in Studio for easier sharing and collaboration.
Save an image with transformations applied
You can choose to save the preview image with the transformations applied either as a new image or overwriting the current image.
If you save it as a new image, you can choose the display name of the new image. The public ID of the new image is the public ID of the original image plus random characters appended as a suffix.
You can also download the transformed image regardless of whether you've saved the asset or template.
Preview multiple images
If you're intending to apply the same transformations to multiple images, you can preview them with the same set of transformations or template applied.
Add more preview images into Studio using the + icon at the bottom, then select images from your product environment, and/or upload new ones.
You can click through each of the images in turn or change the view (button in the top right corner) to see all images together.
Next to the + icon is a drop-down menu with further options:
- Use the Replace All option to remove all the selected images and select different images.
- Use the Reset to Default option to remove all the selected images and show the
main-sampleimage as the only preview image.
Save multiple images with transformations applied
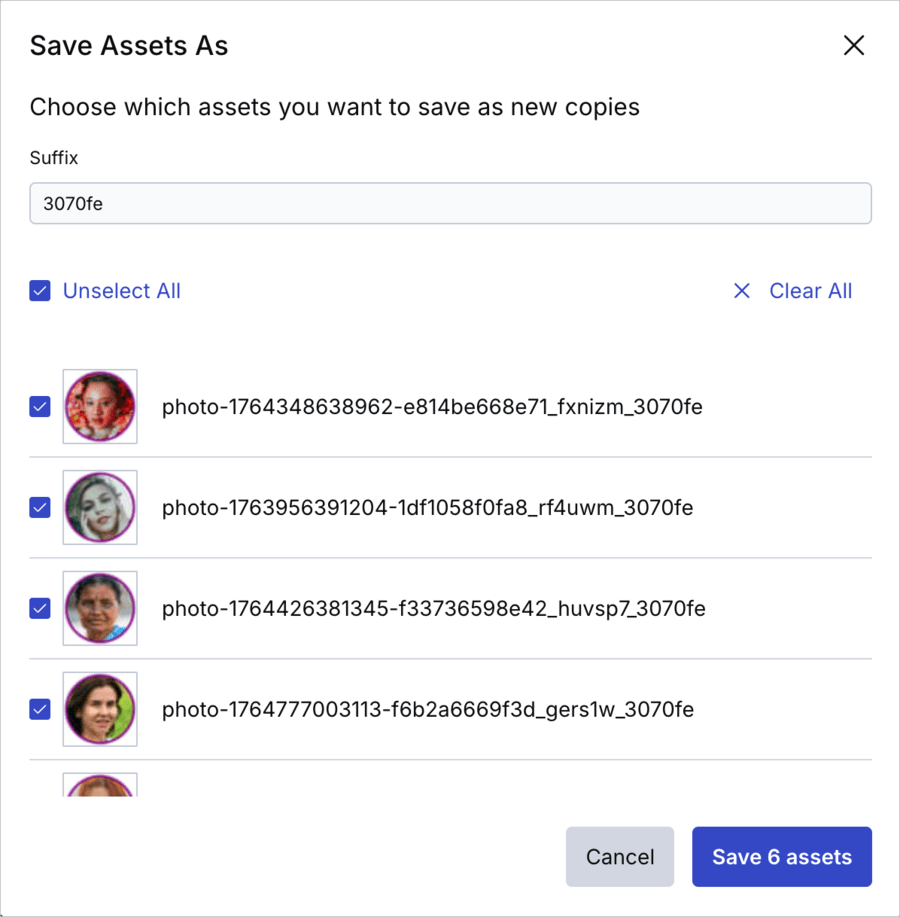
Similar to saving one image with transformations applied, you can save multiple images, either as new images or overwriting existing ones. In both cases, you can select which of the preview images to save. If saving as new assets, you can provide a suffix to apply to each of the display names.
 Ask AI

