Salesforce Commerce Cloud B2C Commerce Cartridge operational overview
Last updated: Feb-17-2026
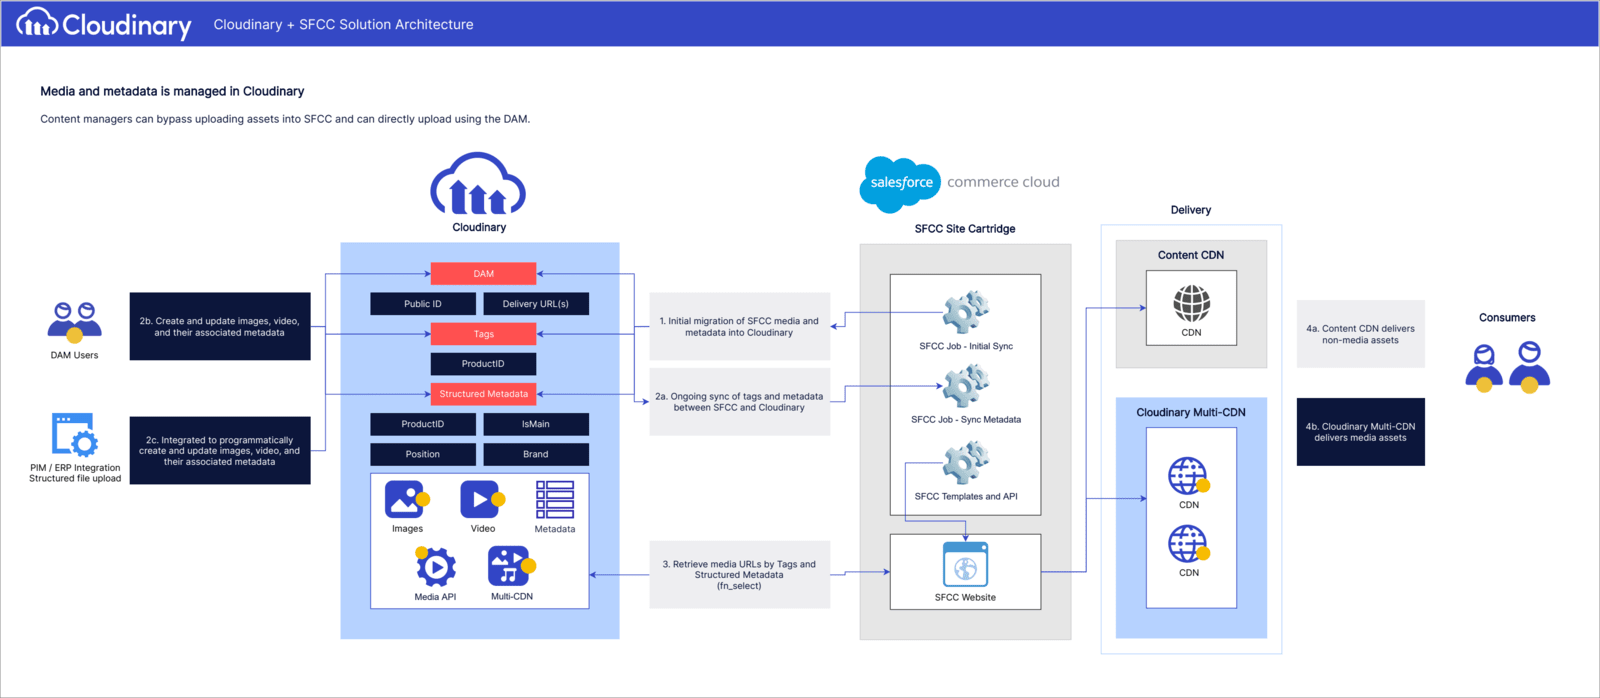
The Salesforce Commerce Cloud B2C Commerce Cartridge enables you to simplify and automate the process of managing, transforming, optimizing, and delivering images and videos throughout your entire Commerce Cloud store, including product images and videos, 360 spin sets and 3D models, category assets, and site catalogs.
You can use the B2C Commerce Cartridge for Headless with PWA Kit, SFRA, or SiteGenesis, to extend Salesforce's native APIs and provide the flexibility to build a composable storefront using Cloudinary assets.
Media mapping options
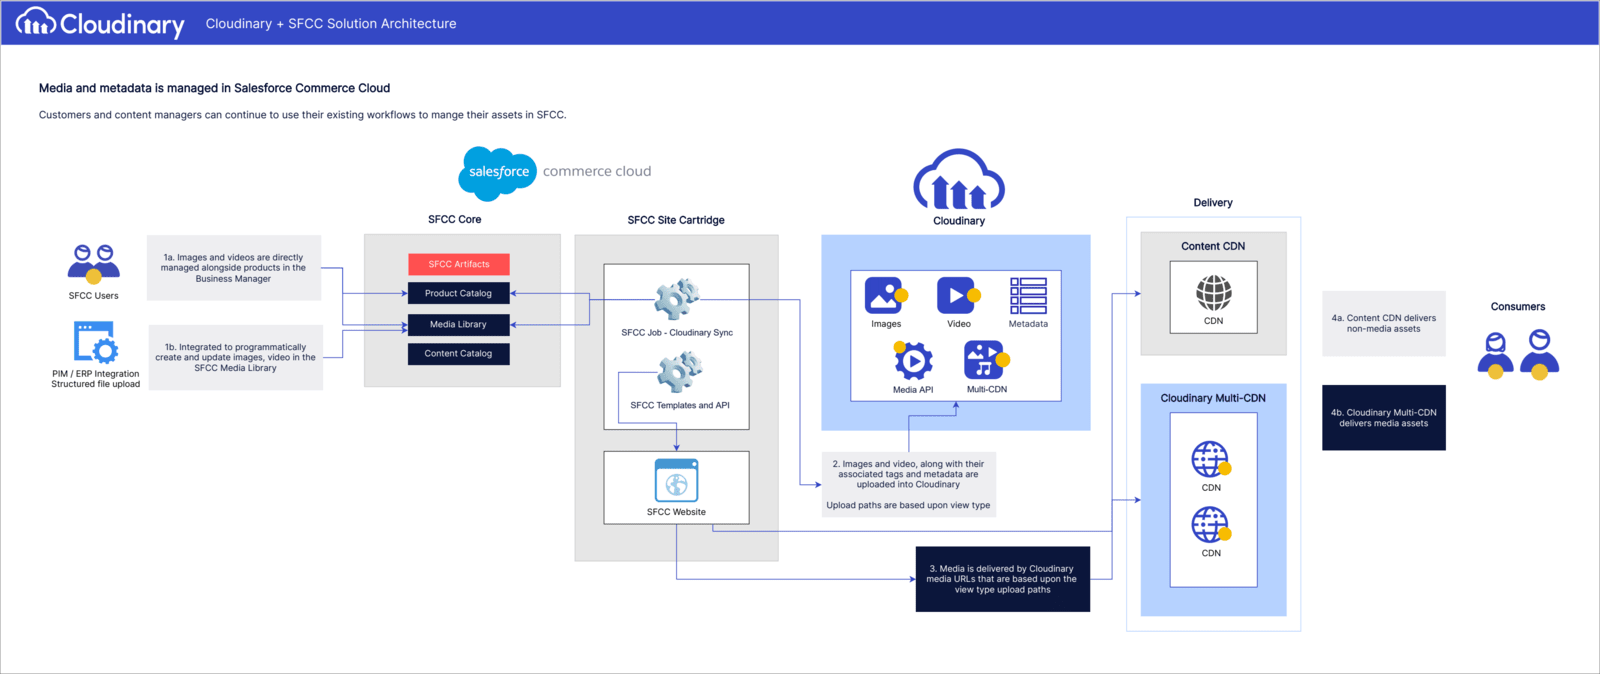
Depending on your setup, there are two main options for media mapping and delivery using Cloudinary:
- Upload and deliver media directly from Cloudinary (recommended)
- Upload media to SFCC and then sync it with Cloudinary
To choose an option, navigate to Merchant Tools > Site Preferences > Custom Site Preference Groups > Cloudinary Asset Management Configurations > Cloudinary Cartridge Operation Mode.
Option 1 - media directly uploaded to Cloudinary (recommended)
Using this option, Cloudinary is the single source of media assets for all catalogs, providing a centralized location for storage, organization, and management. Media assets aren't duplicated between SFCC and Cloudinary, streamlining the media management process.
- Because Cloudinary is the single source of all media for all catalogs, you can manage your assets via the Cloudinary Media Library and benefit from its powerful features.
- For the product catalog, assets in Cloudinary are mapped to products in SFCC using tags and structured metadata.NoteFor product swatches, only images are supported, not videos. Both are supported for the master product.
- For the content and site catalogs, specify URLs to Cloudinary assets in content slots.
- If migrating from an existing site, you can run jobs to bulk upload your media to Cloudinary. Tags and structured metadata are automatically added to the assets in Cloudinary for the product catalog.
- You can use a Media Library app to update the structured metadata values of many assets at the same time. Contact support to guide you through the process of creating a CSV file containing a list of your Cloudinary assets and the metadata values to apply.
- You can use Cloudinary's Product Gallery for displaying product images, videos, 360 spin sets and 3D images.
- You can use Cloudinary's Video Player.
- Image paths and alt text can be stored in SFCC for use in product feeds and image tags, by running a specific job.
- You can use the fn_select custom function to deliver assets based on filters using tags and structured metadata.
Option 2 - media uploaded to SFCC and copied to Cloudinary
Using this option, SFCC acts as the source of mapping for all media across catalogs. This allows for more control over the mapping process since the media assets are expected to reside in both SFCC and Cloudinary, using the same paths. This approach ensures that the assets are ultimately delivered from Cloudinary while still maintaining consistency with SFCC paths.
-
For the product catalog assets, which reside and are delivered from Cloudinary but use the same paths as in SFCC, the paths take the form:
<prefix_path>/images/<path_in_sfcc>Where:
-
<prefix_path>is defined by the custom preferences in Cloudinary Core Configurations:- Folder For Product Images In Cloudinary, for images
- Folder For Product Videos In Cloudinary, for videos
-
<path_in_sfcc>is the path used for the asset in SFCC.
-
You need to run jobs periodically to upload and sync assets from SFCC to Cloudinary, and also to add tags and metadata to the assets automatically. Tags and metadata help with searching within the Cloudinary Media Library and are required if you migrate to Option 1.
For the content and site catalogs, specify URLs to Cloudinary assets in content slots.
You can use Cloudinary's Product Gallery for displaying product images and videos.
You can use Cloudinary's Video Player.
Tips and considerations
- For testing or prototyping purposes only, you can use a different media mapping option, fetching media to Cloudinary on demand, as a quick and simple way to deliver your media from Cloudinary. Using this option, media is automatically uploaded from its existing location to Cloudinary when requested by the end user, and is subsequently delivered from Cloudinary.ImportantThis option is exclusively intended for testing purposes and should not be utilized for any other scenarios as it lacks the asset management benefits provided by the other two options.
- If you're choosing Option 1, initially setting up Option 2 then switching to Option 1 may provide a smoother transition in your migration to Cloudinary, with the goal of eventually centralizing your media management within Cloudinary as your single source of truth and taking advantage of full DAM capabilities of the Assets product.
- Starting with Option 2 allows you to leverage SFCC as the source of mapping for media assets across catalogs and gradually set up the infrastructure, configure mappings, and ensure the compatibility of media assets between SFCC and Cloudinary.
- As you populate Cloudinary with media assets synchronized from SFCC, validate and fine-tune the integration process. Ensure the accuracy of mappings, test the delivery of media assets from Cloudinary, and address any potential issues before fully transitioning to Option 1.
- If you decided to implement your media mapping using one option, then at a later stage decide to use a different option, contact support to discuss migration paths.
- When using auto-upload, make sure that the CNAME is set to your custom CNAME rather than the Demandware domain. This configuration is relevant if you're using option 2.
Jobs
In SFCC, jobs are used to automate routine tasks or long-running processes. You can run them manually or schedule them to run at specific times.
The B2C Commerce Cartridge contains the following jobs, which are primarily used for Option 2 - media uploaded to SFCC and copied to Cloudinary, but can also be used for Option 1 - media directly uploaded to Cloudinary if migrating from an existing site:
-
Initial upload of product assets
- This job drives the initial upload of all product assets (images and videos) from the product catalog into Cloudinary.
- By default, the view type configured as the high-resolution source of images and swatch are uploaded, but you can also configure other view types to be uploaded.
- All required structured metadata fields are created.
- Tags and structured metadata are applied to the uploaded assets.
- For more information, see Cloudinary - Initial upload of product assets.
-
Initial upload of catalog assets
- This job drives the initial upload of all catalog assets (images and videos) from the product catalog into Cloudinary.
- For more information, see Cloudinary - Initial upload of catalog assets.
-
Initial upload of content assets
- This job drives the initial upload of all content assets (images and videos) from the content catalog into Cloudinary.
- If a content catalog is shared by multiple sites, you only need to run this job in the context of one of the sites to avoid unnecessary duplication of uploads from multiple job executions from multiple sites.
- For more information, see Cloudinary - Initial upload of content library assets.
For each of the upload jobs, the root upload location in Cloudinary is specified in the custom preferences for the Cloudinary cartridge in SFCC, and the SFCC folder structure is automatically replicated in Cloudinary. You can use each of the jobs both to migrate all your SFCC media assets into Cloudinary and also subsequently to upload only new assets created in SFCC.
-
Delta upload catalog assets and Delta upload library assets
- These jobs identify changes or updates made to the assets in SFCC and upload those assets to Cloudinary. Any change in an SFCC asset is included, even if it's not media-related, like pricing updates, etc.
- They're particularly useful if you have a large number of assets and need an efficient way to keep them synchronized between SFCC and Cloudinary.
- For more information, see Cloudinary - Delta upload catalog assets and Cloudinary - Delta upload library assets.
The cartridge also includes this job for Option 1:
-
Import image path and alt text
- This job is used to fetch public IDs and alt text from primary images in Cloudinary, which are then stored in SFCC to use for product feeds and image tags. See Importing Cloudinary delivery URLs for product feeds and Providing alt text for images for details.
- For more information, see Cloudinary - Import image path and alt text.
Tags and structured metadata
If using Option 1 - media directly uploaded to Cloudinary, assets need to have particular tags and metadata based on the product catalog definitions in SFCC to identify all assets belonging to products and variants. These can be added directly into the Cloudinary Media Library, as described below. When product images and videos are uploaded to Cloudinary using the Upload Product Assets job, the required tags and structured metadata are automatically assigned to them.
Assigning tags to product assets
There are three different tag types that can be assigned to assets:
-
Product tag: This tag is the unique product identifier, which could be the product's
ID, or some other unique identifier, such asUPCorSKU. Use the SFCC custom preference, CLDProductAttributeForTags, to indicate to the cartridge which attribute to use as the identifier. By default it is set toID.
In the example shown here, the tag name is25721034M, same as the ID for the product:

When displaying images and videos on a product page, the gallery automatically pulls in all assets with the same product tag.NoteThe Upload Product Assets job uses CLDProductAttributeForTags to assign the product tag automatically. Should you wish to override this global setting, you can specify the tag name itself on a per-product basis, using the Cloudinary Tag Name (CLDTagName) attribute (in the Cloudinary section of the product settings). Any assets in Cloudinary that have this tag will appear in that product's gallery. -
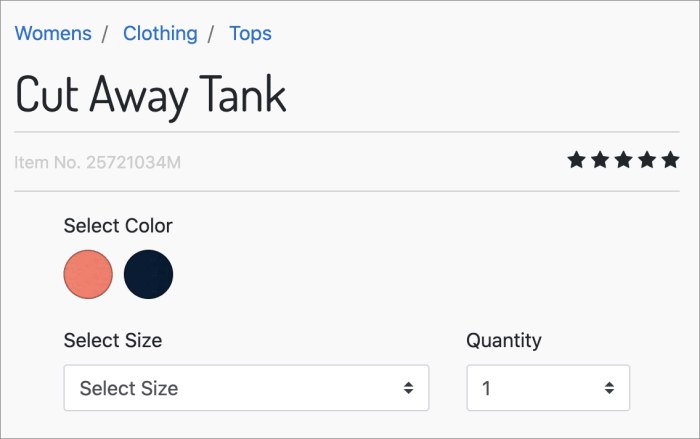
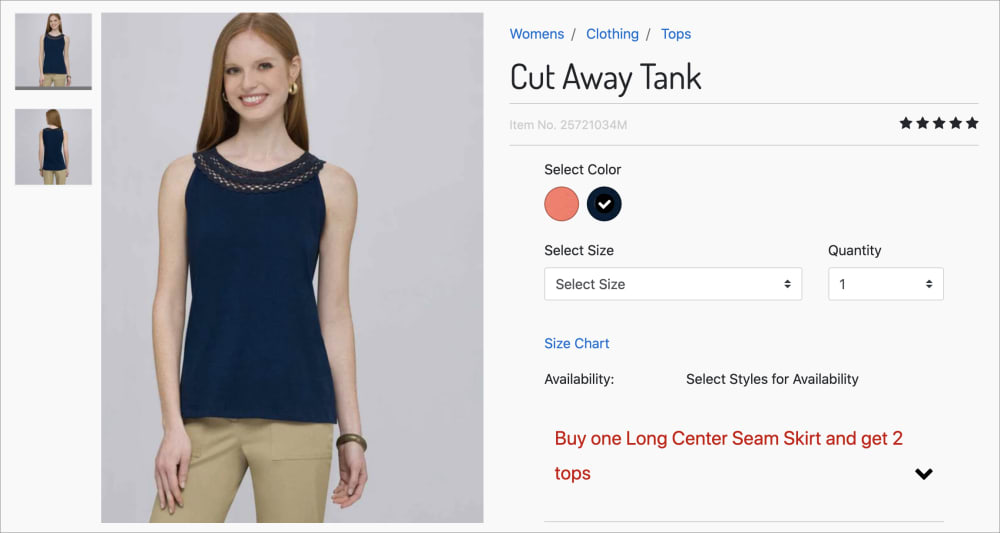
Variation product tag: This tag identifies particular variations of a product. In the example section below, there are two color variations of the product, Sundried Coral and Navy Sky. Each variation has its own set of images, so when the customer selects a color, the relevant images for that color are displayed in the gallery. The tag used for these product types takes the form:
<master-product-tagname>-<variation-color-value-id>, where<master-product-tagname>is the unique product identifier, and<variation-color-value-id>is the color ID of the variation.ImportantOnly images are supported for product variations, not videos.
Variation product swatch tag: This tag identifies the swatch image for a product variation. The tag used for swatch images takes the form:
<master-product-tagname>-<variant-color-value-id>-swatch. Swatch images are used by the customer to select the color they want. The images displayed in the Product Gallery are based on the selected swatch.

Assigning structured metadata to product assets
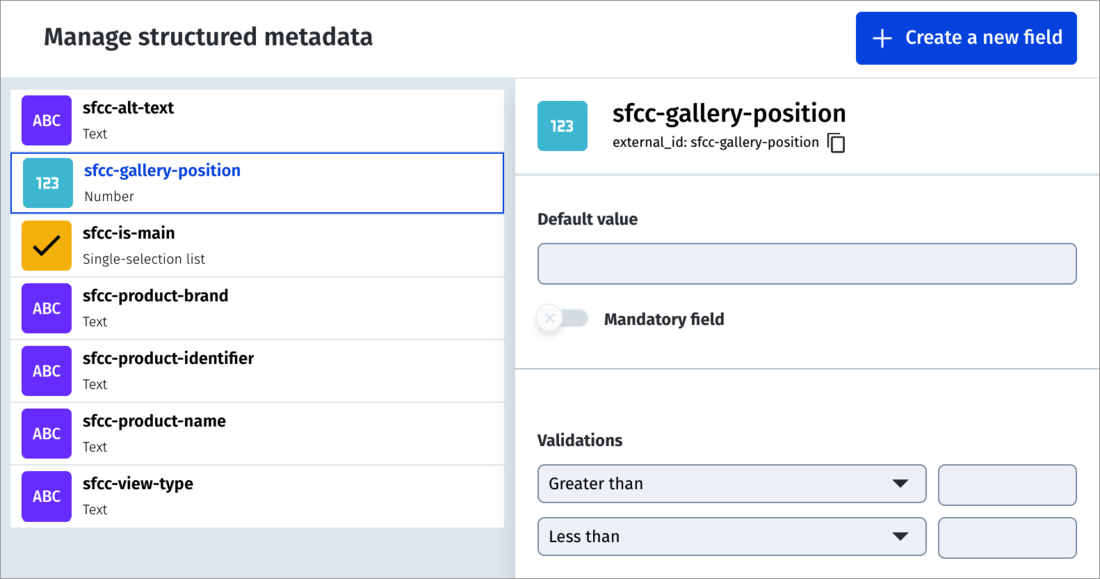
The B2C Commerce Cartridge Initial upload of product assets job creates the required structured metadata fields in Cloudinary, as shown in the following table. These fields are then populated automatically with relevant values for the uploaded assets. You can then set the metadata on each asset to control, for example, where it's positioned in the Product Gallery and whether it's the main image for the product, etc. You can also use metadata in customized templates, for example, using the sfcc-gallery-position value to determine main and alternate images on mouseover.
| External ID & Label | Type | Description |
|---|---|---|
sfcc-alt-text |
Text | Stores the alt text to display with the image. |
sfcc-gallery-position |
Number | Required. Indicates the position of the image in the Product Gallery. |
sfcc-is-main |
Single-selection list (True, False) |
Required. True indicates that this image is the main image for the product variant. If it is the master product image or a swatch image, it is shown on the product listing page. |
sfcc-product-brand |
Text | Stores the product brand, useful for searching in the Media Library. |
sfcc-product-identifier |
Text | Required. Stores the unique product identifier. |
sfcc-product-name |
Text | Stores the product name, useful for searching in the Media Library. |
sfcc-view-type |
Text | Stores the view type in SFCC. |
Example images showing tags and structured metadata
The following table shows all the images stored in Cloudinary that are associated to the product with the unique identifier, 25721034M. Each has its own set of tags and structured metadata. Multiple images and videos that have the same tag are shown together in the same Product Gallery.
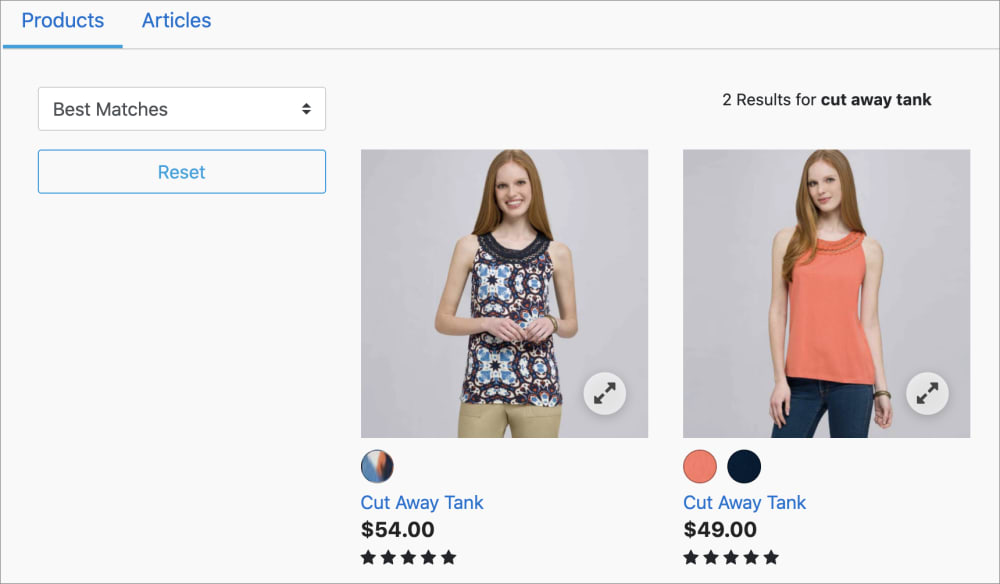
On the product listing page you can see the master product image and both swatch images:
This is the product page, showing the Product Gallery, with the Navy Sky variation of the product selected:
Common media sync scenarios
Here are some common actions you'll need to execute while managing your SFCC site with Cloudinary. The process will differ if you're using Option 1 - media directly uploaded to Cloudinary or Option 2 - media uploaded to SFCC and copied to Cloudinary.
Adding a new product
Create the product in SFCC: Access your SFCC B2C Commerce platform and navigate to the appropriate section where you can create new products. Provide all the necessary details for the new product, such as title, description, pricing, attributes, and any other relevant information. In particular, add the product tag, the new product's unique identifier, and keep it for reference.
If you're using Option 1:
- Upload the product image to Cloudinary: Upload the product image directly to Cloudinary using Cloudinary's Upload API or through the Cloudinary Console UI.
-
Establish mapping in Cloudinary: During or after upload, specify the product tag from the previous step as the value for the
sfcc-product-identifierstructured metadata field, and fill in appropriate values for the other required and optional fields. NoteYou can upload assets in bulk to the Cloudinary Console UI by dragging and dropping several assets or an entire folder structure. Then, update their metadata in bulk by importing a CSV file.
 Display the product image: Retrieve the Cloudinary URL or transformation URL associated with the image mapping and integrate it into your SFCC B2C Commerce website's template or product listing.
Publish the product: Once the product details and image mapping are set up, publish the new product to make it visible on your website. Test the product display and ensure that the image is correctly shown on the product page.
If you're using Option 2:
- Upload the product image: As part of creating the new product, upload the product image within SFCC. Select or upload the image that represents the new product. Ensure that the image meets the desired specifications in terms of size, format, and quality.
-
Trigger the sync process: Initiate the synchronization process between SFCC and Cloudinary by running the Upload Product Assets job.NoteThis job may take a while to complete, depending on the number of assets being uploaded.
- Verify the sync: After the synchronization process is complete, verify that the new product and its image are correctly synced with Cloudinary. Access the product image in Cloudinary and ensure that it matches the uploaded image in SFCC.
- Test product display in your SFCC B2C Commerce site: Ensure that the product details and image are accurately displayed as intended. Test different scenarios, such as browsing, searching, or adding the product to the cart, to ensure its proper functionality.
Updating an existing product
Update the product in SFCC: Access your SFCC B2C Commerce platform and locate the existing product that you want to modify. Make the necessary changes to the product details, such as updating the title, description, pricing, attributes, or any other relevant information. Save the changes.
If you're using Option 1:
- Upload the product image to Cloudinary: Upload the product image directly to Cloudinary using Cloudinary's Upload API or through the Cloudinary Console UI.
-
Establish mapping in Cloudinary: During or after upload, specify the product tag from the previous step as the value for the
sfcc-product-identifierstructured metadata field, and fill in appropriate values for the other required and optional fields. NoteYou can upload assets in bulk to the Cloudinary Console UI by dragging and dropping several assets or an entire folder structure. Then, update their metadata in bulk by importing a CSV file.
 -
Sync the changes with SFCC: Retrieve the Cloudinary URL or transformation URL associated with the image and update the mapping in your SFCC B2C Commerce website's template or product listing to ensure that SFCC retrieves the updated product information from Cloudinary.
NoteIf your integration setup includes automated synchronization, the changes made in Cloudinary may be automatically reflected in SFCC. If your integration doesn't include automated synchronization, you might need to trigger a manual synchronization process, such as running specific jobs, scripts, or APIs. Publish the product: Once the product details and image mapping are set up, publish the new product to make it visible on your website. Test the product display and ensure that the image is correctly shown on the product page.
If you're using Option 2:
- Update the product image: If you want to change the product image, upload the new image or select an existing image within SFCC. Ensure that the image meets the desired specifications, such as size, format, and quality.
- Trigger the Sync Process: Initiate the synchronization process between SFCC and Cloudinary by running a Upload Product Assets job.
- Verify the sync: After the synchronization process is complete, verify that the new product and its image are correctly synced with Cloudinary. Access the product image in Cloudinary and ensure that it matches the uploaded image in SFCC.
- Test product display in your SFCC B2C Commerce site: Ensure that the product details and image are accurately displayed as intended. Test different scenarios, such as browsing, searching, or adding the product to the cart, to ensure its proper functionality.
Renaming assets
If you're using Option 1:
-
Rename the asset in Cloudinary: You can rename an asset via Cloudinary's Console UI or through the API. Locate the asset you want to rename and update its public ID to the new desired name. NoteIf you want to update your asset metadata in bulk from a CSV file, use the Bulk Update Metadata feature.
- Make sure metadata is set up correctly: Before proceeding, ensure that the Cloudinary metadata for the asset is accurately configured. This metadata establishes a crucial link between the asset and its corresponding product in SFCC, enabling a seamless automatic synchronization process between Cloudinary and SFCC.
- (Optional) Sync alt text: If you rely on Cloudinary's metadata for the image's alt text, run the alt text job to synchronize the alt text with SFCC.
- Verify the synced asset: Once the synchronization process is complete, verify that the renamed asset is correctly reflected in SFCC. Ensure that the updated asset name is associated with the corresponding product or catalog entry in SFCC. You may need to check the product details or any other relevant locations where the asset name is used within SFCC.
If you're using Option 2:
- Rename the asset in SFCC: In your SFCC instance, locate the asset that you want to change or replace. Make the necessary modifications or upload a new version of the asset within SFCC. Ensure that the asset is in the desired format, resolution, or any other relevant attributes.
-
Trigger the sync process: Initiate the synchronization process between SFCC and Cloudinary by running the appropriate upload sync job.NoteIf you have a large number of assets, the upload sync job may take a while to complete. If you've only renamed a few assets, it might be more efficient to sync manually by updating the asset's name in Cloudinary.
- Verify the sync: After the synchronization process is complete, verify that the changes made to the asset in SFCC are reflected correctly in Cloudinary. Access the asset in Cloudinary and ensure that it matches the updated version or modifications you made in SFCC.
- Test asset delivery within your SFCC B2C Commerce site: Verify that the updated asset is being served correctly and displayed as intended. Test different scenarios and pages where the asset is used to ensure its proper functioning.
Importing Cloudinary delivery URLs for product feeds
If using Option 1 - media directly uploaded to Cloudinary, all your media is stored in Cloudinary, so when creating product feeds from SFCC, you need to obtain information about the product images from Cloudinary.
The Import Image Path and Alt Text job gets the public IDs of all the product catalog primary images in Cloudinary and stores them in the 'large' view type for the product and variants in SFCC. This has the added benefit of being able to see product images in the Business Manager so you can easily see the product you're working with.
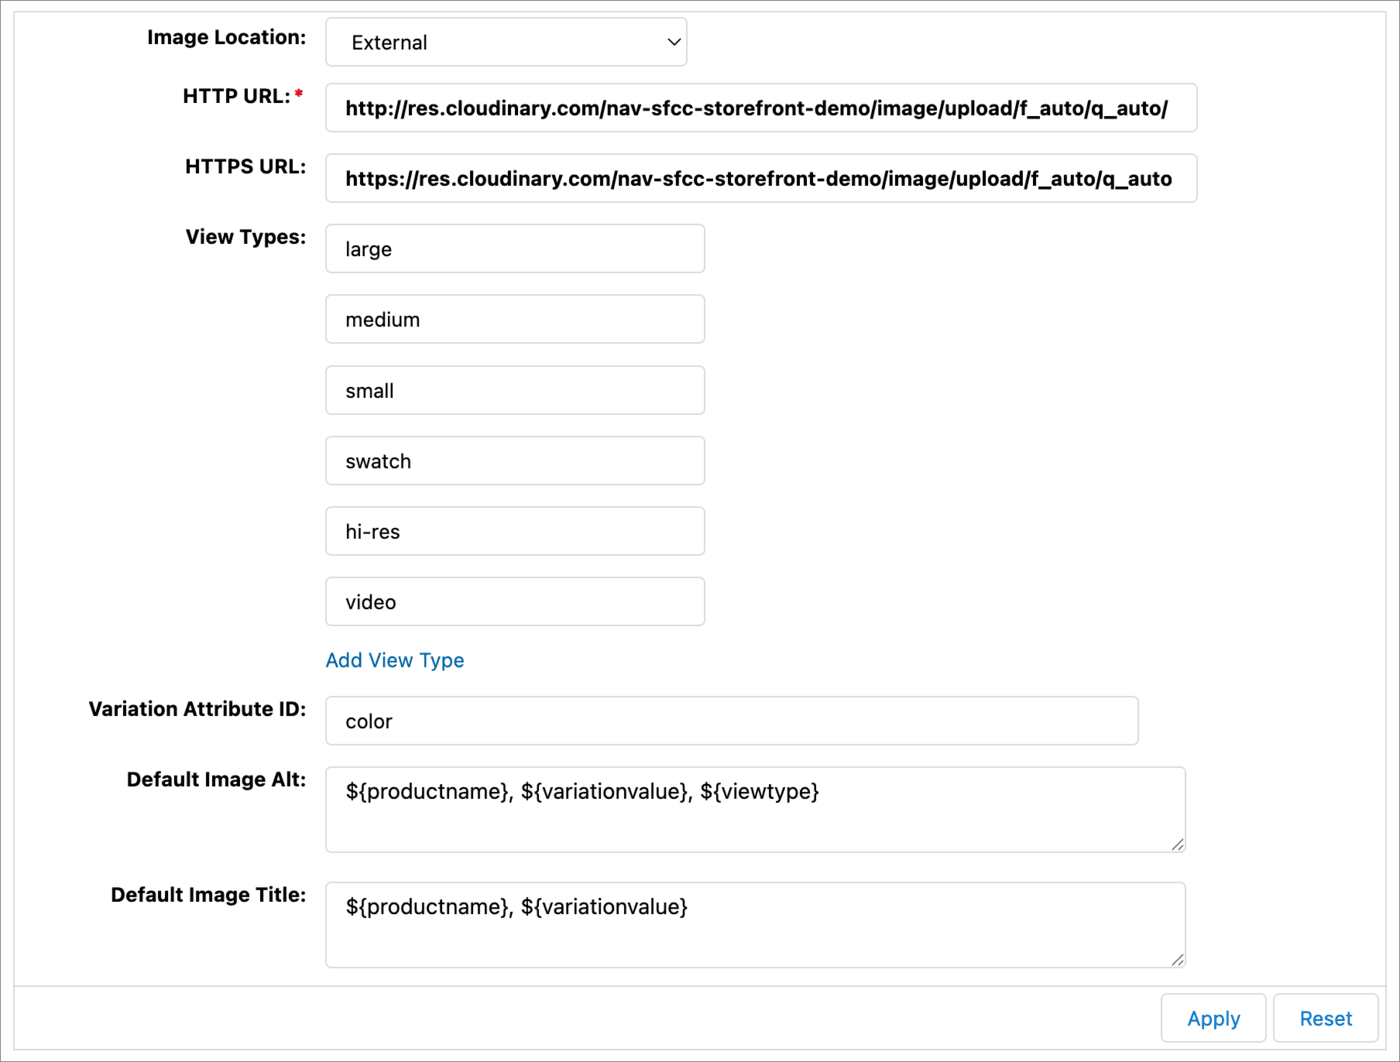
For each catalog, you can set an external URL for images as follows:
- Navigate to Merchant Tools > Products and Catalogs > Catalogs > (Your Catalog) > Edit > Image Settings.
- Set Image Location to
External. - Set HTTP URL and HTTPS URL to the common part of your Cloudinary image delivery URLs, for example:
https://res.cloudinary.com/mycloud/image/upload/f_auto/q_auto/,
orhttps://www.example.com/image/upload/f_auto/q_auto/. - Click Apply to save the settings.
This allows the process that produces the product feed to construct the full image path using HTTPS URL + Public ID.
Providing alt text for images
Alt text for images in Cloudinary's Product Gallery is configured as described in Setting alt text for assets in the Product Gallery.
For other pages, the alt text depends on which option you are using:
- For Option 1 - media directly uploaded to Cloudinary, the alt text that is specified in the
sfcc-alt-textstructured metadata field of the primary image in Cloudinary is used. The value of this field is imported into the CLD Alt Text For Images attribute in your product in SFCC when the Import Image Path and Alt Text job is run. This attribute can be inserted into the image tag used to display the image on your site.NoteCurrently the same alt text is used for each image in the product. - For Option 2 - media uploaded to SFCC and copied to Cloudinary, the alt text specified in SFCC for the view type is used.
Enabling Cloudinary on specific pages
You can choose on which pages you want to enable Cloudinary using the Cloudinary Image Page Type Settings custom preference. By default, Cloudinary is enabled on all built-in page types.
Set "enabled" to true or false for each page type, for example:
Product environments
Cloudinary offers support for multiple product environments, which enables you to effectively manage and isolate groups of media assets. This feature proves particularly useful when you need to separate assets based on various stages of your development and deployment process.
If you'd like to utilize multiple product environments, coordinate with your dedicated Cloudinary success manager. They can provide guidance and assistance on how to best leverage this functionality for your specific requirements.
Advanced Cloudinary features
You can incorporate advanced Cloudinary features in your app. For more information on configuring a Product Gallery, displaying videos, and applying transformations, see the Developer guide.
Commonly used Media Library features
With the B2C Commerce Cartridge installed, you can open your Cloudinary Media Library from Merchant Tools > Cloudinary Admin > Media Library. You can access almost all of the same functionality that is available in the full Media Library in your Cloudinary Console.
- Safari: The Safari browser may require additional steps when logging in to the Media Library. If you encounter an issue, follow the prompts to log in separately and attempt to open the Media Library again. Alternatively, use one of the other recommended browsers when working with Cloudinary.
-
Third-party cookies: Some browsers (such as Firefox) may block third-party cookies by default, which can prevent the Media Library Widget from functioning properly. Users may need to explicitly allow third-party cookies for the Cloudinary domain (
https://cloudinary.com) in their browser settings.
Advanced search
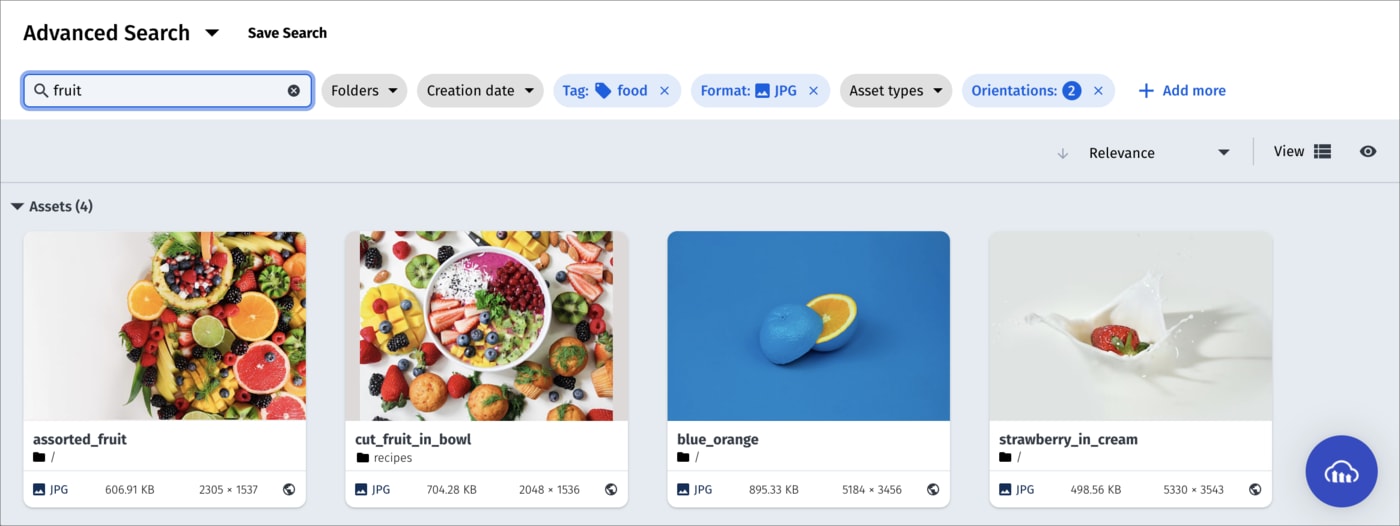
The Advanced Search feature lets you search by filters such as tags, metadata, format, orientation, resolution, or (if supported for your account), even by image analysis characteristics, such as prominent colors, presence of faces, or image location.
For more details, see Advanced Search in the Assets user guide.
Collections
Collections are ad-hoc groupings of assets. Assets can be added to and from collections without affecting or moving the asset itself, and assets can be included in multiple collections. You can create your own collections (assuming you have the required permissions) or other Cloudinary users can share collections with you. You can also share collections with external stakeholders by sending a URL to a dedicated collection webpage, which is available to those with a link during an optionally specified date range.
Collections can often be a convenient way to group all assets that you might want to use on a particular project or campaign.
For more details, see Collection management in the Assets user guide.
Tagging and metadata
Assets that have tags and other metadata enable all Media Library users to better organize and search for assets in the Media Library.
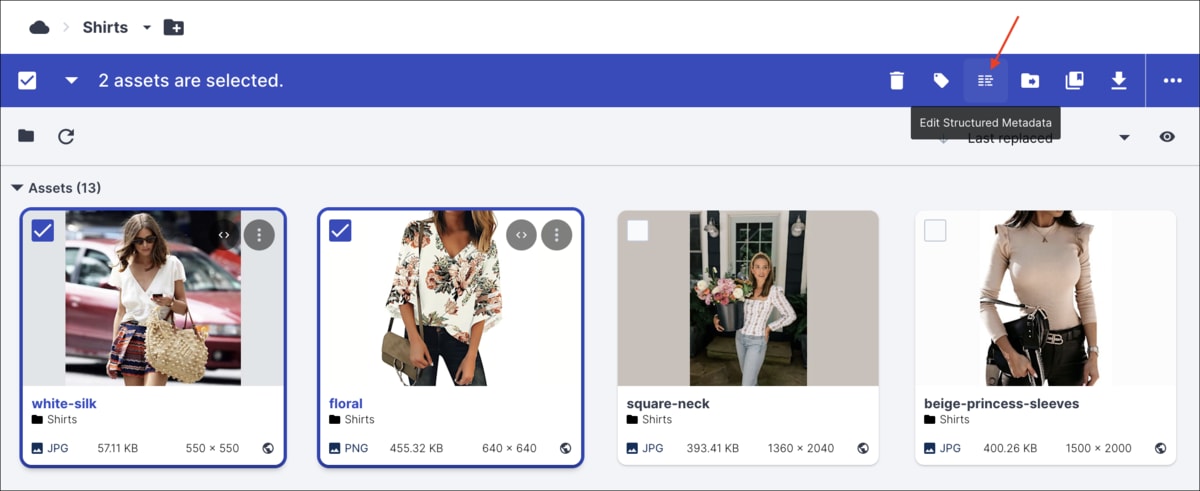
In addition to the option to specify tags when you upload an image or video, you can also add or edit tags and other metadata after images and videos are uploaded via the embedded Media Library, and even set the same tags or metadata on multiple images and videos at once.
You can view and set this data using the Asset toolbar or in the Asset management page.
Asset toolbar
You can set tags and metadata for several selected assets at once from the Media Library using the Tag or Edit Structured Metadata options in the asset toolbar. You can Edit Contextual Metadata via the (3-dot) options menu. The type of metadata available for editing (contextual or structured) depends on the setup for your organization's account.
Asset management page
You can view or edit tags and metadata as well as view embedded image metadata for a specific asset from the Summary and Metadata tabs of the Asset management page.
To open the Asset management page either double-click the asset or select Open from the asset's context (right-click) menu.
Media Editor
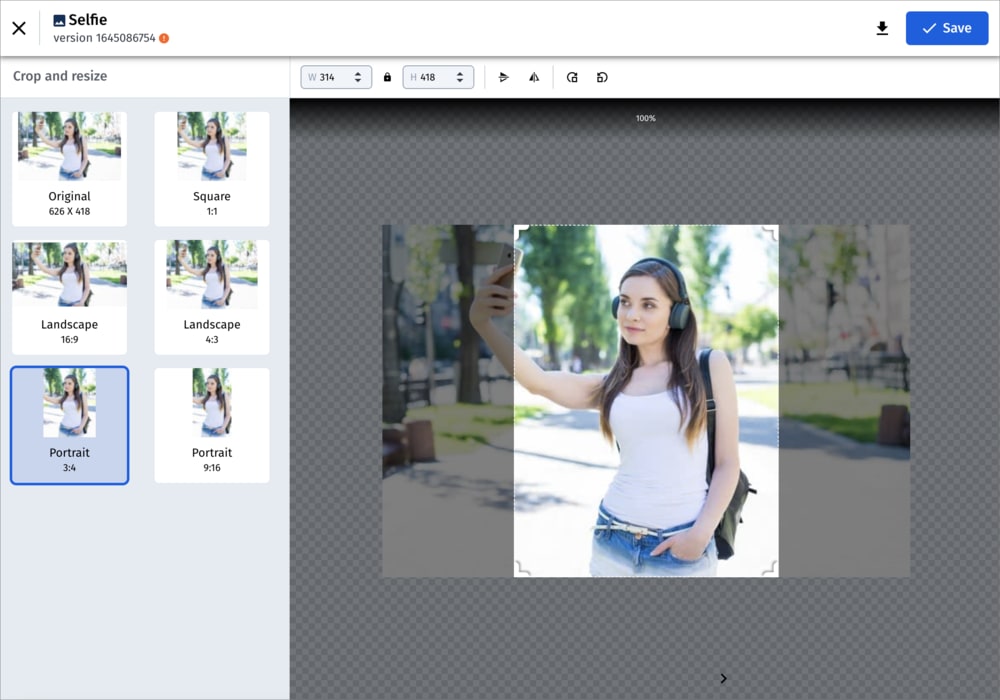
The Media Editor is only applicable to images and is accessible from the Asset management page, by clicking the Edit Image button.
In the Media Editor, you can crop and resize your image to suit your design. If you save the modified image, your current asset will be overwritten. You can retrieve the original if you have backups enabled. Otherwise, you may prefer to download the modified image and upload it as a new asset.
 Ask AI
