commercetools extension operational overview
Last updated: Feb-02-2026
Once the extension is set up, you can manage the content you display on your commercetools site via the Cloudinary Media Library. You can:
- Add Cloudinary assets to a new commercetools Product
- Update Cloudinary asset links to Products
- Publish assets
- Unpublish assets
- Stage assets - advanced feature
- Set or update an asset's position on the PDP
- Set or update alt-text and description
Add Cloudinary assets to a new commercetools Product
When you create a new Product in commercetools, you'll want to link Cloudinary images to it.
First, look up the new Product's SKU and keep the number accessible. Then, follow these steps in the Cloudinary Media Library:
- Upload the assets for the new Product to the Cloudinary Media Library.
- Switch to the Folders view using the tab at the top of the Media Library and navigate to, or add, the desired folder.
- Drag and drop the assets into the folder.NoteYou can also keep track of your assets by using tags.
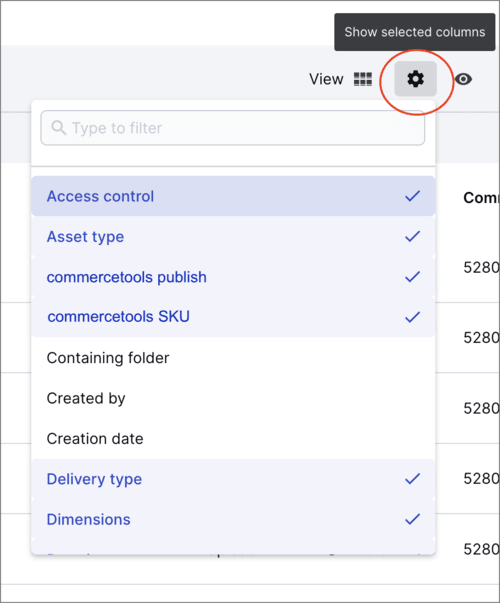
- Configure List view:
- Switch to List view by clicking the View icon.

- Click the Settings icon to select the columns you want to display.
 NoteThese settings are saved, so you only have to set this once for each page of the Media Library.
- Switch to List view by clicking the View icon.
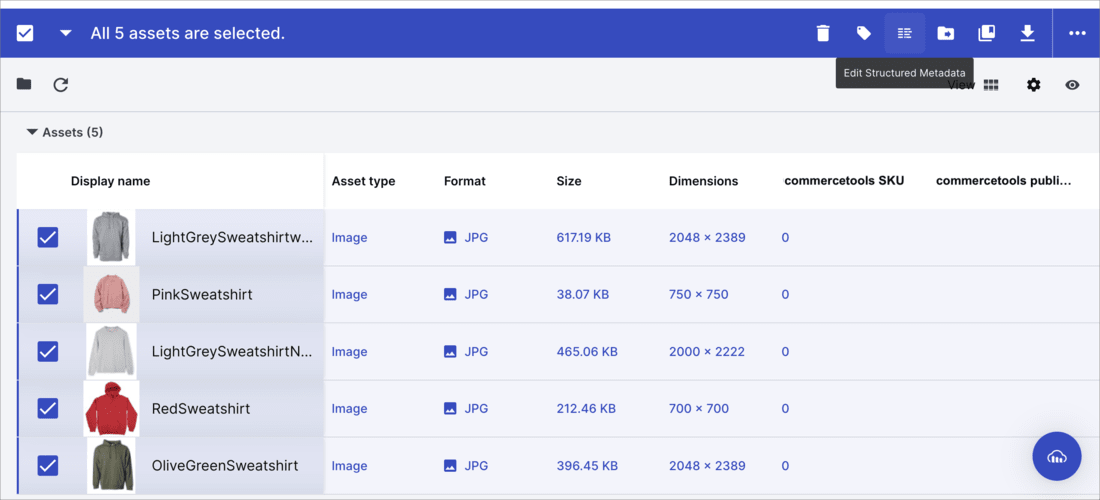
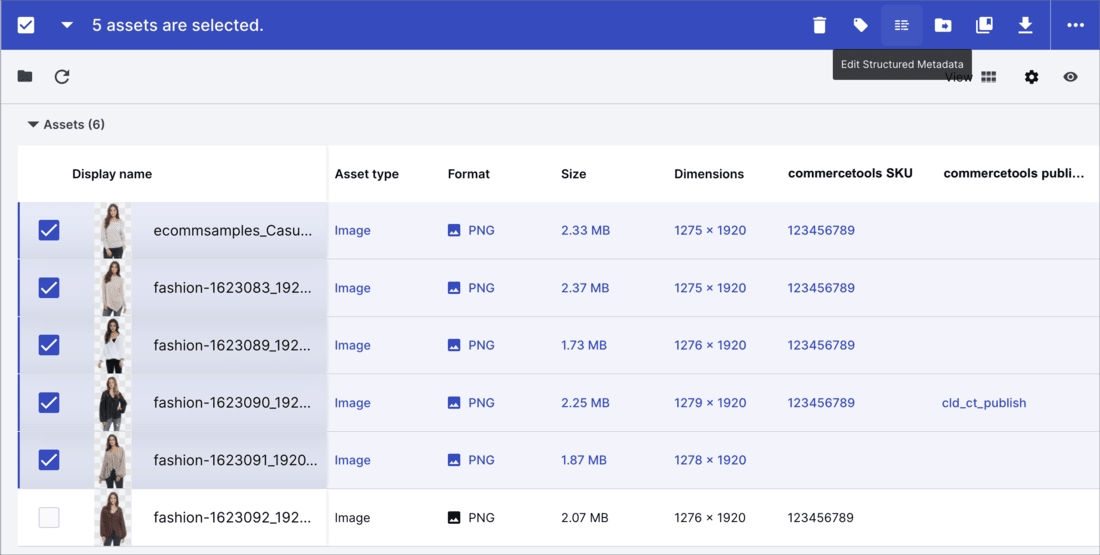
- Select all the assets you want to link to the new Product.
- From the asset toolbar, select Edit Structured Metadata to set the metadata for all selected assets.

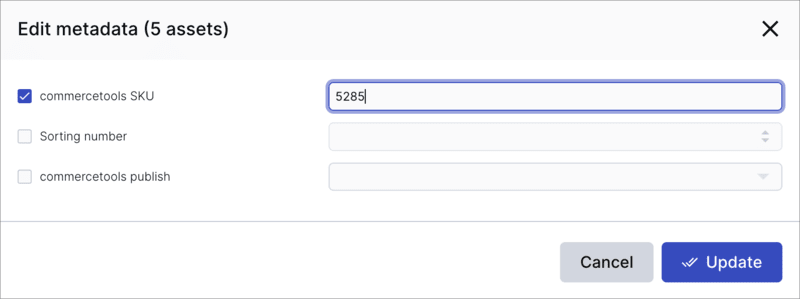
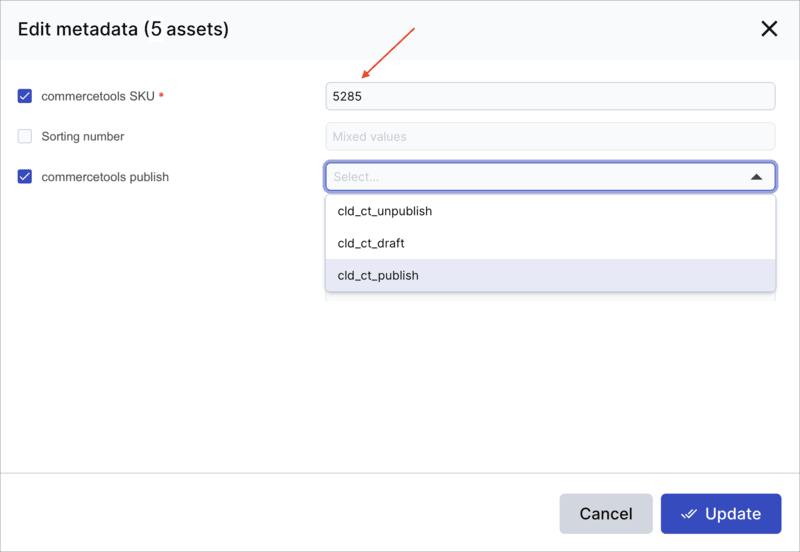
- The following dialog box opens showing all the structured metadata fields that are set up in your product environment:NoteYour product environment may contain additional fields to the ones shown here. However, it must contain fields similar to commercetools SKU and commercetools publish, possibly with somewhat different names.
 You can select any field you want and update its value. The new value will be applied to all the assets you selected.
- To link the assets to a Product, select the commercetools SKU field and enter the SKU of the commercetools Product you want to link the assets to.
- If you want to publish or stage the assets, set the commercetools publish field to cl_ct_publish or cl_ct_draft.
- Optionally change any other structured metadata fields that you want to set for all selected assets and click Update.
- To link the assets to a Product, select the commercetools SKU field and enter the SKU of the commercetools Product you want to link the assets to.
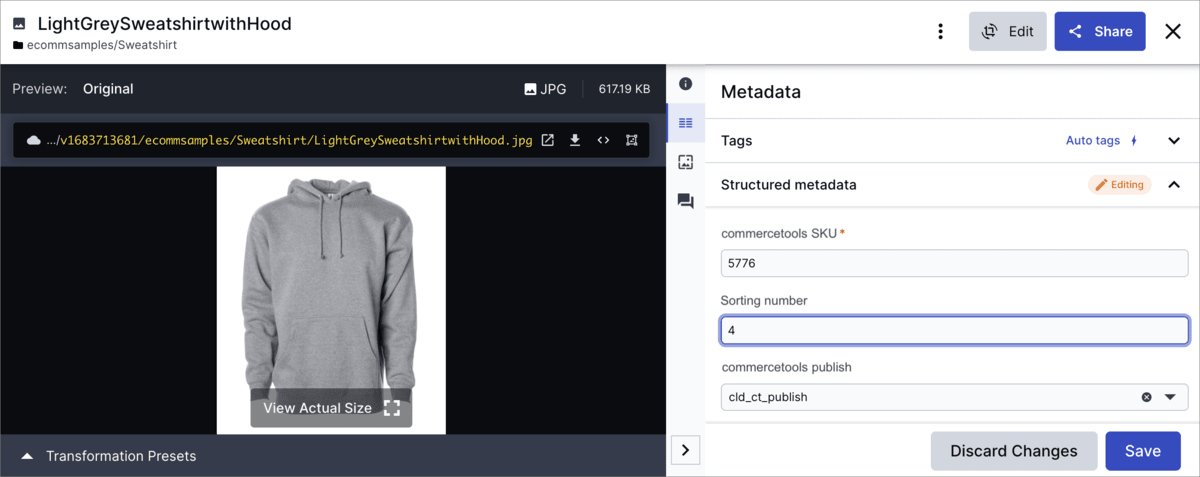
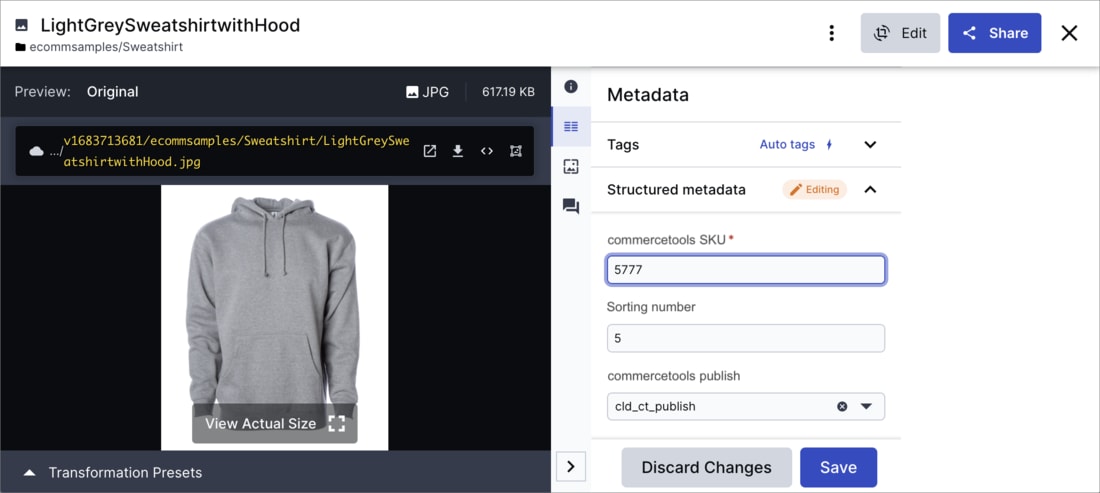
- Set the position on the PDP individually for each asset by clicking the asset to open the Manage page.
Click the Metadata tab, expand the Structured metadata section, and specify the desired value for the Sorting number.

Update Cloudinary asset links to Products
You can update which Product a Cloudinary asset is linked to. You can do this for multiple assets at a time, or for individual assets.
First, look up the SKU of the Product that you want to link your assets to and keep the number accessible. Then, follow these steps in the Cloudinary Media Library.
Update assets in bulk
- Switch to the Assets page using the tab at the top of the Media Library.
- Use the Folders filter to find the assets you want to update by their containing folder.NoteIf you use tags to keep track of your assets, you can use the Tags filter.
- Configure List view:
- Switch to List view by clicking the View icon.

- Click the Settings icon to select the columns you want to display.
 NoteThese settings are saved, so you only have to set this for each page of the Media Library.
- Switch to List view by clicking the View icon.
- Select all the assets you want to update.
- From the asset toolbar, select Edit Structured Metadata to update the metadata for all selected assets.

- The following dialog box opens showing all the structured metadata fields that are set up in your product environment:NoteYour product environment may contain additional fields to the ones shown here. However, it must contain fields similar to commercetools SKU and commercetools publish, possibly with somewhat different names.
 You can select any field you want and update its value. The new value will be applied to all the assets you selected.
- To update the Product link, select the commercetools SKU field and enter the SKU of the commercetools Product you want to link the assets to.
- To publish the assets, set the commercetools publish field to cl_ct_publish.
- To unpublish the assets, set the commercetools publish field to cl_ct_unpublish.
- To stage the assets (advanced feature), set the commercetools publish field to cl_ct_draft.
- Optionally change any other structured metadata fields that you want to set for all selected assets and click Update.
Update assets individually
To update an individual asset's link to a Product, click the asset to open the Manage page, select the Metadata tab, expand the Structured metadata section, and specify the SKU of the Product you want to link to.
Publish assets
Once your assets are approved and ready, you can publish them to commercetools. They'll then be automatically displayed on your app or website according to the Product that they're linked to. The assets will also appear on the Variations > Images page of the Merchant Center.
To publish assets in bulk, follow these steps.
To publish an individual asset, click the asset to open the Manage page, select the Metadata tab, expand the Structured metadata section, and set the commercetools publish field to cl_ct_publish.
Unpublish assets
If you want to take assets off production, you can do so by unpublishing them.
To unpublish assets in bulk, follow these steps.
To unpublish an individual asset, click the asset to open the Manage page, select the Metadata tab, expand the Structured metadata section, and set the commercetools publish field to cl_ct_unpublish.
Stage assets - advanced feature
If you want to stage assets linked to a Product but not have them appear in production, you can set the assets as drafts. The assets will then appear on the Variations > Images page of the Merchant Center.
To stage assets in bulk, follow these steps.
To stage an individual asset, click the asset to open the Manage page, select the Metadata tab, expand the Structured metadata section, and set the commercetools publish field to cl_ct_draft.
- If your assets are already published and you want to move them to staging, you must first unpublish the assets and then stage them, otherwise they'll will remain in production.
- The commercetools extension provides one-way synchronization from Cloudinary to commercetools, and changes that you make to assets in the Merchant Center won't be updated on Cloudinary.
Set or update an asset's position on the PDP
You can determine the order that your Product assets appear on the PDP.
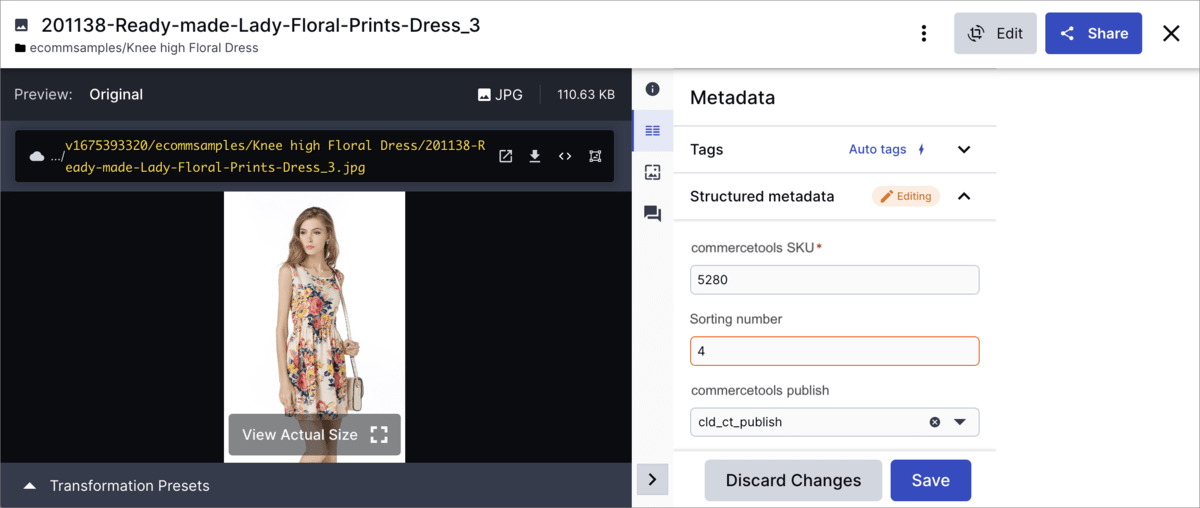
- Set the position on the PDP individually for each asset by clicking the asset to open the Manage page, clicking the Metadata tab, expanding the Structured metadata section, and specifying the desired Sorting number.

Set or update alt-text and description
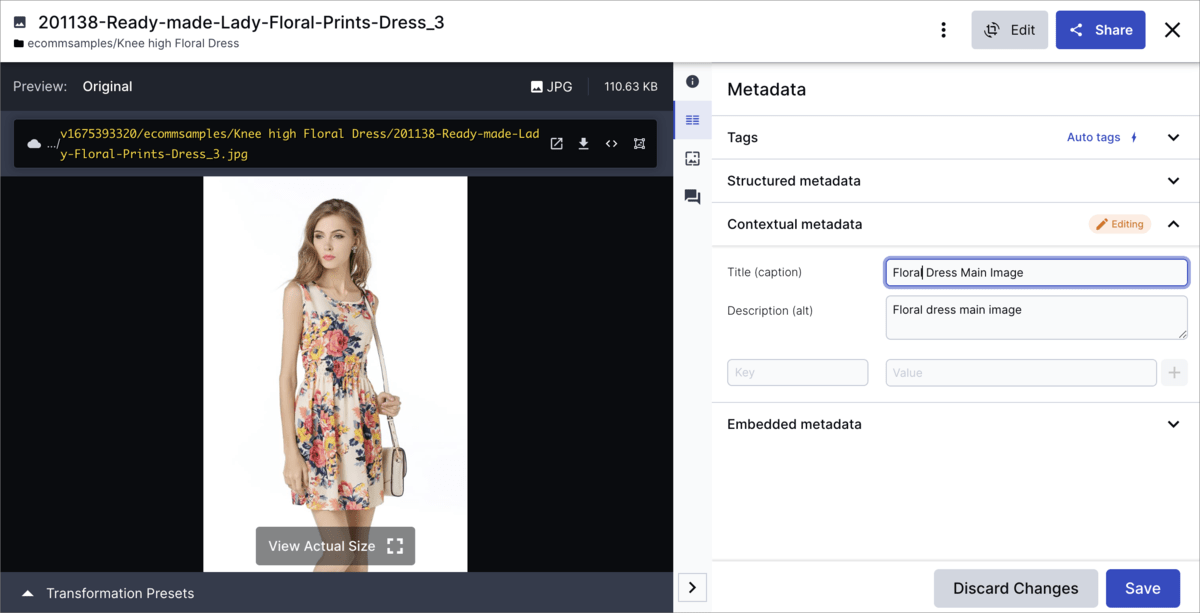
You can set the alt-text of the commercetools Product Asset via Cloudinary.
 Ask AI

