SCIM provisioning setup for Cloudinary with IdP (Okta)
Last updated: Feb-02-2026
Overview
This guide provides a step-by-step walkthrough for configuring SCIM (System for Cross-domain Identity Management) provisioning to integrate your Identity Provider (IdP), such as Okta, with Cloudinary. SCIM provisioning automates user and group synchronization, ensuring that any changes in your IdP are reflected in Cloudinary without manual updates. This integration reduces administrative overhead and supports secure, consistent user and group management, particularly for organizations with large or frequently updated user bases.
1. Prerequisites
Ensure you have access to the following:
- Admin access to Okta.
- Client ID and Client Secret for secure integration, which you can obtain from your Customer Success Manager (CSM).
2. Create a custom app
Follow these steps to create a custom app in Okta:
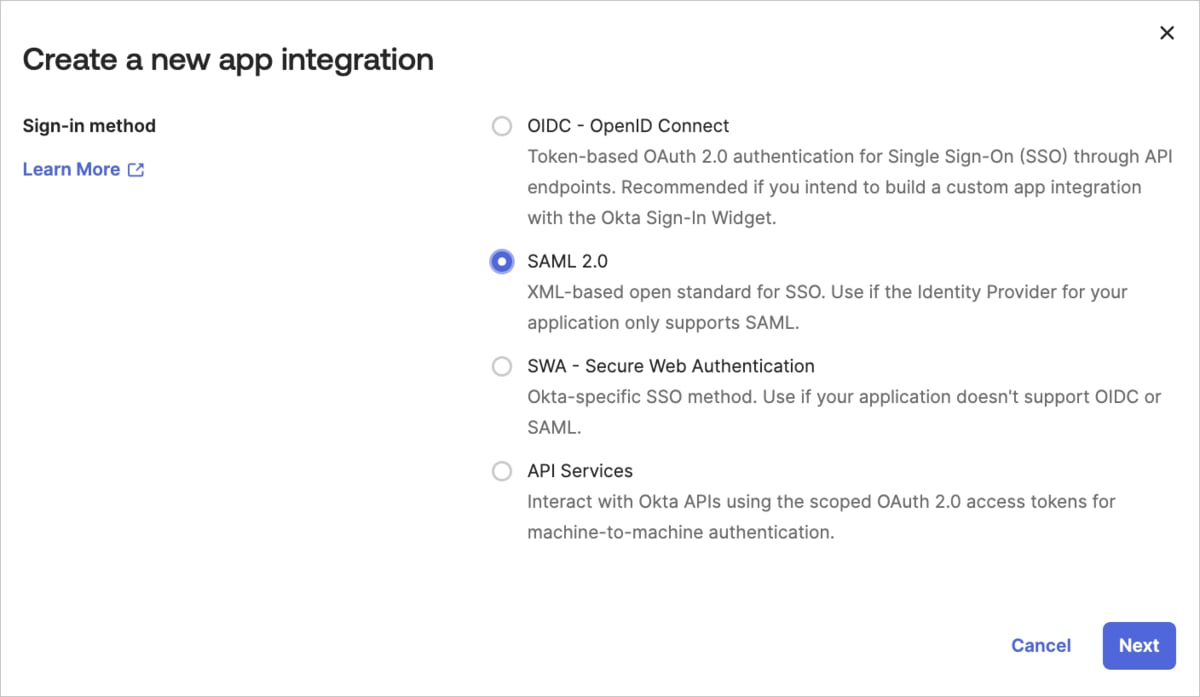
- Create a new SAML 2.0 Web application (e.g., in the Okta Admin console, select Applications from the Applications menu, click Create App Integration, and select SAML 2.0 as the Sign-in method).
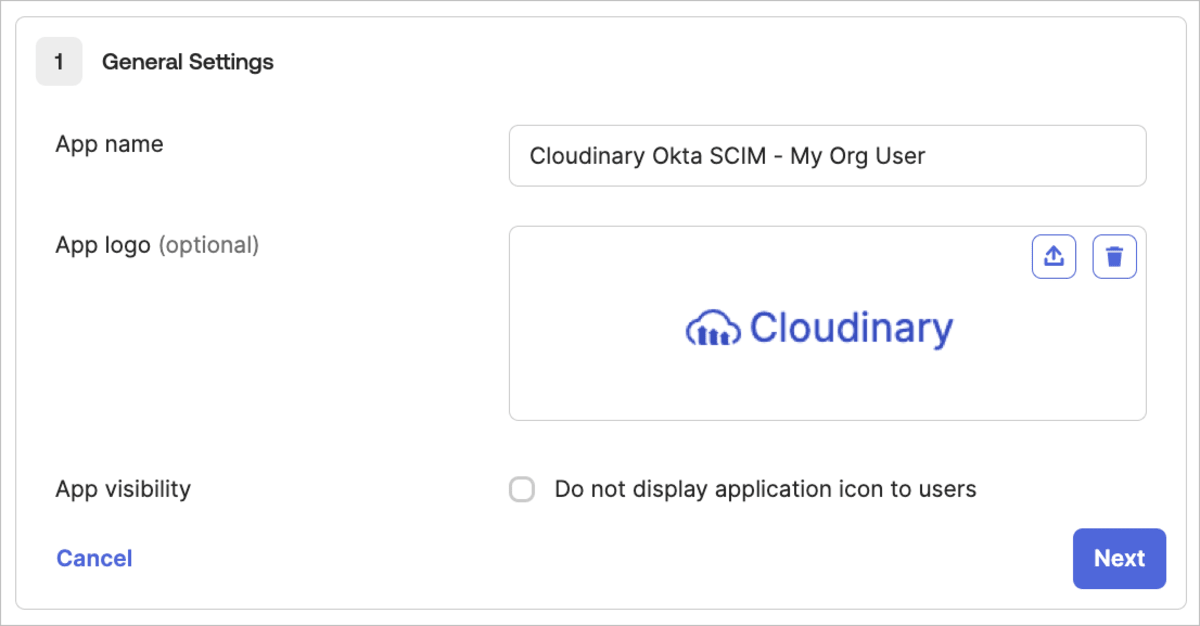
- Give your app a name (e.g., Cloudinary Okta SCIM - My Org), and then optionally select a logo and visibility options (you can download a Cloudinary logo from our Cloudinary logo kit).
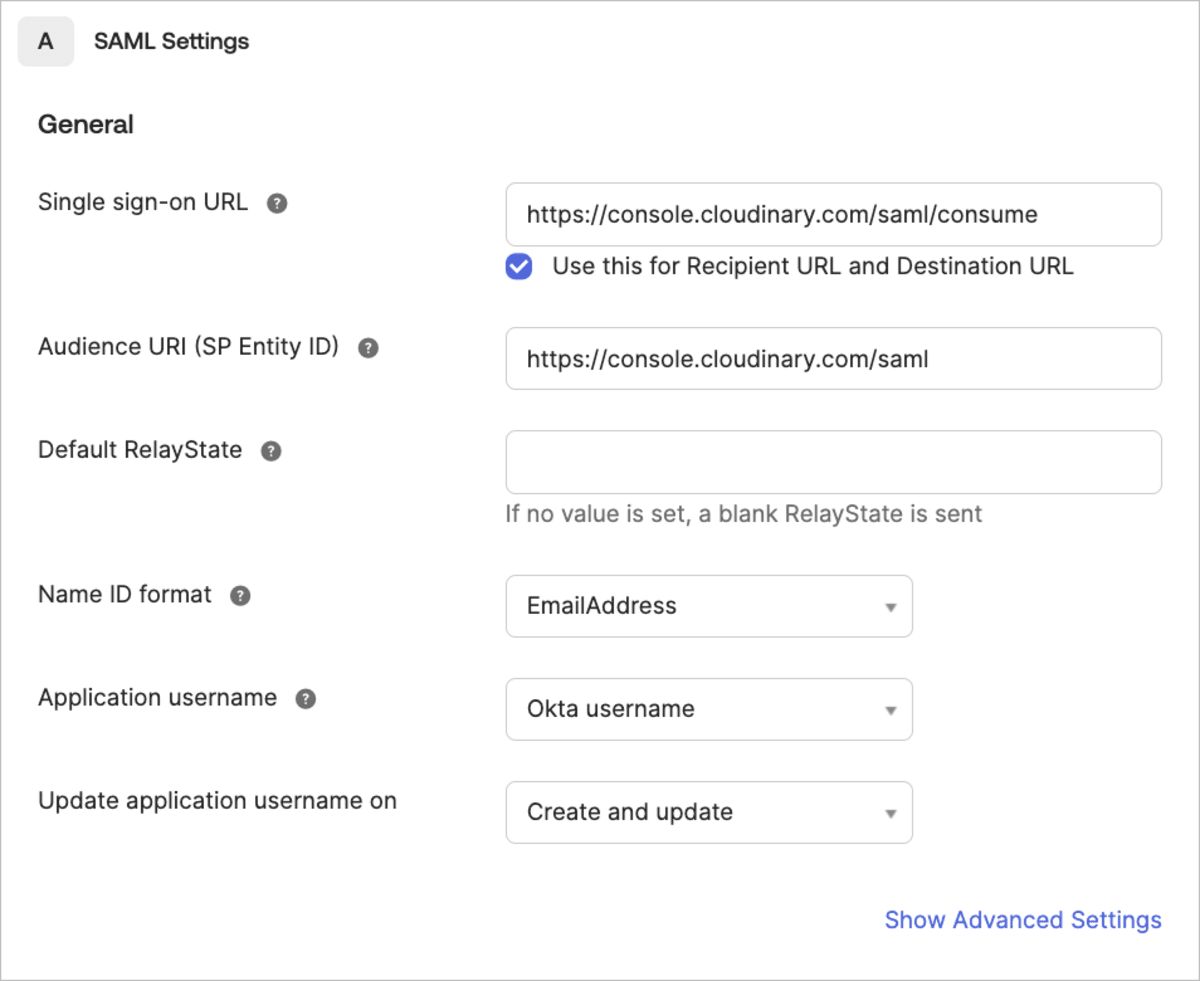
- Configure SAML settings as follows:
- Enter
https://console.cloudinary.com/saml/consumeas the Single sign on URL for both the Recipient URL and the Destination URL. - Enter
https://console.cloudinary.com/samlas the Audience URI. - Select
EmailAddressas the Name ID format.

- Click Show Advanced Settings, then add
cloudinary.com/saml/consumeunder Other Requestable SSO URLs.

- Click Next at the bottom of the page.
- Enter
- Optionally add Feedback and click Finish when done.
3. Initial configuration steps
Access provisioning settings
- In Okta, go to Applications > Applications in the left-hand menu.
- In the main panel, select Cloudinary Okta SCIM - My Org User (or your Cloudinary application name).
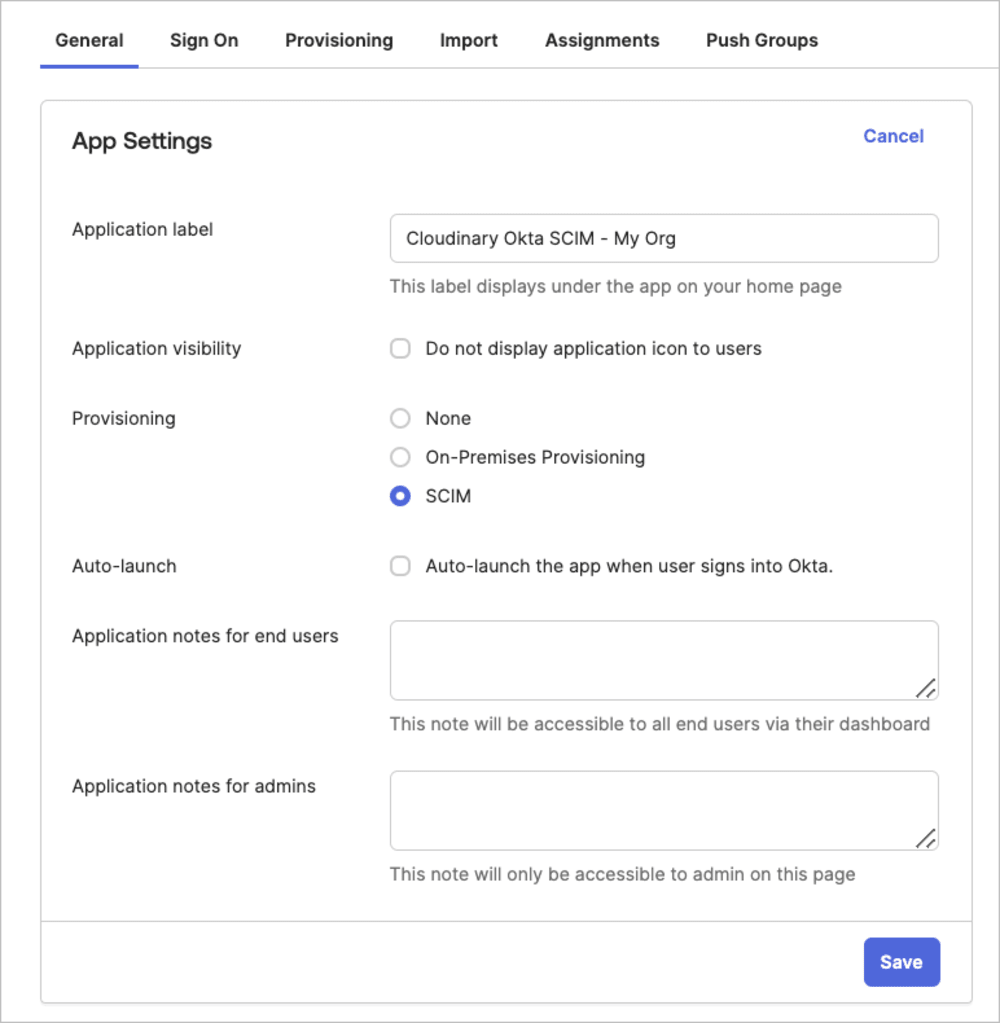
- Select the General tab for the Cloudinary application.
- Under App Settings, select SCIM as the Provisioning scheme and Save.
Set SCIM base URL, feature settings, and authentication
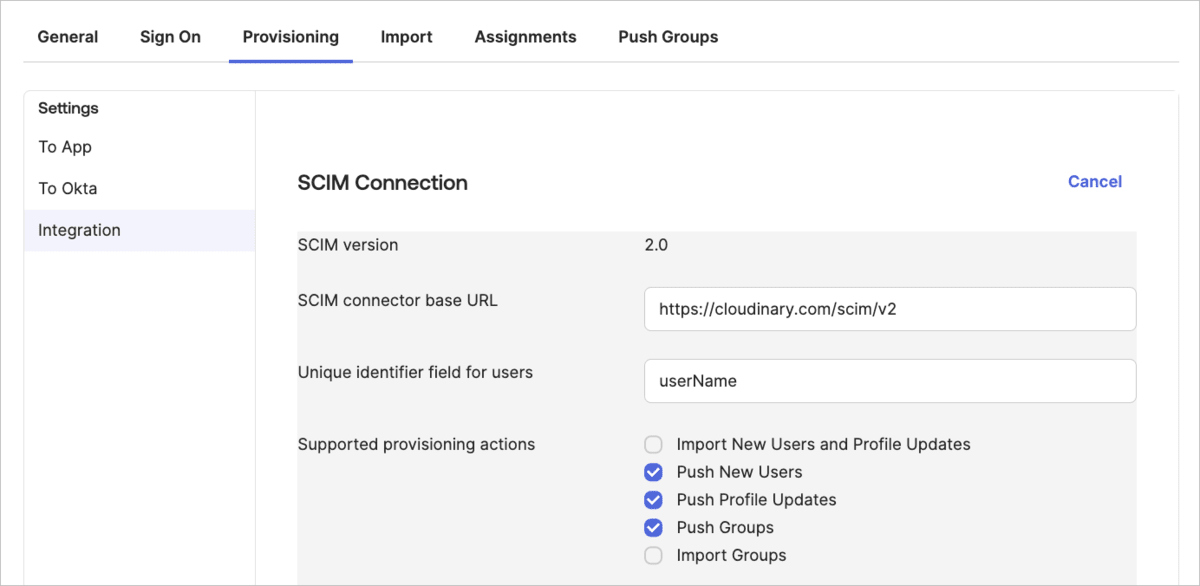
- In Okta, select the Provisioning tab for the Cloudinary application and select Integration from the left-hand menu.
- Set the SCIM connector base URL to
https://cloudinary.com/scim/v2. - Set the Unique identifier field for users as
userName(case-sensitive). - Enable SCIM features by selecting the checkboxes under Supported provisioning actions:
- Choose Push New Users, Push Profile Updates, and Push Groups (optional but recommended for group synchronization), along with any additional actions that suit your organization's needs.
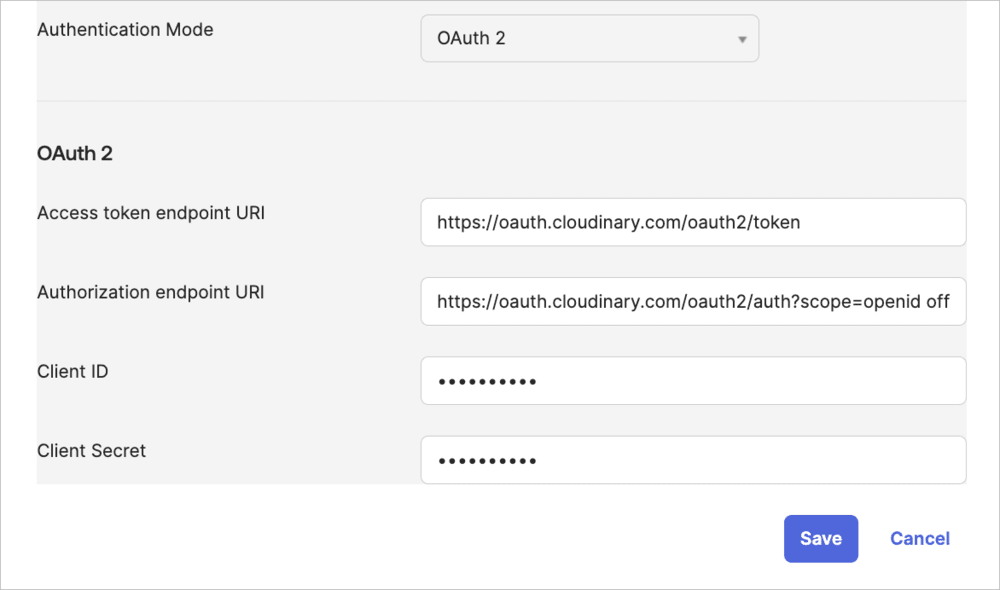
- Choose OAuth 2 as the Authentication Mode.
- Register your variable name:
- Authenticate the app:
- Go to Applications > Applications in the left-hand menu.
- In the main panel, select Cloudinary Okta SCIM - My Org User (or your Cloudinary application name).
- Select the Provisioning tab, and from the Settings menu in the main panel, select Integration.
- Scroll down and click Authenticate with Cloudinary Okta SCIM - My Org (or your Cloudinary application name) and follow the authentication process.
- The following screen will open in a browser window. Click ACCEPT ACCESS.
Configure Cloudinary application custom attributes
Set up the product_environments and role custom attributes for users in your Cloudinary application. Manually add these fields in the Profile Editor.
In Okta, go to Directory > Profile Editor in the left-hand menu.
From the Users tab, select Cloudinary Okta SCIM - My Org User (or your Cloudinary application name).
-
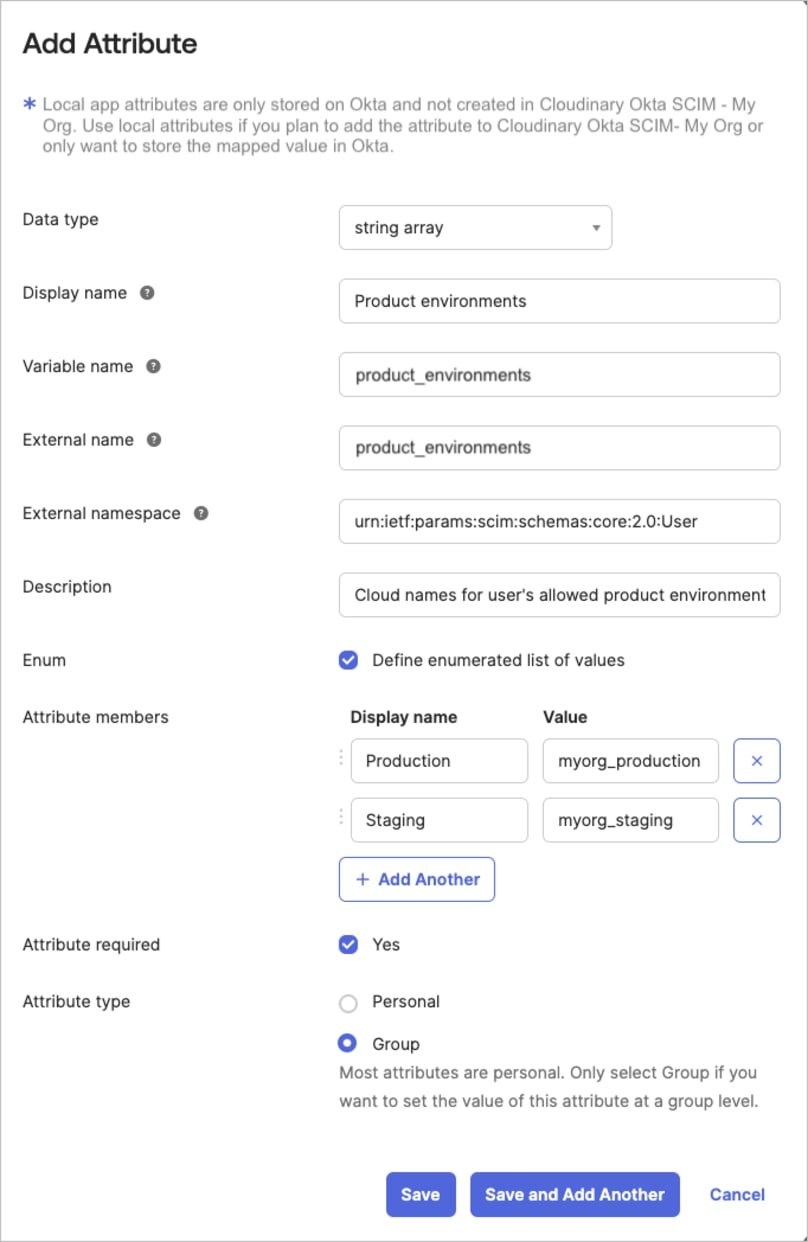
Click + Add Attribute and set up the product_environments attribute with the following:
-
Data type:
string array -
Display name:
Product environments(or any display name that's clear to you) -
Variable name:
product_environments(or any variable name that's clear to you. The Cloudinary variable name will be automatically added as a prefix.) -
External name:
product_environments(copy this exactly) -
External namespace:
urn:ietf:params:scim:schemas:core:2.0:User -
Description:
Cloud names for user's allowed product environments(or any description that's clear to you) - Select Define enumerated list of values
- Attribute members: For the Values, enter the cloud names of all the product environments in your account
- Select Attribute required
-
Attribute type:
Group(optional)NoteSetting this toGroupallows the value to be inherited from the Okta group to all its users. See Enable group inheritance for Cloudinary custom attributes. - Click Save and Add Another
-
Data type:
-
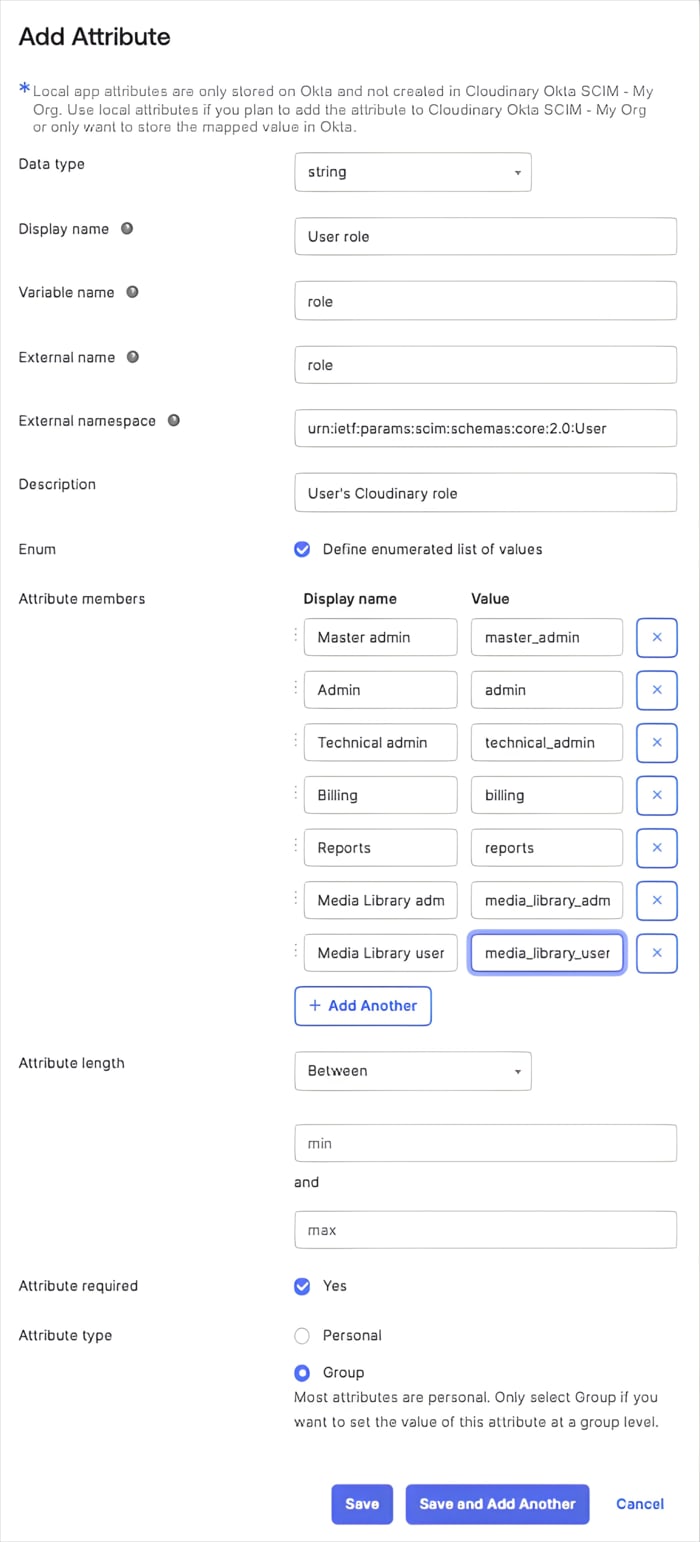
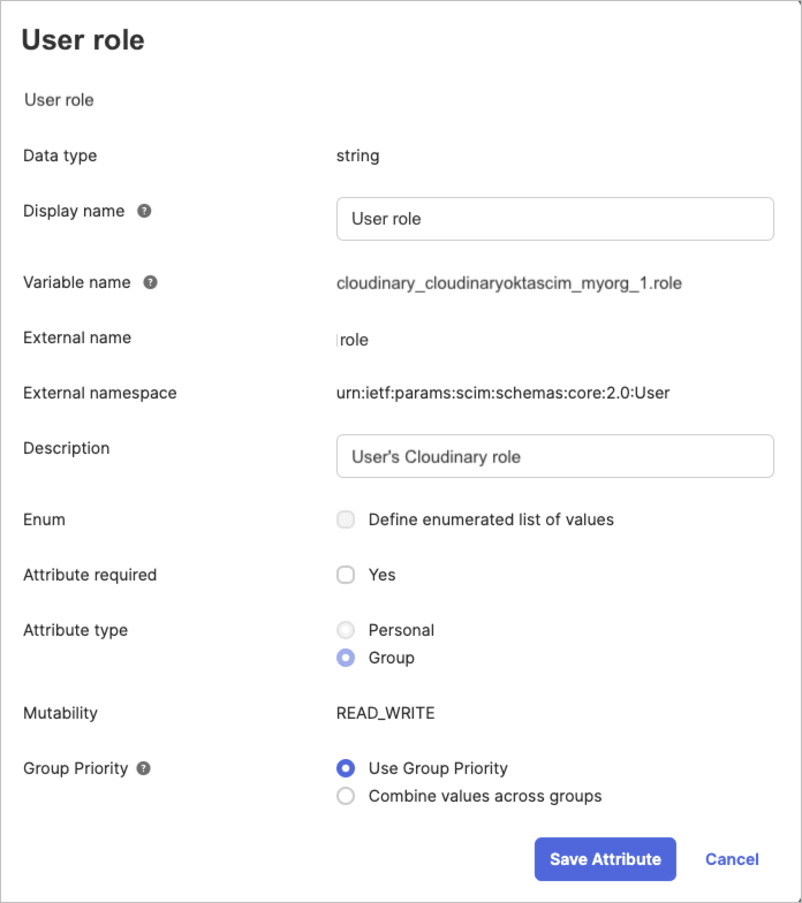
Set up the role attribute with the following:
-
Data type:
string -
Display name:
User role(or any display name that's clear to you) -
Variable name:
role(or any variable name that's clear to you. The Cloudinary variable name will be automatically added as a prefix.) -
External name:
role -
External namespace:
urn:ietf:params:scim:schemas:core:2.0:User -
Description:
User's Cloudinary role(or any description that's clear to you) - Select Define enumerated list of values
-
Attribute members: Enter all the Cloudinary user roles as values, with display names that make sense to you:
-
master_admin,admin,technical_admin,billing,reports,media_library_admin,media_library_userTipTo find out what permissions are granted for each role, see Permissions for the Assets digital asset management product, Permissions for Cloudinary Image and Video (Programmable Media), and Permissions for Console Settings.
-
- Select Attribute required
-
Attribute type:
Group(optional)NoteSetting this toGroupallows the value to be inherited from the Okta group to all its users. See Enable group inheritance for Cloudinary custom attributes. - Click Save
-
Data type:
Enable provisioning
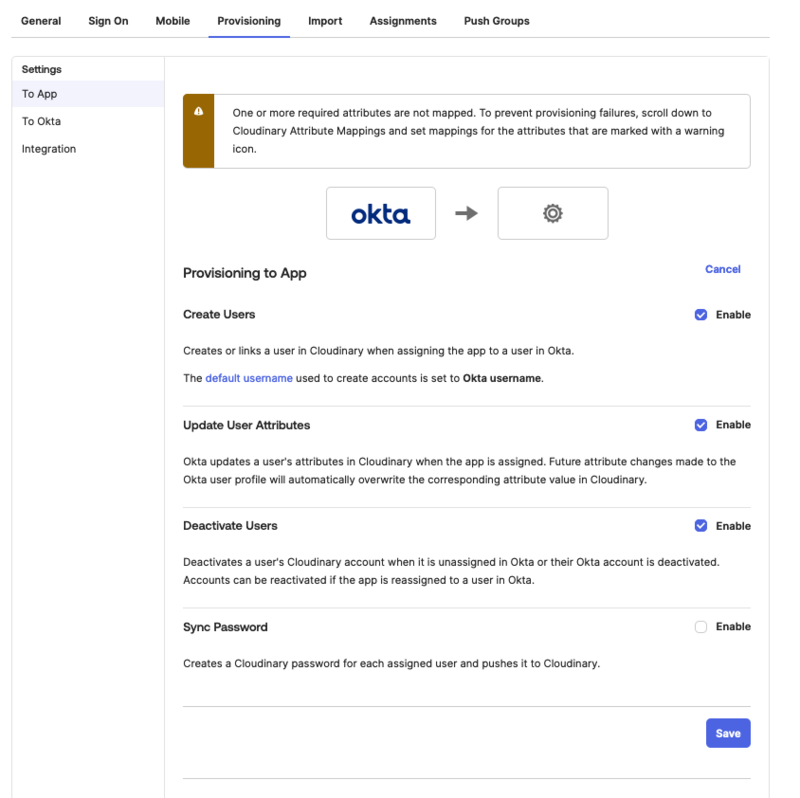
Enable provisioning in terms of user creation, upadate user attributes, and deactivate user to Cloudinary from Okta.
- In Okta, go to Applications > Applications in the left-hand menu.
- In the main panel, select Cloudinary Okta SCIM - My Org User (or your Cloudinary application name).
- Select the Provisioning tab, and from the Settings menu in the main panel, select To App.
- Enable Create Users, Update user Attributes, and Deactivate Users.
Optional configurations
Set Cloudinary custom attributes during Okta user creation
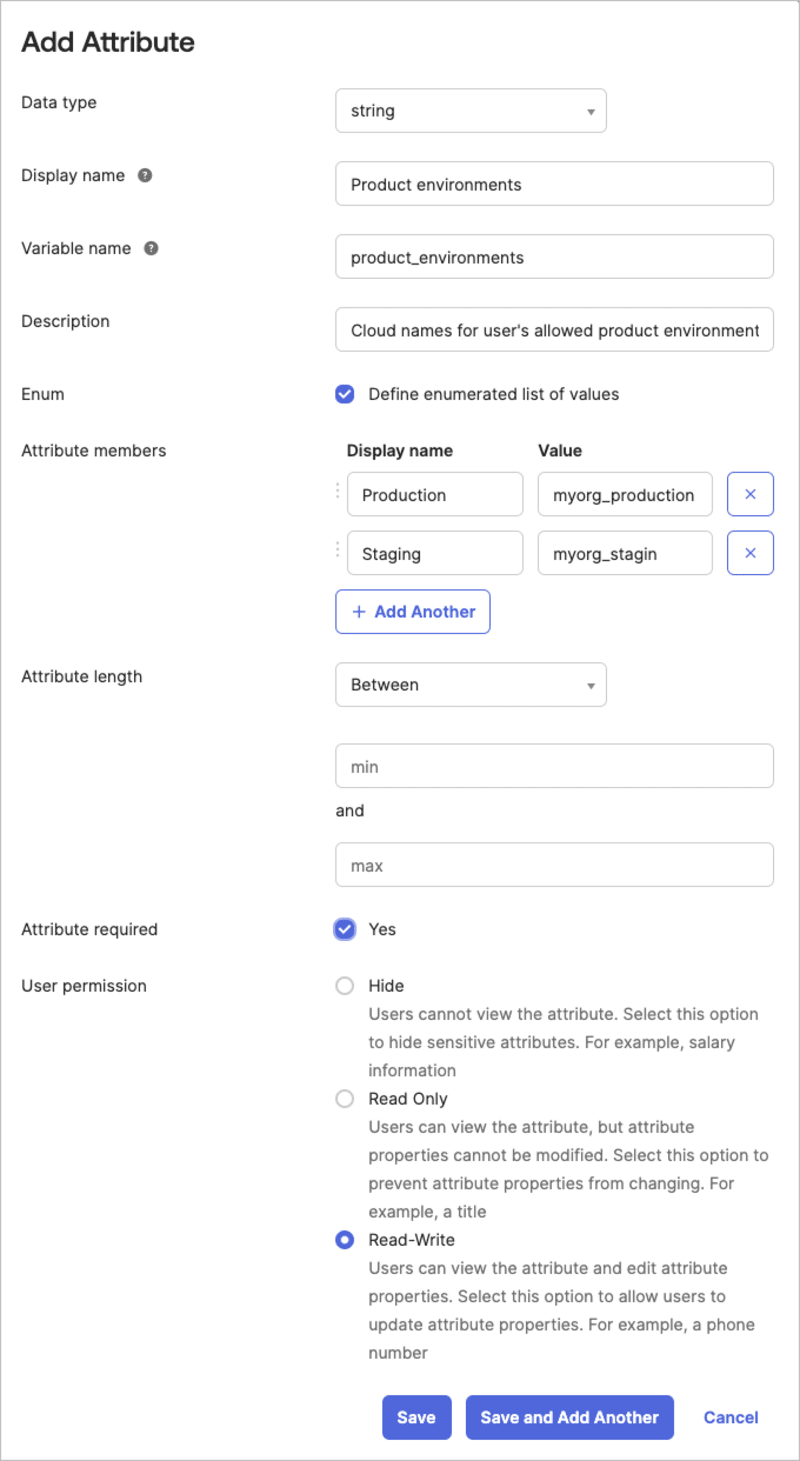
To allow setting a user’s permitted product environments and Cloudinary role during Okta user creation, configure these as default user attributes in Okta. Next, map the Cloudinary app custom attributes to these Okta attributes. Otherwise, you’ll need to manually enter these values when assigning users to Cloudinary.
To configure the product_environment and cld_role Okta User (default) attributes:
- Select Directory > Profile Editor from the left-hand menu.
- Select Okta User (default) from the Users tab.
- Click + Add attribute and set up the product_environments attribute with the following:
-
Data type:
string array -
Display name:
Product environments(or any display name that's clear to you) -
Variable name:
product_environments(copy this exactly) -
Description:
Cloud names for user's allowed product environments(or any display name that's clear to you) - Select Define enumerated list of values
- Attribute members: For the Values, enter the cloud names of all the product environments in your account.
- Select Attribute required
- User permission: Select Read-Write
- Click Save and Add Another
-
Data type:
- Set up the cld_role attribute with the following:
-
Data type:
string -
Display name:
Cloudinary role(or any display name that's clear to you) -
Variable name:
cld_role(copy this exactly) -
Description:
User's Cloudinary role(or any display name that's clear to you) - Select Define enumerated list of values
-
Attribute members: Enter all the Cloudinary user roles as values, with display names that make sense to you:
-
master_admin,admin,technical_admin,billing,reports,media_library_admin,media_library_userTipTo find out what permissions are granted for each role, see Permissions for the Assets digital asset management product, Permissions for Cloudinary Image and Video (Programmable Media), and Permissions for Console Settings.
-
- Select Attribute required
- User permission: Select Read-Write
- Click Save
-
Data type:
To map the product_environment and role Cloudinary user custom attributes to your Okta user default attributes:
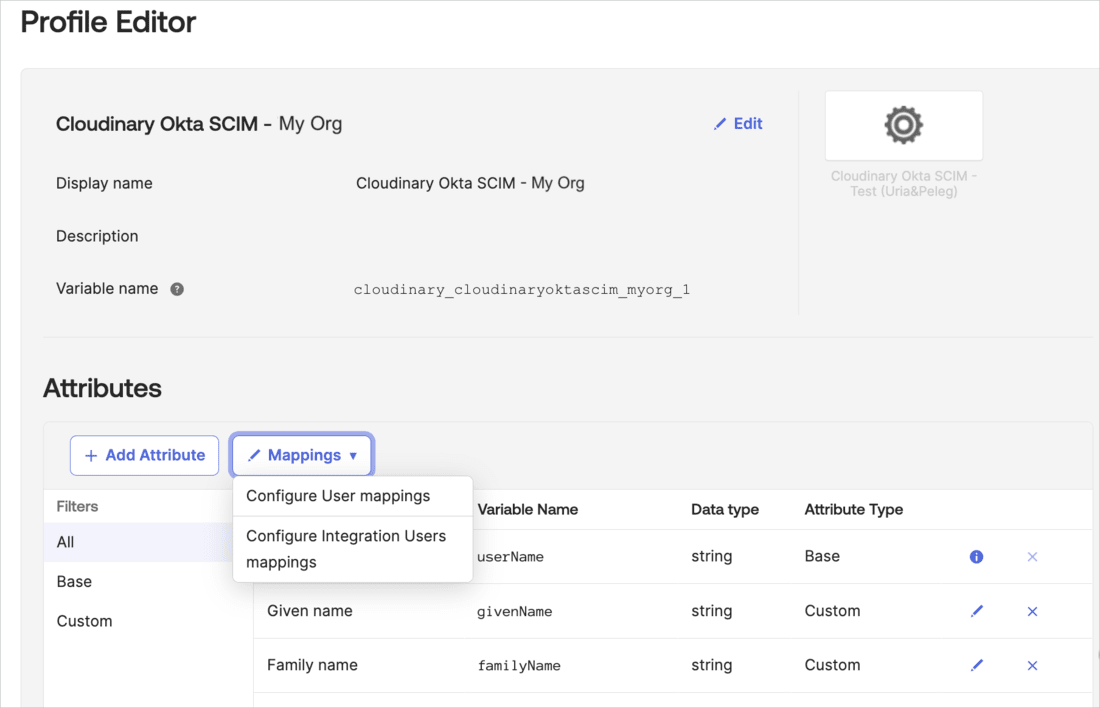
- Click Back to profiles, or select Directory > Profile Editor from the left-hand menu.
- From the Users tab, select Cloudinary Okta SCIM - My Org User (or your Cloudinary application name).
- Click Mappings, and then select Okta User to Cloudinary Okta SCIM - My Org.
- Scroll down to find your custom attributes.
- Enter the mapping in the textbox to the left of each attribute:
Enable group inheritance for Cloudinary custom attributes
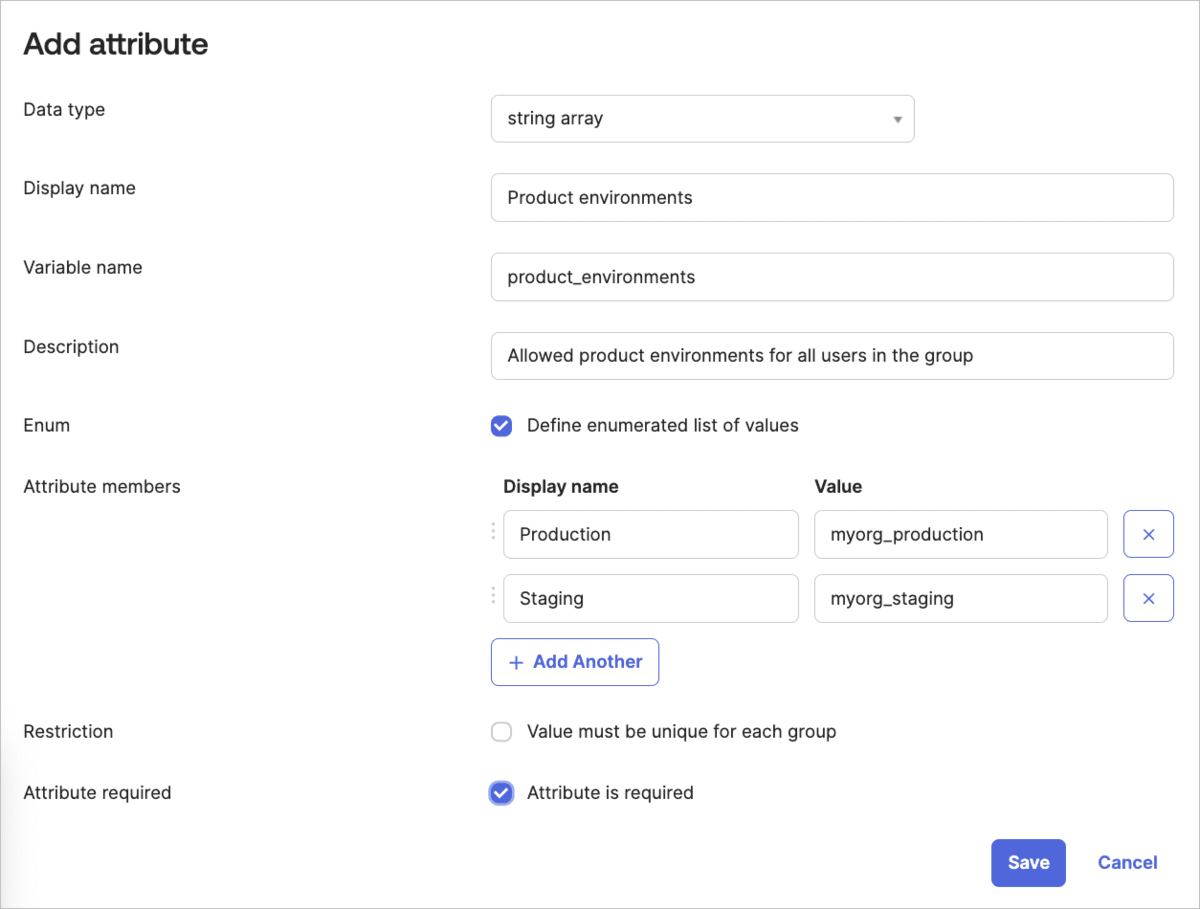
If you want the Cloudinary application user roles and allowed product environments to be inherited from the Okta group they belong to, you'll need to configure the product_environments and cld_role custom attributes for groups. Otherwise, you’ll need to manually set these values when assigning users to Cloudinary.
- Select Directory > Profile Editor from the left-hand menu.
- Select the Groups tab and select Okta group.
- Click + Add attribute and set up the product_environment attribute with the following:
-
Data type:
string array -
Display name:
Product environments(or any display name that's clear to you) -
Variable name:
product_environments(copy this exactly) -
Description:
Allowed product environments for all users in the group(or any description that's clear to you) - Select Define enumerated list of values.
- Attribute members: For the Values, enter the cloud names of all the product environments in your account.
- Select Attribute required
-
Data type:
- Make sure that the User role Cloudinary custom attribute for any specific user inherits the prioritized group value, and that the Product environments custom attribute inherits a combined list of product environments from all assigned groups:
- Click Back to profiles or click Directory > Profile Editor from the left-hand menu.
- From the Users tab, select Cloudinary Okta SCIM - My Org User (or your Cloudinary application name).
- Scroll down to the Role Cloudinary custom attribute and click the pencil icon to edit it.
- Make sure Use Group Priority is selected.
- Click Save Attribute.
- Scroll down to the Product environments Cloudinary custom attribute and click the pencil icon to edit it.
- Make sure Combine values across groups is selected and Save Attribute.
4. User and group synchronization
Here's an overview of all the available actions you can perform to initiate user and group syncing. For implementation instructions, click the link for each action, or scroll down:
Assign users from Okta to Cloudinary to establish a link, ensuring any changes in Okta automatically sync to Cloudinary. You can assign multiple users at a time by assigning all users in an Okta group to Cloudinary.
-
Push Okta groups to Cloudinary to copy the group structure and establish a link, ensuring that any changes to the groups in Okta automatically sync to Cloudinary.
You can also manage links for groups that have existing links to Cloudinary.
-
Import users from Cloudinary to Okta to:
- Create and link Cloudinary users in Okta. Once linked, any changes to these users in Okta sync automatically to Cloudinary. ImportantThere's no automatic sync between changes to users in Cloudinary to users in Okta.
- Sync user updates from Cloudinary to Okta.
- Manually import new Cloudinary users to Okta.
- Create and link Cloudinary users in Okta. Once linked, any changes to these users in Okta sync automatically to Cloudinary.
Set up periodic automatic syncing to regularly bring new Cloudinary users into Okta and sync any updates made to existing users in Cloudinary.
- Select Applications > Applications in the left-hand menu.
- In the main panel, select Cloudinary Okta SCIM - My Org User (or your Cloudinary application name).
- Select the tab as described for each action.
Assign users from Okta to Cloudinary
Assigning users from Okta to Cloudinary establishes a link between them. Any subsequent changes to linked users in Okta will automatically sync to Cloudinary.
To assign users from Okta to Cloudinary:
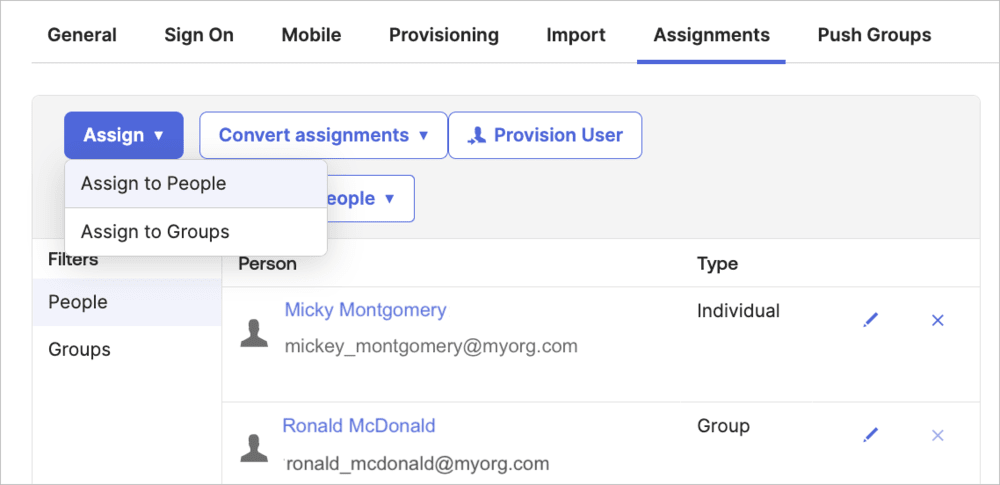
- In Okta, select the Assignments tab for the Cloudinary application.
- Click Assign and select Assign to People.
- From the popup, click Assign next to the user you want to sync to Cloudinary.
- Fill in the form with all the fields for that user and save. Fields relevant in Okta but not applicable in Cloudinary will be ignored.
- If you set up the optional configurations, the Product environments attribute (with external ID product_environments) and User role attribute (with external ID role) will contain the corresponding value of the Okta user or group.
- If you didn't set up the optional configurations, you'll need to fill in values for those attributes now.
- Repeat steps 3-4 for all the users you want to sync.
Assign all users in an Okta group
You can assign all the users in an Okta group to Cloudinary. This action establishes a link and syncing for multiple users at a time.
To assign all users in an Okta group to Cloudinary:
- In Okta, select the Assignments tab for the Cloudinary application.
- Click Assign and select Assign to Groups.
- Click Assign next to the group you want to sync to Cloudinary and Save.
Push Okta groups to Cloudinary
Pushing groups from Okta to Cloudinary creates corresponding groups in Cloudinary and establishes links between them. All users in the Okta group who have already been assigned to Cloudinary will populate the Cloudinary group. Any unassigned users will be ignored during the push action.
To push Okta groups to Cloudinary:
- In Okta, select the Push Groups tab for the Cloudinary application.
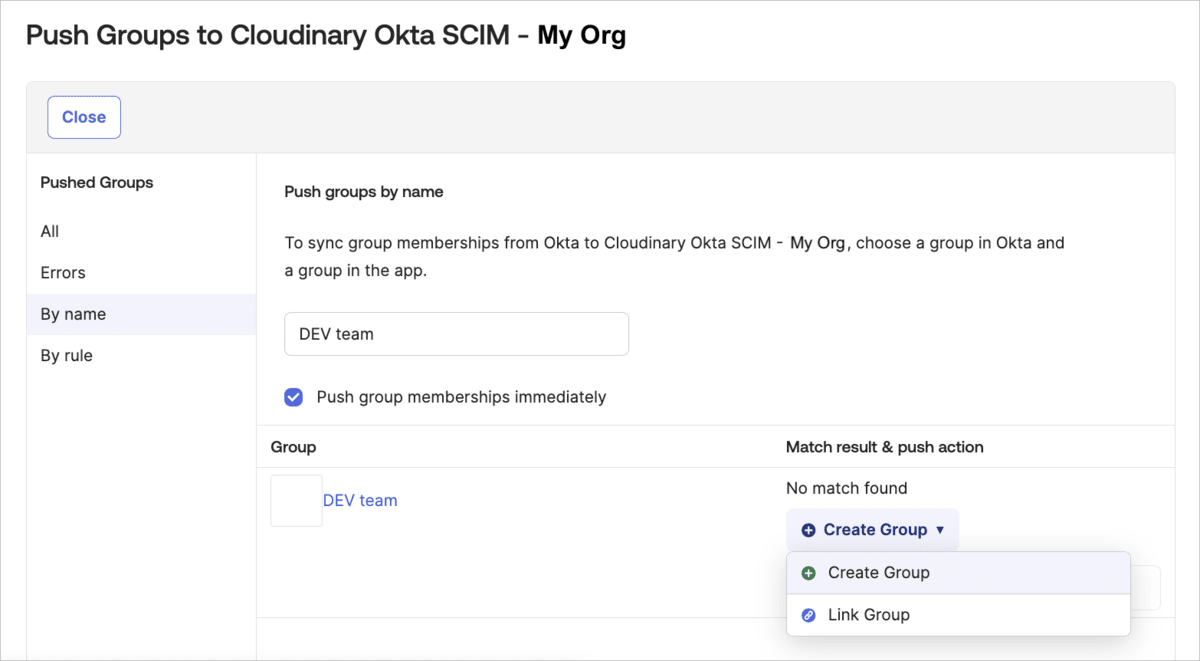
- Click the Push Groups drop-down button and select Find groups by name to search for a group that exists in Okta. For example, search for a group by name (e.g., "DEV team") in Okta.
- Select the group you want to link.
- In the bottom right corner, if No match found, select Create group to create and link a corresponding group in Cloudinary and save. Otherwise, select Link group and select the group in Cloudinary you want to link to.
Manage linked groups
You can manage groups already linked between Okta and Cloudinary in the following ways:
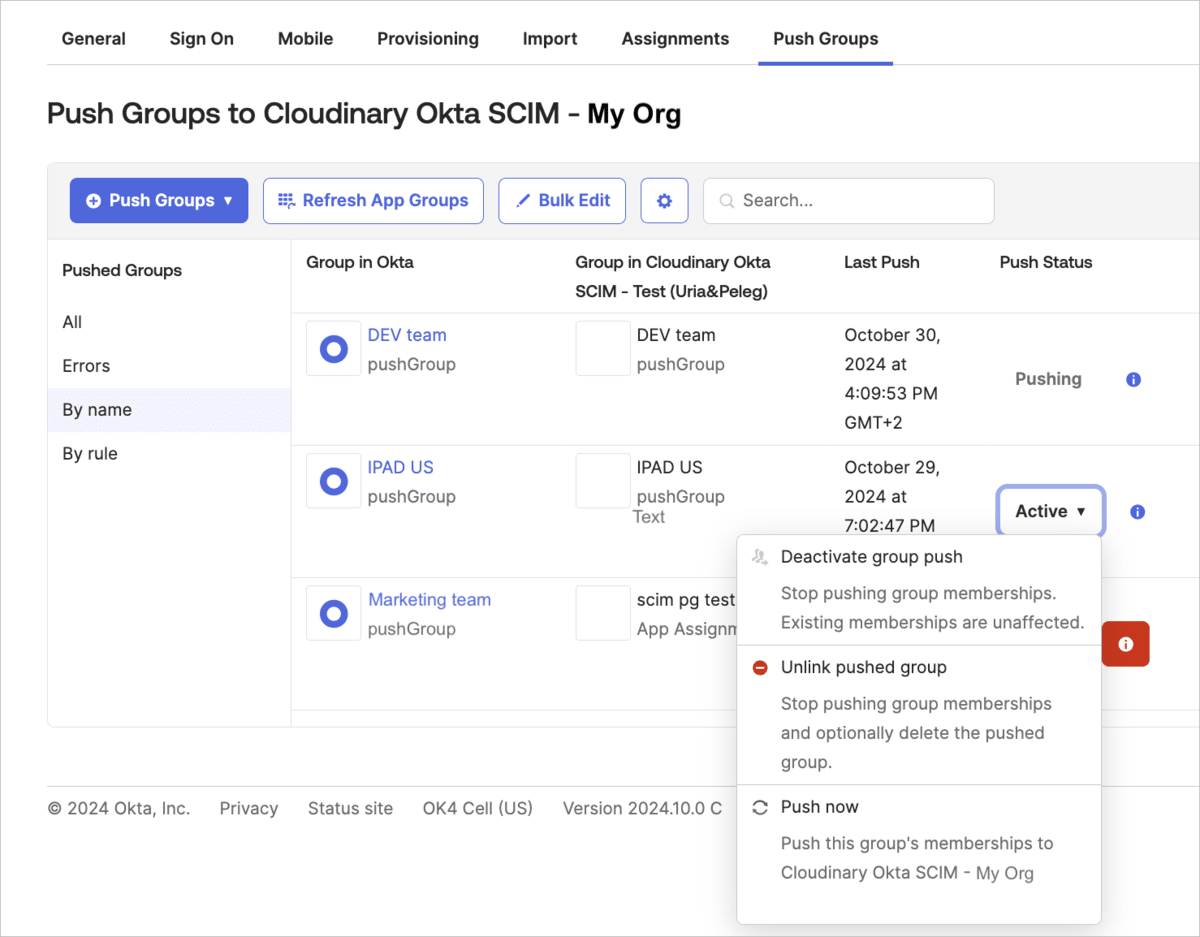
- Deactivating group push: Stops syncing new group memberships (users) from Okta without impacting existing users in the group.
- Removing links from pushed group: Stops syncing memberships (users) and optionally removes the group from Cloudinary.
- Push now: Manually syncs the group’s current (users) to Cloudinary.
To manage Okta groups that are already linked to Cloudinary:
- In Okta, select the Push Groups tab for the Cloudinary application. The list of groups already linked between Okta and Cloudinary will be displayed.
- To change Push Status for a particular group, click the drop-down list in that column for the group you'd like to change, and select an action.
Import users from Cloudinary to Okta
Importing users from Cloudinary does the following:
- Creates and links Cloudinary users in Okta. Once linked, any changes to these users in Okta sync automatically to Cloudinary. Note that there's no automatic sync for changes made to users in Cloudinary back to Okta.
- Syncs user updates from Cloudinary to Okta.
- Allows you to import new Cloudinary users to Okta.
To import users from Cloudinary to Okta:
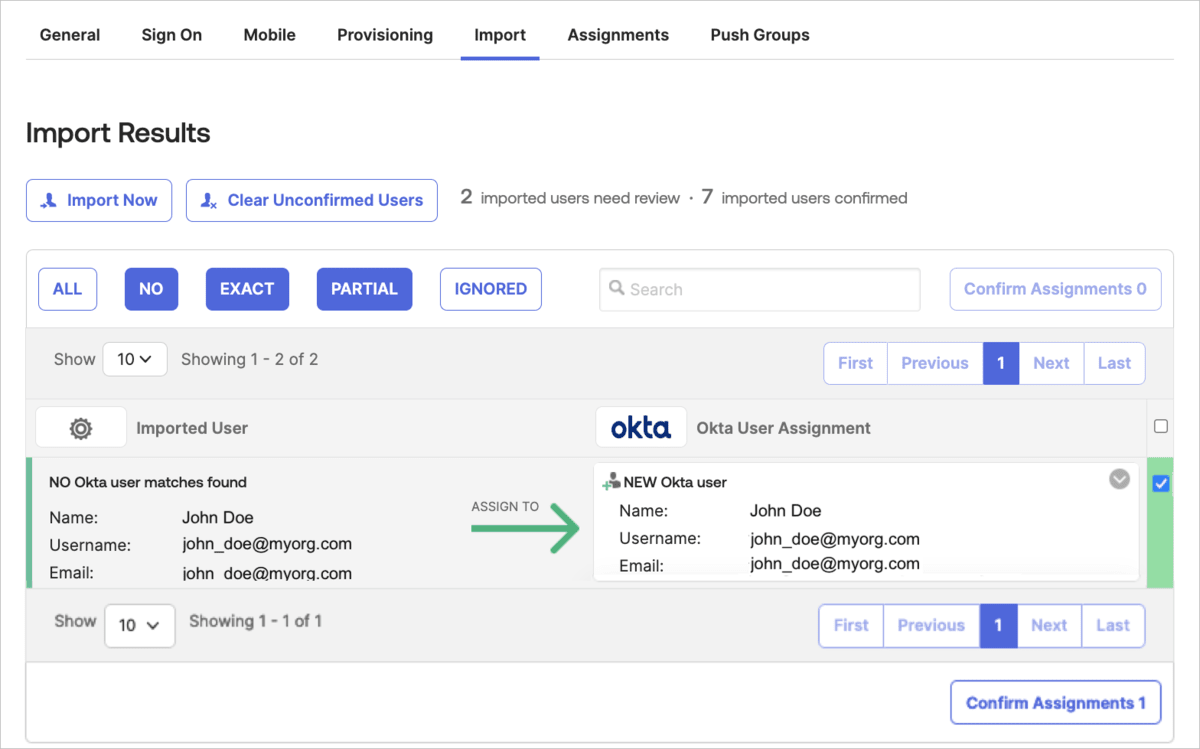
- In Okta, select the Import tab for the Cloudinary application to access the Cloudinary account.
- Click Import Now to display users from Cloudinary that are not yet in Okta.
- Select the user(s) to import by checking their box on the right panel.
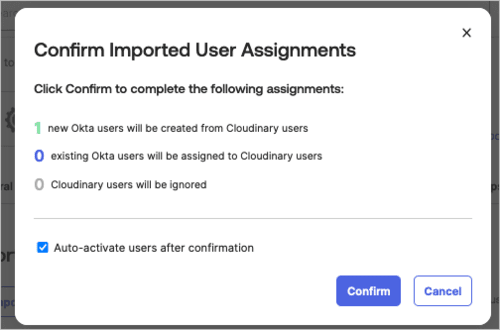
- Click Confirm Assignments.
- Click Confirm in the dialog box.
Sync users periodically from Cloudinary to Okta
You can schedule regular imports of new users created in Cloudinary and sync any changes made to linked users in Cloudinary with Okta.
To sync users periodically from Cloudinary to Okta:
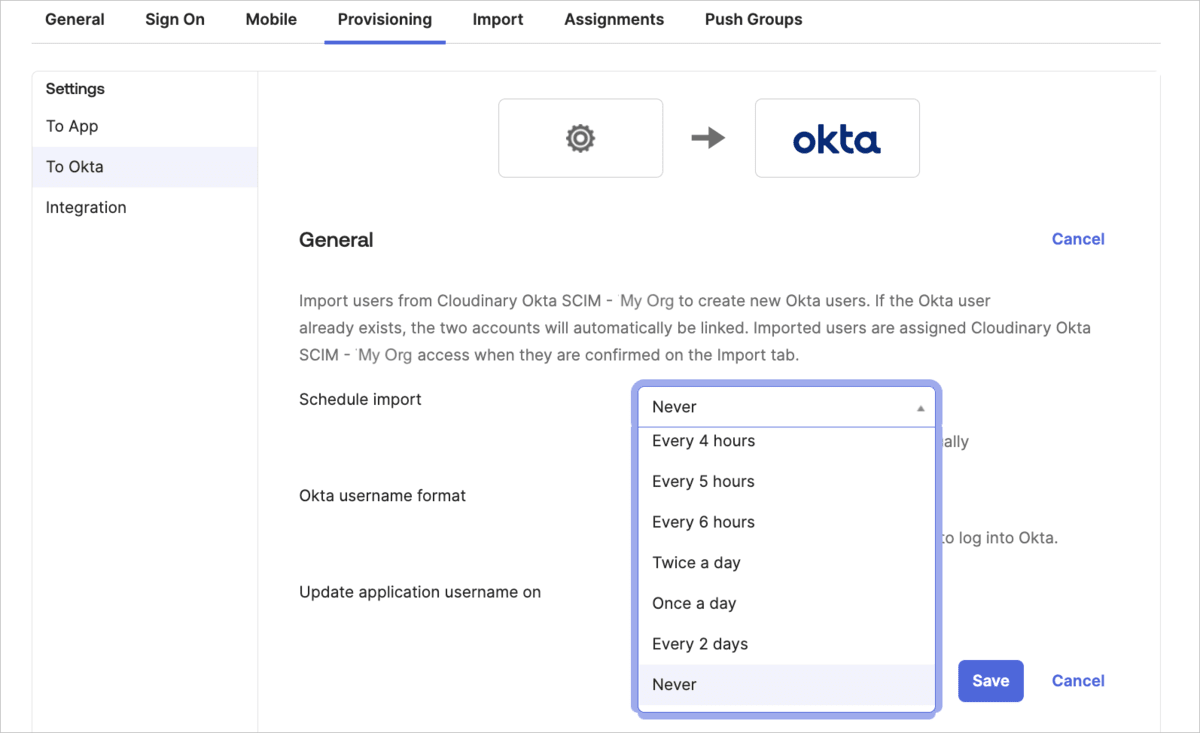
- In Okta, select the Provisioning tab for the Cloudinary application.
- Select To Okta from the left-hand menu.
- Select a time interval from Schedule import and save. If you want to import manually, select Never.
5. Testing and finalization
Provisioning test: Confirm that your Oka users are synchronizing correctly with Cloudinary.
Group push verification: Confirm the groups you pushed are synchronized correctly with Cloudinary.
Field validation: Confirm custom attributes, such as product_environments and role, are mapped and transferred correctly.
 Ask AI
