 Ask AI
Moderate UGC images
Last updated: Oct-07-2026
Marketplace platforms enable businesses to create profiles and upload product images and descriptions to sell their offerings. For example, in a restaurant marketplace, each restaurant manages its own section, uploading images of its dishes. To maintain image quality, consistency, and compliance, marketplaces often enforce guidelines on file formats, size limits, content restrictions, and overall presentation.
This sample PowerFlow automates image moderation, ensuring that vendor-uploaded images to Cloudinary meet marketplace standards before going live.
Learn more about user-generated content.
Overview

This sample workflow covers three different types of moderation, triggered on upload. You can use any combination of these in your flow. We're showing them all connected, with the approval outcome at the end, but you could apply this sooner in your flow.
The flow comprises:
- Amazon Rekognition AI moderation: This is an add-on dedicated to detecting unsafe content in images such as nudity, violence, drugs etc.
- Color analysis: This is a Cloudinary feature that you can invoke on upload to determine the colors in your uploaded images.
- Watermark detection: This is a feature of the Cloudinary AI Content Analysis add-on, specifically trained to detect watermarks in images.
Image upload
There are many different ways in which a marketplace platform can accept image uploads. Regardless of how the images are uploaded, the act of uploading an image to Cloudinary can trigger the flow.
Upload preset
Some of the blocks in the flow rely on specific analysis taking place on upload. Use an upload preset to specify the analysis that you want to trigger.
To configure the upload preset:
- Log into your Cloudinary Console.
- Navigate to Settings > Upload > Upload Presets.
- Click Add Upload Preset.
- For color analysis, click the Manage and Analyze tab and enable Retrieve predominant colors and histogram.

- For watermark detection, click Addons, scroll to Cloudinary AI Content Analysis and enable Detect watermark on your image. You also need to subscribe to the Cloudinary AI Content Analysis add-on.

- Configure any other settings relevant to your workflow and click Save.


Make sure you reference your upload preset in the upload mechanism that you choose, for example in the Upload widget configuration, or API call. See Upload presets for further information.
Upload trigger
When someone uploads an image, Cloudinary sends a webhook notification to the On Asset Upload block, which activates the flow.
Steps:
- Create a new flow and select the On Asset Upload block as the trigger.
- Click the block and set it to trigger only when the Asset type is Image.

Amazon Rekognition AI moderation
Amazon Rekognition automatically detects categories of unsafe content in images. The Moderate Image Using Amazon Rekognition block invokes the Amazon Rekognition AI Moderation add-on. Using a Branch On Condition block, you can check if the add-on approved the image and optionally add the outcome to the logs. If approved, you can move on to the next part of the flow. If rejected, you can add the image to an email report and end the flow there. You can see rejected images in the Moderation tab of your Media Library (see Moderate assets for more information).

Moderate the image
To use the Moderate Image Using Amazon Rekognition block, you need to subscribe to the Amazon Rekognition AI Moderation add-on, which you can do inside the block configuration (there's a free tier).
Steps:
- Click the Add Block node on the On Asset Upload block and add the Moderate Image Using Amazon Rekognition block to your canvas.
- Click the block and select the
On Asset Uploadasset for Use the asset from. - Set the Moderation confidence level between 0.0 and 1.0. The lower the confidence level, the more images are blocked.
- Select the Moderation categories to block.
- Subscribe to the add-on, if you haven't already.

The moderation response includes an "approved" or "rejected" status:
Test the status
Use a Branch On Condition block to check the status of the moderation.
Steps:
- Click the Add Block node on the Moderate Image Using Amazon Rekognition block and add the Branch On Condition block to your canvas.
- Click the block and set the name to something meaningful like
Check Approved. - Set the Value type to
String. - Set the Value to the Moderate Image Using Amazon Rekognition Status field (use the
+icon to insert the variable). - Set the Operator to
is equal to. - Set the Compare to value to
approved.
The Yes output connector is the path taken if the condition is true (in this case, if the status is "approved"), otherwise the flow continues through the No output connector.

Add to logs
You can optionally add the moderation status to the logs so that you can easily identify what happened during a flow execution.
Steps:
- Click the Add Block node on the Yes output of the Branch On Condition block and add the Add To Logs block to your canvas.
- Click the block and set the name to something meaningful like
Approved Image. - Set the Message to something meaningful like
Approved by Amazon Image Moderation. - Repeat the steps for the No output of the Branch On Condition block to show that the moderation rejected the image.

Add rejected images to scheduled email
To stay informed about rejected images, you can use the Schedule Email Report block. The system sends the email at the configured time and includes details of all the assets that reach that part of the flow in a 24-hour period. If all images pass the moderation, the execution never reaches that block and the email is never scheduled.
Steps:
- Click the Add Block node on the Add To Logs block for the rejected image and add the Schedule Email Report block to your canvas.
- Click the block and select the
On Asset Uploadasset for Use the asset from. - Add a comma-separated list of email addresses that you want to receive the email.
- Specify the time to send the email, for example 10:00.
- Give the report a name: this is the subject of the email.
- Add a description to appear in the body of the email.

Color analysis
If one of your requirements is to check that uploaded images aren't black and white, you can do this without using an add-on by asking for the upload response to return information about the colors in the image. You can use an upload preset to do this, or if you're not using an upload preset, set the colors parameter of the upload request to true.
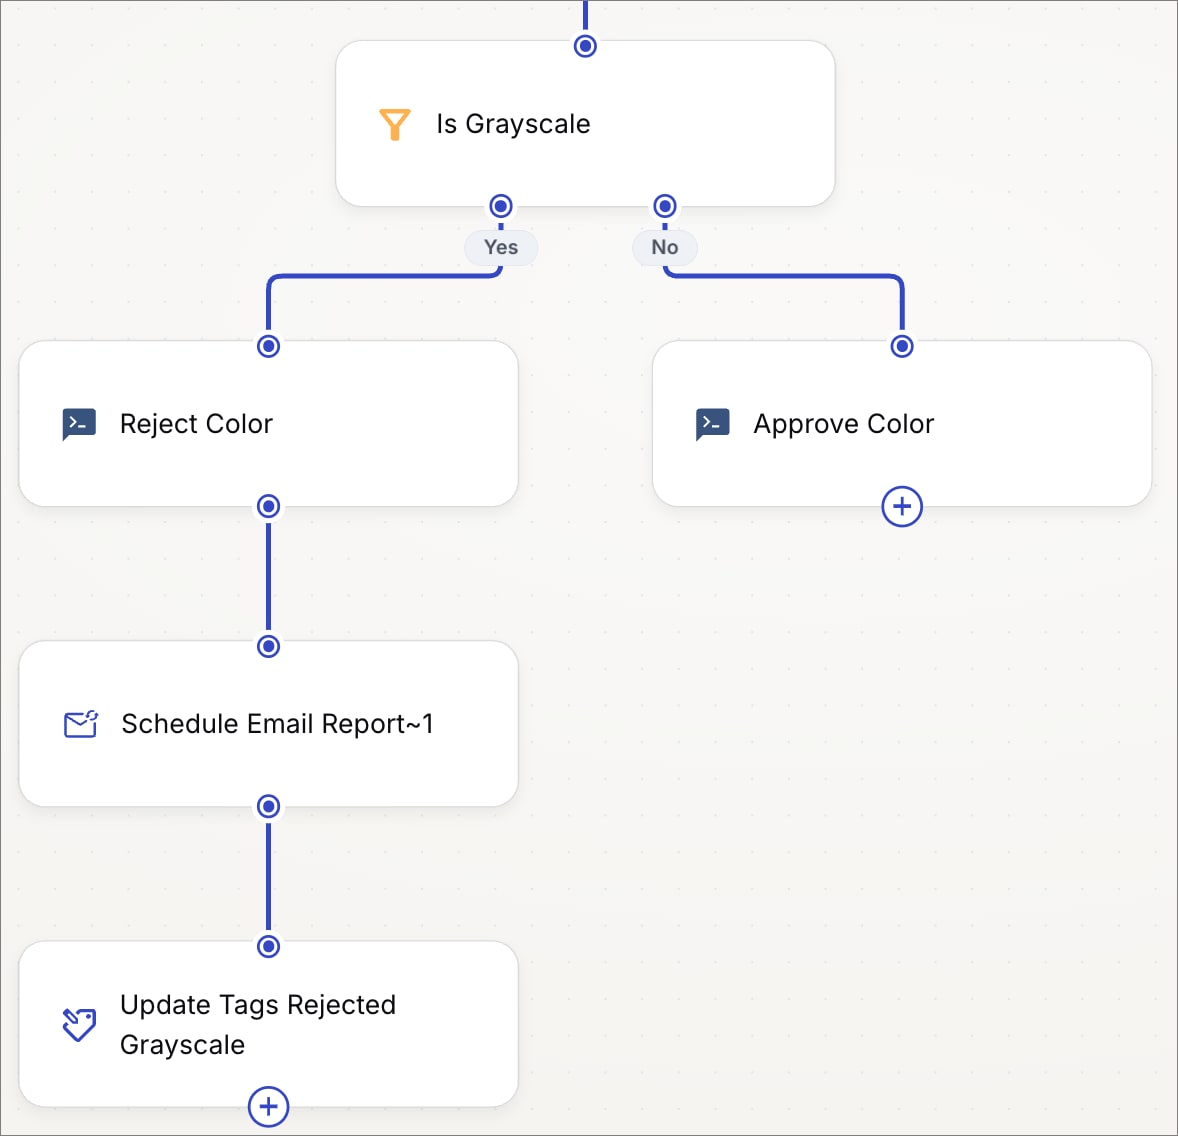
Check image colors
The upload response includes the predominant colors in the image:
Use a Branch On Condition block with Advanced condition turned on to check if the image is grayscale.
Steps:
- Click the Add Block node on the Add To Logs block for the approved contents and add the Branch On Condition block to your canvas. If you don't want to use the previous moderation, click the Add Block node on the On Asset Upload block instead.
- Click the block and set the name to something meaningful like
Is Grayscale. - Turn on Advanced condition.
- In the JSON data field, click the
+icon to insert a variable. The variable to insert equates to{{$.On_Asset_Upload.result.predominant.cloudinary}}. Add this by manually addingpredominant.cloudinaryas a variable to the On Asset Upload variables.
-
Enter the following JsonLogic conditional expression:
The "all" operator checks whether every item in a list matches a given condition. In this case, the list contains the predominant colors in the image. If each color in the list is "white", "black", or "gray" then the condition returns
true. If any of the predominant colors isn't "white", "black", or "gray", it returnsfalse.


You can optionally connect Add to logs blocks after each of the outputs, and another Schedule Email Report block to the rejection flow, with a message specific to the grayscale check. Note that the Yes output of the Branch On Condition block indicates the true condition; in this case, that the image is grayscale.
Tag rejected images
When an image is rejected during the flow, it's useful to tag it so that you can handle it later.
Steps:
- Click the Add Block node on the Schedule Email Report block for the rejected grayscale image and add the Update Tags block to your canvas.
- Click the block and set the name to something meaningful like
Update Tags Rejected Grayscale. - Select the
On Asset Uploadasset for Use the asset from. - Select the
Addaction. - Enter the names of the tags you want to use in the Tag field, for example:
rejected,grayscale.

Watermark detection
If one of your requirements is to check that images don't have watermarks, you can use the watermark detection functionality of the Cloudinary AI Content Analysis add-on. You can use an upload preset to do this, or if you're not using an upload preset, set the detection parameter of the upload request to watermark-detection. Remember to subscribe to the Cloudinary AI Content Analysis add-on.
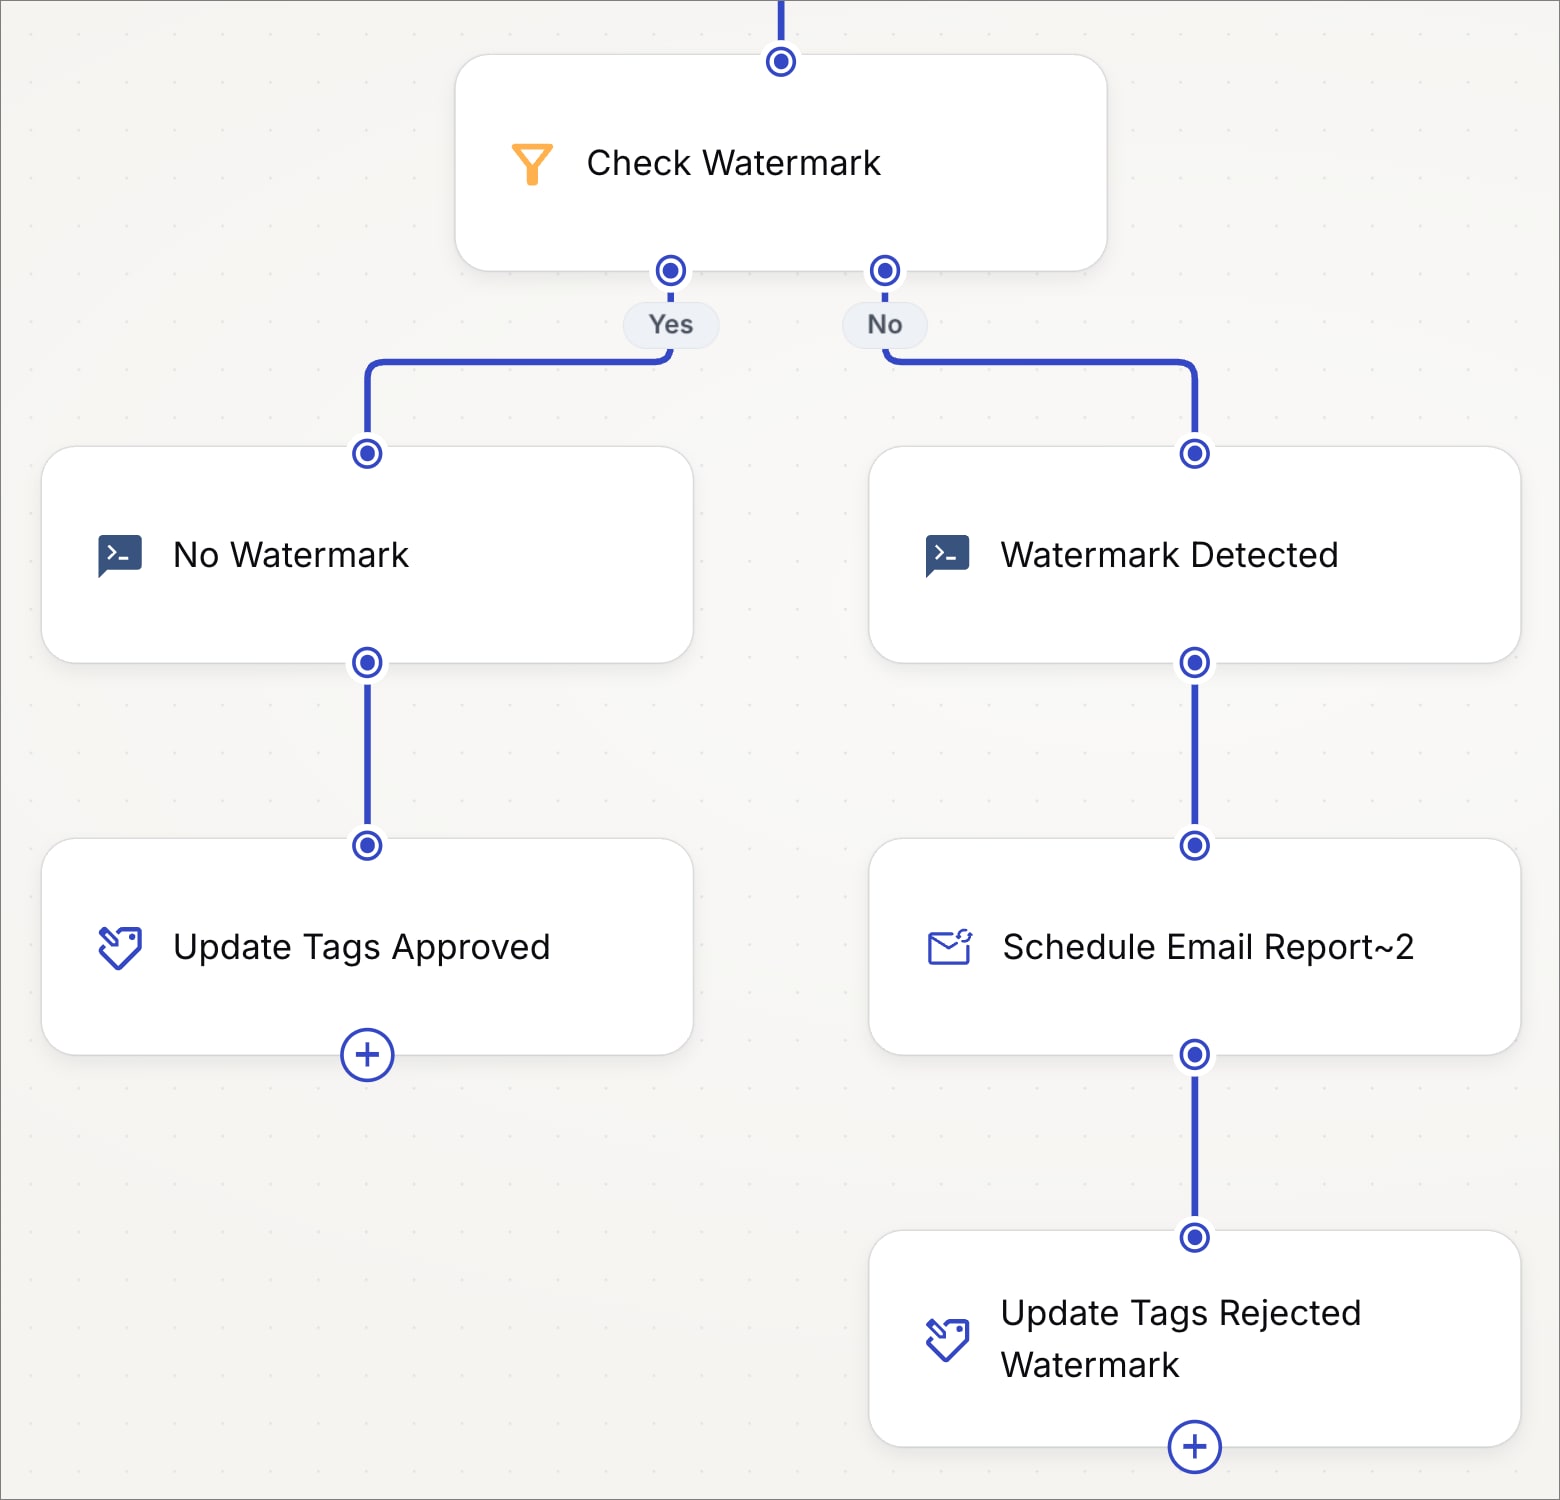
Check for watermarks
The upload response includes the results from the watermark detection. If there are no watermarks detected, the response contains a "clean" tag:
Use a Transform JSON Using JQ block to determine if the tags contain a "clean" key.
Steps:
- Click the Add Block node on the Add To Logs block for the approved color check and add the Transform JSON Using JQ block to your canvas. If you don't want to use the previous moderations, click the Add Block node on the On Asset Upload block instead.
- In the JSON data field, click the
+icon to insert a variable. The variable to insert equates to{{$.On_Asset_Upload.result.info.detection.object_detection.data.watermark-detection.tags}}. Add this by manually addinginfo.detection.object_detection.data.watermark-detection.tagsas a variable to the On Asset Upload variables.
-
Enter the following JQ expression:
This checks if the "clean" key exists at the top level of the JSON object. The result is
trueif the "clean" key exists, otherwise it'sfalse.


Use a Branch On Condition block to check the result of the JQ expression.
Steps:
- Click the Add Block node on the Transform JSON Using JQ block and add the Branch On Condition block to your canvas.
- Click the block and set the name to something meaningful like
Check Watermark. - Set the Value type to
Boolean. - Set the Value to the Transform JSON Using JQ Result field (use the
+icon to insert the variable). - Set the Operator to
is true. There's no Compare to field for a Boolean value type.
The Yes output connector is the path taken if the condition is true (in this case there is no watermark detected), otherwise the flow continues through the No output connector.

You can optionally connect Add to logs blocks after each of the outputs, and another Schedule Email Report block to the rejection flow, with a message specific to the watermark detection check.
Additionally, you can tag rejected images using appropriate tags such as "rejected" and "watermark".
Tag approved images
When an image is approved at the end of the flow, it's useful to tag it so that you, and other users of your product environment, know that it has passed through this moderation process.
Steps:
- Click the Add Block node on the Add To Logs block (no watermark) and add the Update Tags block to your canvas.
- Click the block and set the name to something meaningful like
Update Tags Approved. - Select the
On Asset Uploadasset for Use the asset from. - Select the
Addaction. - Enter the name of the tag you want to use in the Tag field, for example:
approved.

Error
Rate this page:
