Content Creation Guidelines
Last updated: Feb-17-2026
Overview
This guide covers the additional content creation processes, focusing on specific workflows for SDKs, add-ons, and video tutorials.
Adding a New SDK or Integrations Guide
Follow instructions for Adding a new documentation page
-
Add logo for integration & home page
- Get an svg image for the new framework - ideally, it should be well cropped to the logo. If not, you can use https://svgcrop.com/ to crop it.
- Assign the relevant sprite tag & regenerate the sprite using the API
Add the new page & icon to the relevant SDK, integration, or 3rd party partials page
Make sure the JIRA Epic for the new SDK includes tasks (for SDK/front-end team) to update welcome email, dashboard quick links, and onboarding widget. Give them the main doc page for the SDK framework that they should link to.
Add link to SDK from the following locations:
| Source file | File usage | To do |
|---|---|---|
| documentation/image_transformation | Doc file | All SDKs currently mentioned 2x. Once to main section and once specifically to section about image_tag. |
| documentation/_client_libraries | Snippet that's called from many of the haml-based add-on help pages | Add/update as needed |
Documenting New Add-ons
Every new Add-on should have an Epic in JIRA. That epic should include user stories for:
Docs Write Snippet - (JIRA that's generated from the Dev Snippet issue) write text for snippet & provide dev with the link they should use to the docs. This JIRA is in our doc sprint. When done, copy-paste the text & link to the CLD issue & then mark the Docs issue as done.
Snippet Graphics - Prepare svg icon & a graphic for within the snippet
Dev implement Snippet - Create the snippet itself.
-
Add-on development - CLD issue assigned to dev for actually creating the add-on
- Should be marked as impacts doc, which will generate the Doc Add-on issue.
Document add-on - DOC issue generated from CLD issue. See Add-on Help Page below for full checklist.
-
Console Settings - For some add-ons, there are settings in the console. If relevant, there should be JIRA issues for these (and we should document as appropriate)
- If it's an on-the-fly transformation add-on, the add-on should be in the "Allow unsigned add-on transformations" option under Security
- If it's an add-on that's activated on Upload, the add-on needs to be added to the upload preset settings
- If it's a moderation add-on, needs to get added to the Moderation drop-down in the Moderation view.
- There may be other special settings for specific add-ons - if so, make sure our docs cover these - Just add notes to your main "Document the add-on" JIRA issue and/or link these settings JIRA to your "Document the add-on" JIRA issue. No need for separate doc issue for these.
Videos
Content Creation Guidelines
- Videos with speech (like tutorials)
- Videos without speech (like teasers)
- Video transformation examples
- Adding existing Dev Hints
- Creating new tutorials
Custom Markdown Syntax
Automated scripts and rules
Videos with speech (like tutorials)
Upload the video using this page: https://cloudinary-devs.github.io/cld-docs-assets/upload/tutorial-uploads.html.
This uses the auto-tutorial upload preset to automatically upload it to the training folder in the cloudinary product environment and generate captions, subtitles and chapters.
(Or, if you're in the cloudinary product environment, navigate to the training folder and use the upload preset, auto-tutorial-signed.)
Use the Video Player JavaScript to render the video on the page with chapters, subtitles and captions. Copy the code from e.g. upload_programmatically_tutorial.html.md:
Put videoPlayer: true in the front matter.
Then, use this code to render the Video Player (for some reason it doesn't display in docs-dev), replacing the public ID in publicID and posterOptions:
To add a new Video Tutorial page to the corresponding Video Tutorial library, use the add-video-tutorial Cursor command. This should do all the code for you.
Videos without speech (like teasers)
Upload the video to the cloudinary product environment, using the upload preset docs_videos.
Use the videoplayer markdown syntax.
Video transformation examples
Use the transformation widget syntax, e.g.:
Dev Hints videos
Adding Existing Dev Hints
Dev Hints videos should have already been uploaded to the training folder in the cloudinary product environment using https://cloudinary-devs.github.io/cld-docs-assets/upload/tutorial-uploads.html.
In the JIRA ticket, add the public ID of the video to the description or a comment.
Use the add-video-tutorial Cursor command to add a new Video Tutorial page to the corresponding Video Tutorial library.
Creating New Tutorials
You can use Camtasia to create video tutorials.
For a demo of how we use it in Cloudinary, see https://Cloudinary.zoom.us/rec/share/CLc-SNGCw36Fqw98qZFqfrdEvJTAvj5XZDM8iKo7FQNftyLT1QuGSO5rk6HA0WAK.TTwSH-2lz_IqiPft
Plus, there are lots of video editing tutorials here: https://www.techsmith.com/learn/tutorials/camtasia/
Import the Cloudinary brand assets library from here: https://drive.google.com/file/d/1Xxy2cenWfKjH7KoVIajWgLX7MIQAdIFA/view?usp=sharing
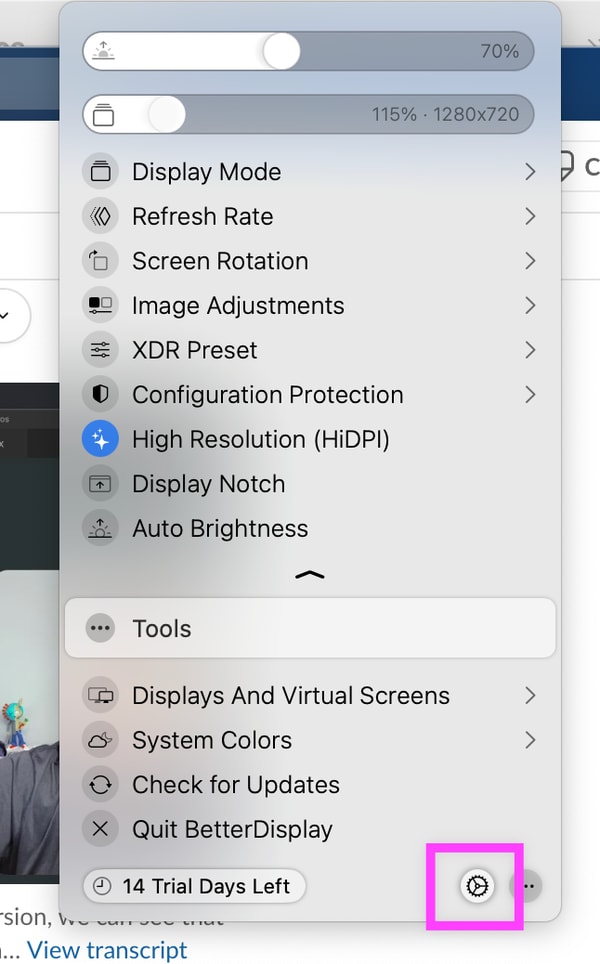
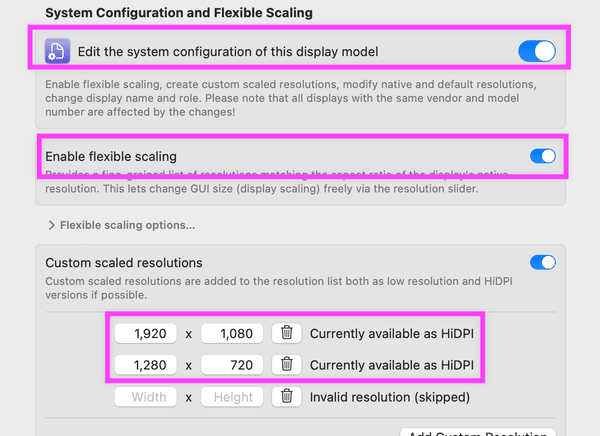
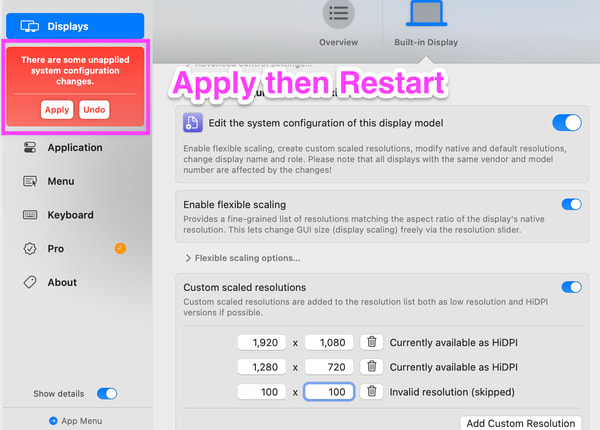
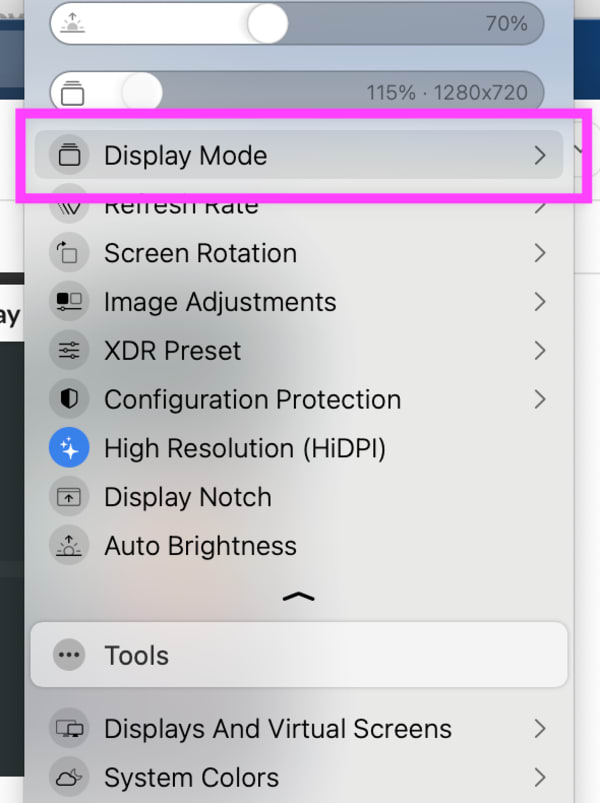
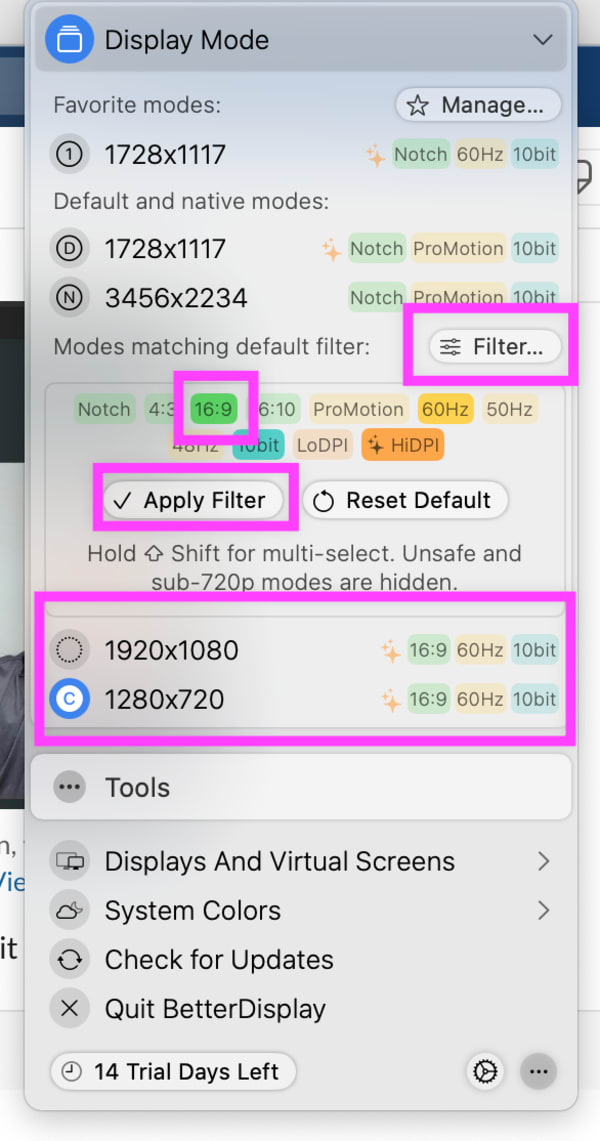
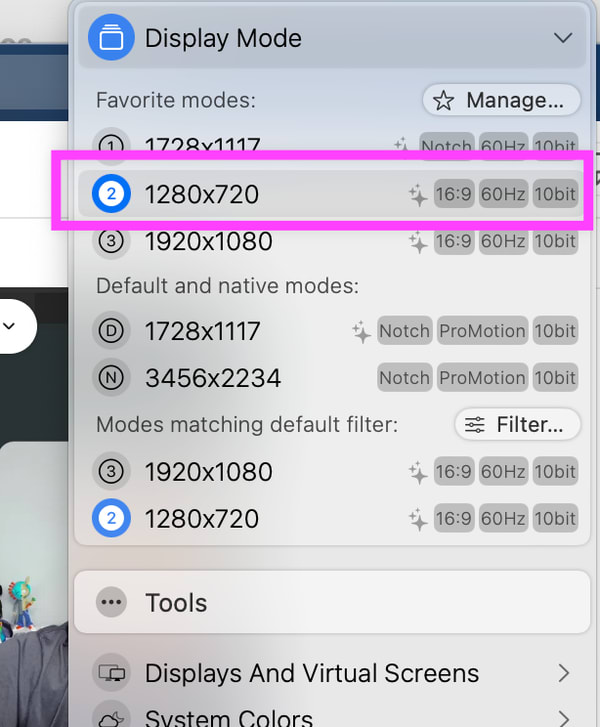
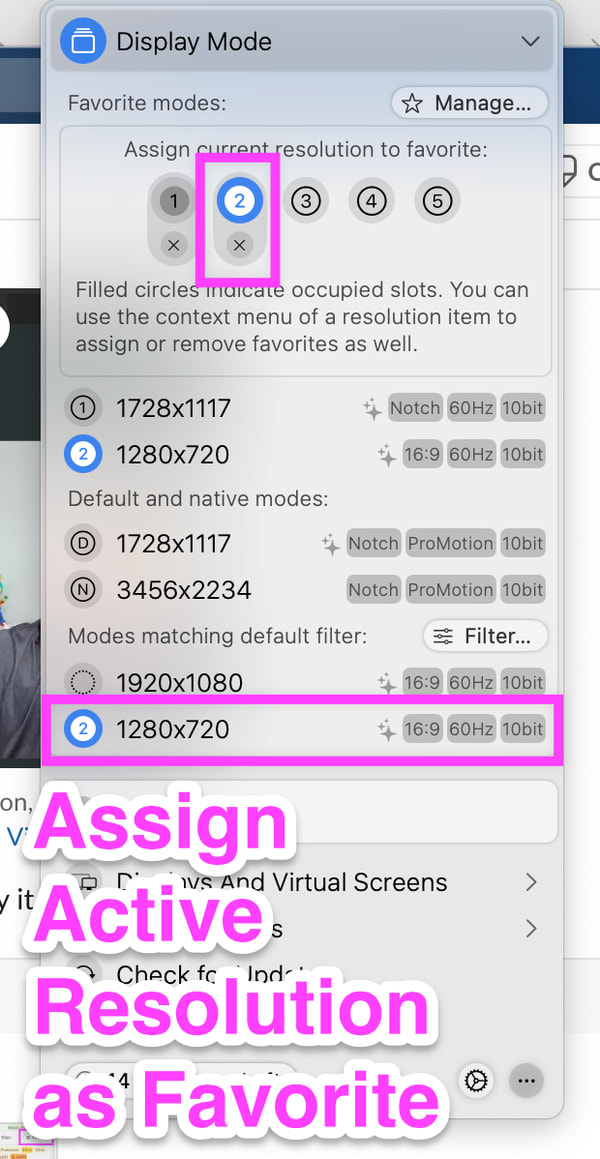
Use BetterDisplay to set your screen up for a 16:9 recording.
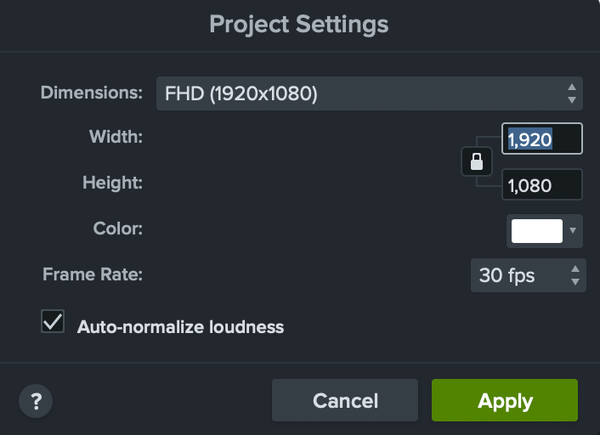
It's also good to hide the menu bar and Dock (you can do this in your Mac settings), then you have the full 16:9 screen for the app you want to show. If you start recording with the video tool with the full screen, then the project settings should automatically set themselves to FHD (1920 x 1080), which is what you want to export the video at.
See Videos with speech for adding them to the docs.
Detailed doc, that Becky wrote for the training team: https://cloudinary.atlassian.net/wiki/spaces/CE/pages/1940062820/How+to+Migrate+a+Video+into+the+Docs+Video+Library
Code Explorers Integration
Embedding Code Explorers
We now embed only StackBlitz code explorers in the docs.
Important Points:
- All embedded explorers should also be in GitHub at cloudinary-devs
- Start with GitHub and import into explorer
- Hide attribution when possible
- Use meaningful names for explorers
- Support both dynamic and fixed folder modes (so avoid explicit use of ‘folders’ or ‘asset folders’ or any other folder-mode specific options)
- Use designated accounts for uploads:
cld-demo-ugcorhzxyensd5]- If your demo / code explorer includes an upload, make sure assets are uploaded to the product environment called cld-demo-ugc (dynamic folder mode - preferable) or hzxyensd5 (if you’re demonstrating something in fixed folder mode). If you’re not expecting the user to need the uploaded asset after a day, either tag each uploaded asset with ‘widget’ or upload to the ‘docs-temp’ asset folder/folder. These assets will be deleted at 00:00, 08:00 and 16:00 GMT each day if they have been there for longer than a day (there is a MediaFlow (cld-demo-ugc) (or MediaFlow (hzxyensd5)) that does this automatically). You can add the tag
keepmeto any asset that you don’t want to be deleted.
- If your demo / code explorer includes an upload, make sure assets are uploaded to the product environment called cld-demo-ugc (dynamic folder mode - preferable) or hzxyensd5 (if you’re demonstrating something in fixed folder mode). If you’re not expecting the user to need the uploaded asset after a day, either tag each uploaded asset with ‘widget’ or upload to the ‘docs-temp’ asset folder/folder. These assets will be deleted at 00:00, 08:00 and 16:00 GMT each day if they have been there for longer than a day (there is a MediaFlow (cld-demo-ugc) (or MediaFlow (hzxyensd5)) that does this automatically). You can add the tag
Importing GitHub Projects to StackBlitz
See Importing projects.
Start with GitHub repository URL, e.g.:
Replace github.com with stackblitz.com/github:
For React and Angular, append ?preset=node:
This makes the project into a Web Container, which is the latest version of their runtime environment (it should say ‘Fork on StackBlitz’, not ‘Edit on StackBlitz’ when embedded).
A project will automatically be created in StackBlitz (if you get errors, try updating the packages - see below). We shouldn’t embed this, as we can’t capture stats on it such as forks and views. Instead, fork the project and embed the forked version.
Embedding StackBlitz Sandboxes in Docs
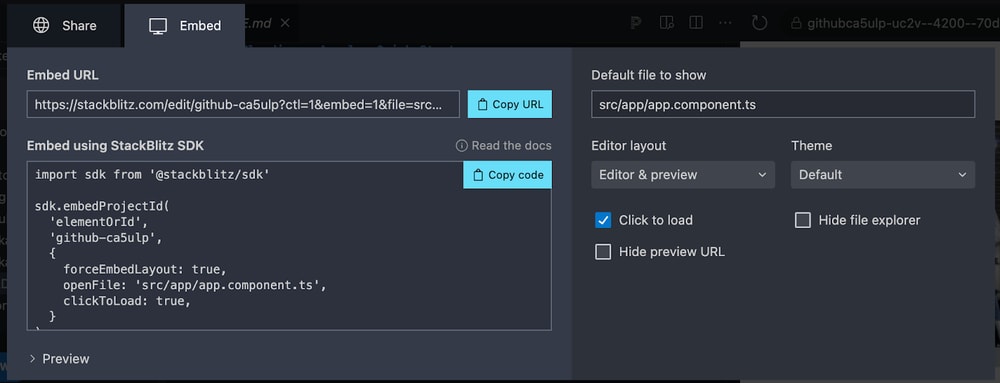
- In your StackBlitz project, open the file you’d like to show in the embed.
- Click Share
- Click Embed tag and Click to load checkbox
- Replace the src attribute in the following code, with the copied URL:
Example iframe:
Ensure the title is of the format <language>-<hyphenated short description>
In code-explorers.js, gaTitle must match this format too and be the same as any inline embed titles (see Adding Sandboxes to the Code Explorers Page)
You can have more than one file open in the embed by separating file sources with a comma, e.g. "https://stackblitz.com/edit/github-ccowbv?ctl=1&embed=1&file=src%2Fapp%2Fexample.component.html,src%2Fapp%2Fquickstart.component.ts"
ctl=1 stops the project from running until someone clicks the Run Project button. This is best practice to reduce loading time and also prevents an issue with the page jumping to the embed due to auto focus on the code.
If a project hasn’t been updated for a while, consider installing the latest dependencies in your project folder (create a branch in GitHub first):
npx npm-check-updates -u npm install
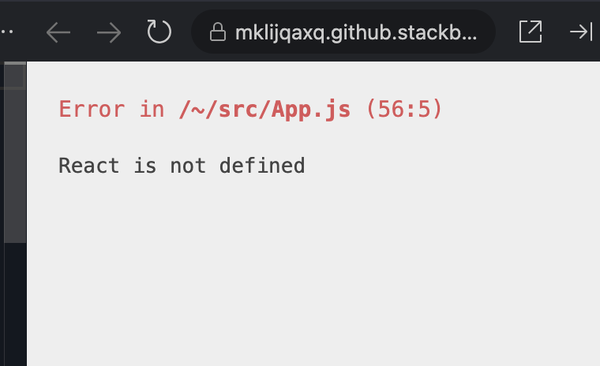
For React projects, if you get this error:
Add this line to the file that has the error:
Adding Sandboxes to the Code Explorers Page
To include a sandbox in the Try it! Code Explorers page:
-
Add the sandbox title to
sandboxOptions(around line 12 in code-explorers.js)- Find the array for your language (e.g.,
javascript,react,angular,vue,node,python,go,Rest) - Add your sandbox title as a new string entry in the array
- The title should match the
titleproperty you'll use insandboxMapping
- Find the array for your language (e.g.,
-
Add a new entry to
sandboxMapping(starting around line 83 in code-explorers.js)- Create a key by taking your title, converting it to lowercase, replacing spaces with hyphens, and appending a hyphen followed by the first letter of the language (e.g.,
-jfor JavaScript,-rfor React,-afor Angular,-vfor Vue,-nfor Node,-pfor Python,-gfor Go,-Rfor REST) - Example key:
'my-new-sandbox-title-j'for a JavaScript sandbox
- Create a key by taking your title, converting it to lowercase, replacing spaces with hyphens, and appending a hyphen followed by the first letter of the language (e.g.,
-
Configure the sandbox entry properties:
-
url: The sandbox embed URL for the iframe in the Code Explorers page (include?ctl=1&embed=1&file=...parameters) -
source: The platform hosting the sandbox (e.g.,'StackBlitz','CodeSandbox','GitHub') -
title: The display title (must match the entry insandboxOptions) -
gaTitle: Google Analytics tracking ID in format<language>-<hyphenated-description>(e.g.,'javascript-upload-widget') -
blurb: A short description of what the sandbox demonstrates -
context: The doc page anchor link (e.g.,'upload_widget#code_explorer_upload_widget_example') -
contextWording: The link text for the context link (e.g.,'Upload widget guide') -
githubUrl: Link to the GitHub repository (leave empty string''if none)
-
Example entry:
Images & Videos in Docs & Posts
Legal Requirements
All media must be legally distributable (CC0 license, purchased by Cloudinary, created by a Cloudinary graphic artist)
Good sources of CC0 images & videos:
Images
- Stunning Free Images · Pixabay
- CC Search
- OnlyGFX.com - Vector images
- PNG images with transparent background | Free PNG images clipart
- Public Domain ~ Free Media for Creative Projects | Pond5
- StockSnap.io - Beautiful Free Stock Photos (CC0)
- Free stock photos · Pexels
- Unsplash | High-Resolution Photos
- OnlyGFX.com - Vector images
- Unsplash | Free Commons_0_High-Resolution Photos
Icons
- Free vector icons - SVG, PSD, PNG, EPS & Icon Font - Thousands of free icons
- Noun Project - Icons for Everything
Videos
- Public Domain Videos in HD on Vimeo
- Coverr - Beautiful, free videos for your homepage
- Free Images and Video - Pixabay
- Query: Public Domain Videos, Languages
- Free stock videos – Pexels Videos
- Convert image to video
- 12 Websites with Free Stock Video Footage | Partners In Rhyme Blog
- Commons:Free media resources/Video - Wikimedia Commons
- Beachfront B-Roll: Buildings and Traffic
Storage Guidelines
All media should be delivered via Cloudinary:
For media you use to demonstrate Cloudinary features, store the original in the
/docsfolder in the Demo account & tag it with "CC0"All other media - i.e. diagram images, logos, blog top images, etc, store them in the
/docsfolder in the Cloudinary account
CC0 Graphics Sources
Images
- Pixabay - Stunning Free Images
- CC Search
- OnlyGFX.com - Vector images
- PNG images with transparent background | Free PNG images clipart
- Public Domain ~ Free Media for Creative Projects | Pond5
- StockSnap.io - Beautiful Free Stock Photos (CC0)
- Free stock photos · Pexels
- Unsplash | High-Resolution Photos
Icons
- Free vector icons - SVG, PSD, PNG, EPS & Icon Font - Thousands of free icons
- Noun Project - Icons for Everything
Videos
- Public Domain Videos in HD on Vimeo
- Beautiful, free videos for your homepage
- Free Images and Video
- Free stock videos -- Pexels Videos
- Adding Documentation Pages - Page creation procedures referenced in SDK workflow
- Content Style Guide - Style standards for content creation
- Custom Markdown Syntax - Technical documentation syntax
 Ask AI
