We all know that images attract interest and increase engagement, but with the huge overload of images out there, we sometimes need to get creative to stand out in the crowd. Your users who upload photos to your site or app may also be looking for those same creative opportunities. A quick look at the most popular social media apps and their continually increasing toolbox of special photo effects shows the increasing trend in popularity and demand for these fun ways of expressing one’s identity.
Cartoonifying a photo is one great way to accomplish this.
Graphic designers can manually apply a cartoon effect to photos using a combination of features in sophisticated graphics applications. There are also a variety of online applications where you can upload a photo and get a cartoon version (of varying quality) returned. But these manual methods don’t scale if you have many photos where you want to apply this effect. And offering this feature to your users for the content they upload to your site requires a complex algorithm.
In short, you need a simple way to apply cartoon effects programmatically.
Cloudinary’s image management solution includes a broad set of cloud-based image manipulation capabilities. The manipulation takes place on-the-fly when the dynamic image URLs are first accessed, and then they are immediately cached on CDN servers for even faster delivery.
The new cartoonify effect is yet another way that Cloudinary enables its customers to quickly, easily, and optimally deliver transformed photos that have just the right impact. With a single parameter and a couple optional attributes, you can give any image a unique cartoonified look and feel.
How does it work?
For a default cartoonify effect, it couldn’t be simpler! Just add the cartoonify parameter (e_cartoonify) to your image tag definition, and the original image gets cartoonified and delivered on-the-fly. Of-course you can also combine this cartoon effect with any other transformation your heart desires.
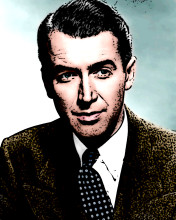
Here’s the transformation code for that last image, which takes advantage of the text overlay, placement gravity, radius, outline, and background color features, in addition to cartoonify:
cl_image_tag("actor.jpg", :transformation=>[
  {:effect=>"cartoonify"},
  {:radius=>"max"},
  {:effect=>"outline:100", :color=>"lightblue"},
  {:background=>"lightblue"},
  {:overlay=>{:font_family=>"times", :font_size=>120, :text=>"James%20Stewart"}, :gravity=>"south_east", :y=>30, :angle=>315}
  ])
cl_image_tag("actor.jpg", array("transformation"=>array(
  array("effect"=>"cartoonify"),
  array("radius"=>"max"),
  array("effect"=>"outline:100", "color"=>"lightblue"),
  array("background"=>"lightblue"),
  array("overlay"=>array("font_family"=>"times", "font_size"=>120, "text"=>"James%20Stewart"), "gravity"=>"south_east", "y"=>30, "angle"=>315)
  )))
(new ImageTag('actor.jpg'))
  ->effect(Effect::cartoonify())
  ->roundCorners(RoundCorners::max())
  ->effect(Effect::outline()->width(100)->color(Color::LIGHTBLUE))
  ->backgroundColor(Color::LIGHTBLUE)
  ->overlay(
      Overlay::source(Source::text('James Stewart', (new TextStyle('times', 120)))
        ->transformation((new ImageTransformation())
          ->rotate(Rotate::byAngle(315))))
      ->position((new Position())
        ->gravity(Gravity::compass(Compass::southEast()))
        ->offsetY(30)
  ));
CloudinaryImage("actor.jpg").image(transformation=[
  {'effect': "cartoonify"},
  {'radius': "max"},
  {'effect': "outline:100", 'color': "lightblue"},
  {'background': "lightblue"},
  {'overlay': {'font_family': "times", 'font_size': 120, 'text': "James%20Stewart"}, 'gravity': "south_east", 'y': 30, 'angle': 315}
  ])
cloudinary.image("actor.jpg", {transformation: [
  {effect: "cartoonify"},
  {radius: "max"},
  {effect: "outline:100", color: "lightblue"},
  {background: "lightblue"},
  {overlay: {font_family: "times", font_size: 120, text: "James%20Stewart"}, gravity: "south_east", y: 30, angle: 315}
  ]})
cloudinary.url().transformation(new Transformation()
  .effect("cartoonify").chain()
  .radius("max").chain()
  .effect("outline:100").color("lightblue").chain()
  .background("lightblue").chain()
  .overlay(new TextLayer().fontFamily("times").fontSize(120).text("James%20Stewart")).gravity("south_east").y(30).angle(315)).imageTag("actor.jpg");
cloudinary.imageTag('actor.jpg', {transformation: [
  {effect: "cartoonify"},
  {radius: "max"},
  {effect: "outline:100", color: "lightblue"},
  {background: "lightblue"},
  {overlay: new cloudinary.TextLayer().fontFamily("times").fontSize(120).text("James%20Stewart"), gravity: "south_east", y: 30, angle: 315}
  ]}).toHtml();
$.cloudinary.image("actor.jpg", {transformation: [
  {effect: "cartoonify"},
  {radius: "max"},
  {effect: "outline:100", color: "lightblue"},
  {background: "lightblue"},
  {overlay: new cloudinary.TextLayer().fontFamily("times").fontSize(120).text("James%20Stewart"), gravity: "south_east", y: 30, angle: 315}
  ]})
<Image publicId="actor.jpg" >
  <Transformation effect="cartoonify" />
  <Transformation radius="max" />
  <Transformation effect="outline:100" color="lightblue" />
  <Transformation background="lightblue" />
  <Transformation overlay={{fontFamily: "times", fontSize: 120, text: "James%20Stewart"}} gravity="south_east" y="30" angle="315" />
</Image>
<cld-image publicId="actor.jpg" >
  <cld-transformation effect="cartoonify" />
  <cld-transformation radius="max" />
  <cld-transformation effect="outline:100" color="lightblue" />
  <cld-transformation background="lightblue" />
  <cld-transformation :overlay="{fontFamily: 'times', fontSize: 120, text: 'James%20Stewart'}" gravity="south_east" y="30" angle="315" />
</cld-image>
<cl-image public-id="actor.jpg" >
  <cl-transformation effect="cartoonify">
  </cl-transformation>
  <cl-transformation radius="max">
  </cl-transformation>
  <cl-transformation effect="outline:100" color="lightblue">
  </cl-transformation>
  <cl-transformation background="lightblue">
  </cl-transformation>
  <cl-transformation overlay="text:times_120:James%20Stewart" gravity="south_east" y="30" angle="315">
  </cl-transformation>
</cl-image>
cloudinary.Api.UrlImgUp.Transform(new Transformation()
  .Effect("cartoonify").Chain()
  .Radius("max").Chain()
  .Effect("outline:100").Color("lightblue").Chain()
  .Background("lightblue").Chain()
  .Overlay(new TextLayer().FontFamily("times").FontSize(120).Text("James%20Stewart")).Gravity("south_east").Y(30).Angle(315)).BuildImageTag("actor.jpg")
MediaManager.get().url().transformation(new Transformation()
  .effect("cartoonify").chain()
  .radius("max").chain()
  .effect("outline:100").color("lightblue").chain()
  .background("lightblue").chain()
  .overlay(new TextLayer().fontFamily("times").fontSize(120).text("James%20Stewart")).gravity("south_east").y(30).angle(315)).generate("actor.jpg");
imageView.cldSetImage(cloudinary.createUrl().setTransformation(CLDTransformation()
  .setEffect("cartoonify").chain()
  .setRadius("max").chain()
  .setEffect("outline:100").setColor("lightblue").chain()
  .setBackground("lightblue").chain()
  .setOverlay("text:times_120:James%20Stewart").setGravity("south_east").setY(30).setAngle(315)).generate("actor.jpg")!, cloudinary: cloudinary)
For more details on all the available transformations, see the image transformation guide and reference.
For added control on your cartoonified image, you can adjust the line strength of the black outlines and the color reduction impact. (As you increase the color_reduction value, and thus decrease the number of colors in the image, the image also gets a higher saturation boost, and a few other adjustments, all leading to a less realistic look).
For example, the following images show the original image, compared to cartoonified versions with different adjustments in line strength and color reduction.
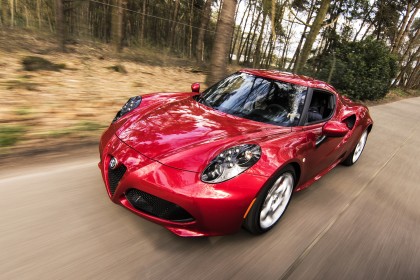 Original
 Above average line thickness, below average color reduction
 Below average line thickness, above average color reduction
And here’s what your code would look like for the last cartoonified car:
Oh, and you can also choose to generate a black and white cartoon if that suits your fancy.
Details for all of the above can be found in the effect parameter section of the image transformation reference.
Your turn to toon
Looks like fun, doesn’t it? Want to try it yourself?

* Enter values between 1-100. For black and white, enter 'bw' in color reduction.
Th...th...th...that’s all folks!
Yes, it’s that simple: one parameter added to your delivery URL or passed on as an option to your users when they upload their profile pics or other images, and the required cartoonification algorithms are automatically applied to the photo.
And don’t forget that cartoon-like images are more than just another cool effect. Cartoonified images can help capture an audience, and they may be more memorable to your users among the plethora of regular photos in every web page on the net.
Additionally, when used in the appropriate context, cartoonified images may be able to express an intended tone, emotion, or personality better than the original photo. And according to marketing consultant, Marcia Hoeck, emotion is (not surprisingly) better at triggering the circuits in the brain that activate behavior and decisions than logic is.
You now know how simple it can be to programmatically cartoonify any image with Cloudinary. And you can do it with any Cloudinary account, including a free one.
So the next time you are looking for just the right creative image that will get your users to tune into your message, consider 'tooning it.


