Cloudinary Blog

ChatBot for Image Manipulation

By Prosper Otemuyiwa
ChatBot for Image Manipulation

Bots - which have been around for a long time and perform different functions - are gradually replacing traditional applications. Consider Internet bots, also known as web robots, as software applications that run automated tasks over the internet, such as crawling websites and indexing search engines. Slack, the popular business messaging service, also popularized the use of bots for almost anything, from tracking stand-ups and sending reminders, to activating continuous integration and different types of activities.

Chatbots are the new trendy type of bots and they are becoming ubiquitous. Several organizations around the world are now taking advantage of chatbots to simulate conversations between users and computers. With chatbots, you can eliminate the need to have a human on the other end, for basic customer enquiries or requests. Messaging platforms, such as WeChat and Facebook Messenger, are massive advocates of chatbots.

The Image Editing Chatbot Overview
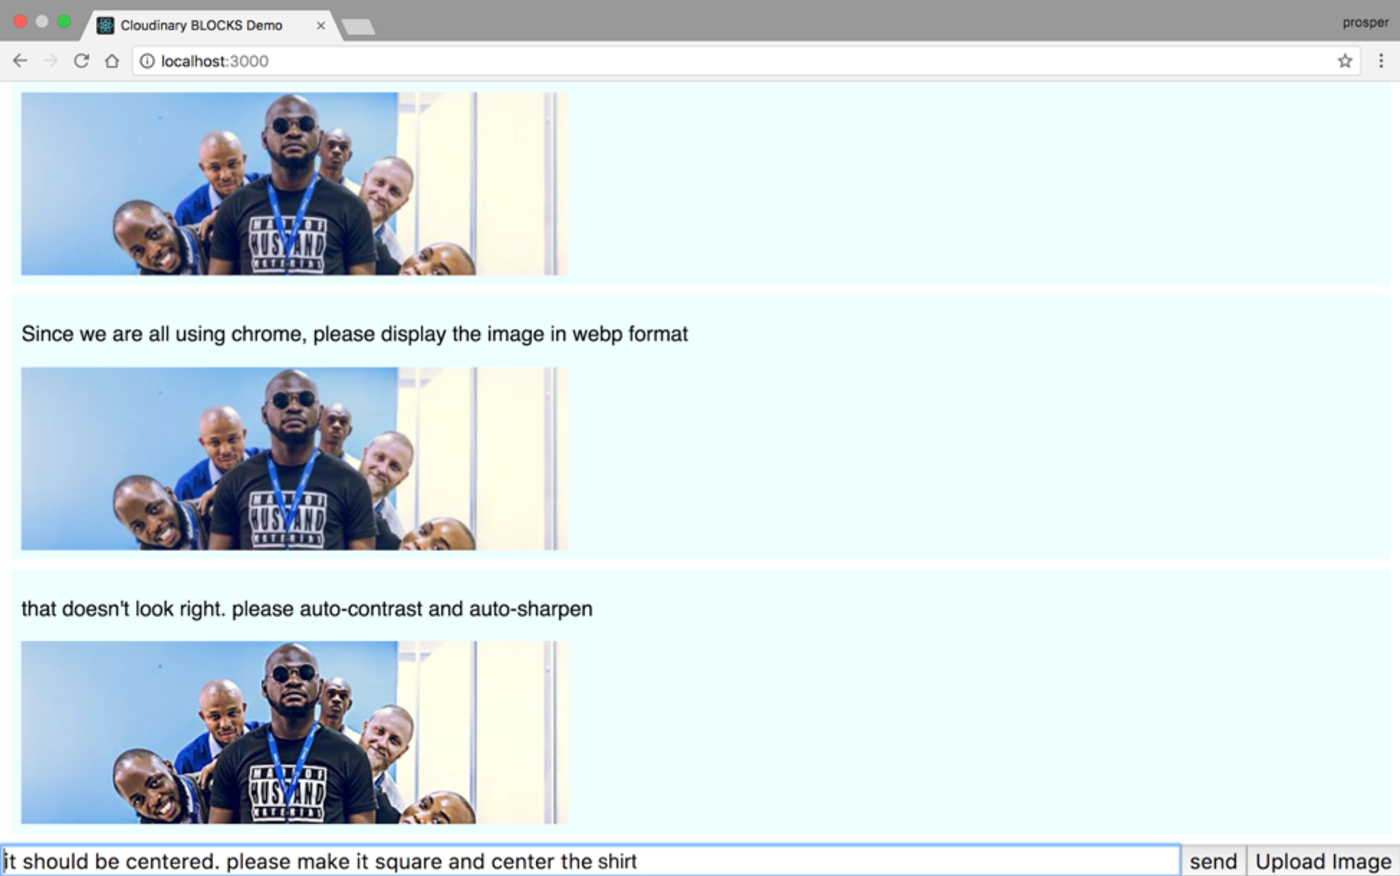
Chatbot screen

The Image Editing Chatbot is a simple prototype/experiment that can quickly solve your image editing challenges. Let’s examine a scenario here to illustrate my point better:

You work for an ecommerce store that has hundreds of images that are being delivered to different layouts, devices, screens and bandwidths. Manually creating these variants can be resource intensive and not scalable.

However, creating multiple variants of an image being delivered across different layouts, devices and bandwidth using an image manipulation chatbot could help. In fact, you can avoid taking on some tasks by simply assigning the URL of the deployed chatbot for others to use. One of the main resulting benefits is that non-technical folks can comfortably use it to solve their image editing challenges, as well.

Some Tech Required

Let’s analyze the technology behind the chatbot.

Before we start, you will want to clone the chatbot from GitHub.

Follow the instructions on the README and execute the commands displayed on the repo in the right sequence. Are you having fun yet?
Chatbot screen

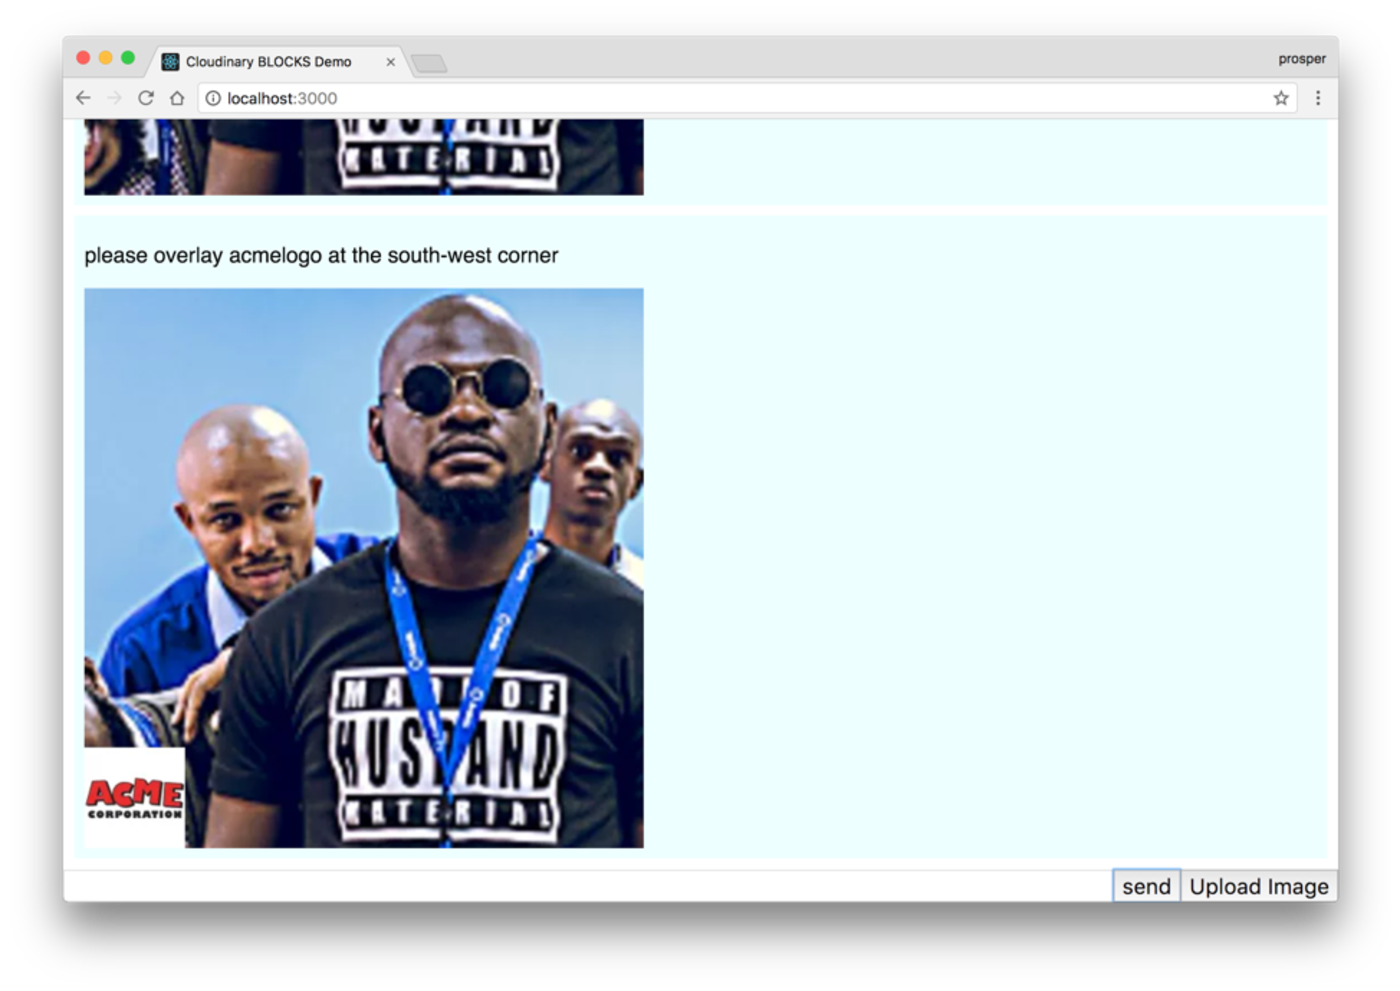
I used the command please overlay ACME logo at the south-west corner and the resulting image was the previously uploaded image with ACME logo placed on it as specified in the command.
Chatbot screen

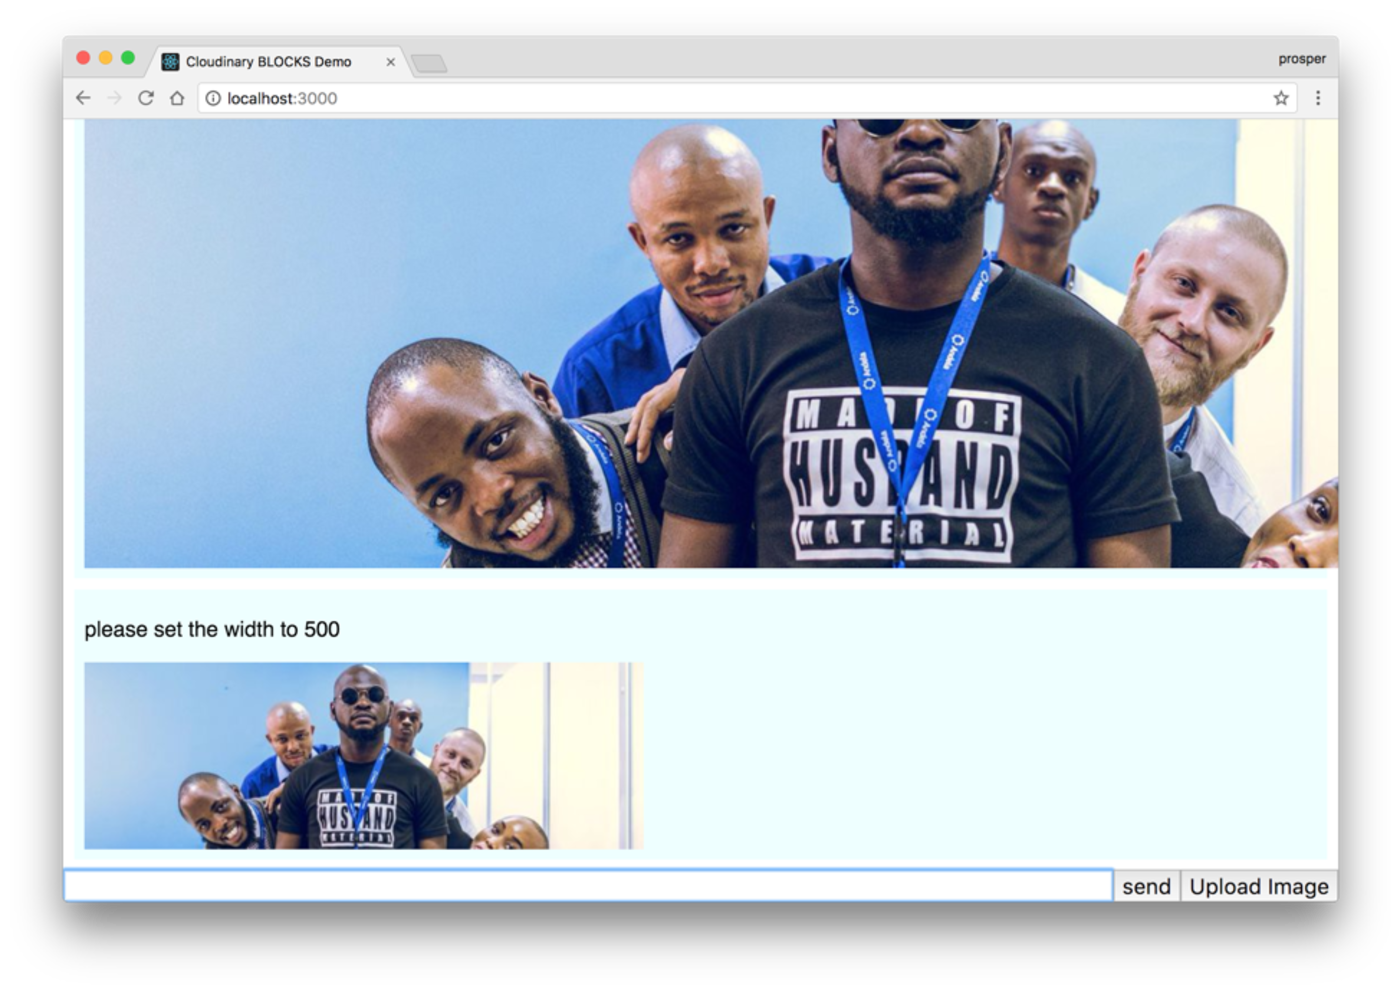
The first image is the original size of the uploaded image. I entered the command please set the width to 500 and it immediately cropped the image and returned the smaller size.

Easy, isn’t it? Next, let’s talk about the stack.

The chatbot is built with:

  • React - for building out the front-end of the image editing tool
  • Node - for building the backend that interacts with the Cloudinary service for image editing
  • Cloudinary - a cloud-based, end-to-end image and video management solution that enables uploads, storage, administration, image manipulation and delivery
  • PubNub - a service for developing Real-time applications

Now, let’s go more in-depth. Open up the source code.

Check out the src/App.js file.

Copy to clipboard
render() {
        return (
            <div className="vbox fill">
                <div className="scroll grow" id="scroll">
                    {this.renderHistory()}
                </div>
                <div className="hbox">
                    <input ref='text' type="text" className="grow"
                           value={this.state.currentText} onChange={this.textEdit.bind(this)}
                           onKeyDown={this.textKeydown.bind(this)}
                    />
                    <button onClick={this.sendMessage.bind(this)}>send</button>
                    <button onClick={this.showUploader.bind(this)}>Upload Image</button>
                </div>
            </div>
        );
    }

    showUploader() {
        var cloudinary = window.cloudinary;
        cloudinary.openUploadWidget({ cloud_name: 'pubnub', upload_preset: 'mcipauzl'},
            (error, result) => {
                console.log(error, result);
                console.log("the upload path is", result[0].path);
                ImageService.setImagePath(result[0].path);
            });
    }

render() is responsible for displaying the send, Upload Image buttons and the history of messages sent in the chatbot.

showUploader() is responsible for calling the Cloudinary upload widget. Take a look at the image below:

Note: You can change the cloud_name and upload_preset to the credentials from your Cloudinary dashboard.

Upload Widget

Check out the src/ImageService.js.

You can change the publishKey and subscribeKey values to the credentials from our PubNub dashboard.

The ImageService is responsible for communicating with PubNub channels on setting and getting image paths in real time.

Check out the src/ParserService.js. The ParserService is a giant service responsible for analyzing keywords in the commands such as upload, display, show, resize, reset, make, overlay and processing it.

Copy to clipboard
src/ParserService.js

if(command.action === 'overlay') {
            console.log("doing an overlay");
            var fname = command.target;
            fname = "sample";
            var scale = 1.0;
            scale = 0.2;
            var grav = command.direction;
            if(command.direction === 'southwest') {
                grav = 'south_west';
            }
            transforms.push("l_"+fname+",w_"+scale+",g_"+grav);
        }

Taking the overlay action and applying the needed Cloudinary transformation.

Copy to clipboard
//apply the context
        if(!context.format) context.format = 'jpg';
        if(context.width) {
            transforms.push("w_"+context.width);
        }
        if(context.autoContrast) transforms.push("e_auto_contrast");
        if(context.autoSharpen) transforms.push("e_sharpen");
        if(context.crop) {
            transforms.push("w_"+context.width+",h_"+context.width
                +",c_fill,g_"+context.gravity);
        }

        console.log("final context is",context);


        //generate the final url
        var apiUrl = 'https://res.cloudinary.com/' +
            cloudName + '/' + resource + '/' + operation + '/';
        if(transforms.length > 0) {
            apiUrl += transforms.join("/") + "/"
        }
        var filename = context.path.substring(0,context.path.lastIndexOf('.'));
        apiUrl += filename  + '.' + context.format;
        return apiUrl;

It obtains the required transformation parameters and generates the Cloudinary URL with those parameters.

The server.js is simply responsible for processing the commands from the frontend via the parser service and returning the right responses.

Cloudinary Transformations

Using Cloudinary, you can quickly and easily optimize your images, regardless of your programming language preference. Cloudinary automatically performs certain optimizations on all transformed images by default. Its integrated, fast CDN delivery also helps to get all the image resources to your users quickly.

Let’s explore some image manipulation techniques and transformations that are effortless using Cloudinary:

Cropping:

Ruby:
Copy to clipboard
cl_image_tag("lady.jpg", :width=>400, :height=>400, :crop=>"crop")
PHP v1:
Copy to clipboard
cl_image_tag("lady.jpg", array("width"=>400, "height"=>400, "crop"=>"crop"))
PHP v2:
Copy to clipboard
(new ImageTag('lady.jpg'))
  ->resize(Resize::crop()->width(400)->height(400));
Python:
Copy to clipboard
CloudinaryImage("lady.jpg").image(width=400, height=400, crop="crop")
Node.js:
Copy to clipboard
cloudinary.image("lady.jpg", {width: 400, height: 400, crop: "crop"})
Java:
Copy to clipboard
cloudinary.url().transformation(new Transformation().width(400).height(400).crop("crop")).imageTag("lady.jpg");
JS:
Copy to clipboard
cloudinary.imageTag('lady.jpg', {width: 400, height: 400, crop: "crop"}).toHtml();
jQuery:
Copy to clipboard
$.cloudinary.image("lady.jpg", {width: 400, height: 400, crop: "crop"})
React:
Copy to clipboard
<Image publicId="lady.jpg" >
  <Transformation width="400" height="400" crop="crop" />
</Image>
Vue.js:
Copy to clipboard
<cld-image publicId="lady.jpg" >
  <cld-transformation width="400" height="400" crop="crop" />
</cld-image>
Angular:
Copy to clipboard
<cl-image public-id="lady.jpg" >
  <cl-transformation width="400" height="400" crop="crop">
  </cl-transformation>
</cl-image>
.NET:
Copy to clipboard
cloudinary.Api.UrlImgUp.Transform(new Transformation().Width(400).Height(400).Crop("crop")).BuildImageTag("lady.jpg")
Android:
Copy to clipboard
MediaManager.get().url().transformation(new Transformation().width(400).height(400).crop("crop")).generate("lady.jpg");
iOS:
Copy to clipboard
imageView.cldSetImage(cloudinary.createUrl().setTransformation(CLDTransformation().setWidth(400).setHeight(400).setCrop("crop")).generate("lady.jpg")!, cloudinary: cloudinary)
lady

Image overlay:

Ruby:
Copy to clipboard
cl_image_tag("lady.jpg", :transformation=>[
  {:width=>500, :crop=>"scale"},
  {:overlay=>"cloudinary_icon", :width=>0.9, :gravity=>"south_east", :opacity=>70, :effect=>"brightness:50", :crop=>"scale"}
  ])
PHP v1:
Copy to clipboard
cl_image_tag("lady.jpg", array("transformation"=>array(
  array("width"=>500, "crop"=>"scale"),
  array("overlay"=>"cloudinary_icon", "width"=>"0.9", "gravity"=>"south_east", "opacity"=>70, "effect"=>"brightness:50", "crop"=>"scale")
  )))
PHP v2:
Copy to clipboard
(new ImageTag('lady.jpg'))
  ->resize(Resize::scale()->width(500))
  ->overlay(
      Overlay::source(Source::image('cloudinary_icon')
        ->transformation((new ImageTransformation())
          ->resize(Resize::scale()->width(0.9))
          ->adjust(Adjust::opacity(70))
          ->adjust(Adjust::brightness()->level(50))))
      ->position((new Position())
        ->gravity(Gravity::compass(Compass::southEast()))
  ));
Python:
Copy to clipboard
CloudinaryImage("lady.jpg").image(transformation=[
  {'width': 500, 'crop': "scale"},
  {'overlay': "cloudinary_icon", 'width': "0.9", 'gravity': "south_east", 'opacity': 70, 'effect': "brightness:50", 'crop': "scale"}
  ])
Node.js:
Copy to clipboard
cloudinary.image("lady.jpg", {transformation: [
  {width: 500, crop: "scale"},
  {overlay: "cloudinary_icon", width: "0.9", gravity: "south_east", opacity: 70, effect: "brightness:50", crop: "scale"}
  ]})
Java:
Copy to clipboard
cloudinary.url().transformation(new Transformation()
  .width(500).crop("scale").chain()
  .overlay(new Layer().publicId("cloudinary_icon")).width(0.9).gravity("south_east").opacity(70).effect("brightness:50").crop("scale")).imageTag("lady.jpg");
JS:
Copy to clipboard
cloudinary.imageTag('lady.jpg', {transformation: [
  {width: 500, crop: "scale"},
  {overlay: new cloudinary.Layer().publicId("cloudinary_icon"), width: "0.9", gravity: "south_east", opacity: 70, effect: "brightness:50", crop: "scale"}
  ]}).toHtml();
jQuery:
Copy to clipboard
$.cloudinary.image("lady.jpg", {transformation: [
  {width: 500, crop: "scale"},
  {overlay: new cloudinary.Layer().publicId("cloudinary_icon"), width: "0.9", gravity: "south_east", opacity: 70, effect: "brightness:50", crop: "scale"}
  ]})
React:
Copy to clipboard
<Image publicId="lady.jpg" >
  <Transformation width="500" crop="scale" />
  <Transformation overlay="cloudinary_icon" width="0.9" gravity="south_east" opacity="70" effect="brightness:50" crop="scale" />
</Image>
Vue.js:
Copy to clipboard
<cld-image publicId="lady.jpg" >
  <cld-transformation width="500" crop="scale" />
  <cld-transformation :overlay="cloudinary_icon" width="0.9" gravity="south_east" opacity="70" effect="brightness:50" crop="scale" />
</cld-image>
Angular:
Copy to clipboard
<cl-image public-id="lady.jpg" >
  <cl-transformation width="500" crop="scale">
  </cl-transformation>
  <cl-transformation overlay="cloudinary_icon" width="0.9" gravity="south_east" opacity="70" effect="brightness:50" crop="scale">
  </cl-transformation>
</cl-image>
.NET:
Copy to clipboard
cloudinary.Api.UrlImgUp.Transform(new Transformation()
  .Width(500).Crop("scale").Chain()
  .Overlay(new Layer().PublicId("cloudinary_icon")).Width(0.9).Gravity("south_east").Opacity(70).Effect("brightness:50").Crop("scale")).BuildImageTag("lady.jpg")
Android:
Copy to clipboard
MediaManager.get().url().transformation(new Transformation()
  .width(500).crop("scale").chain()
  .overlay(new Layer().publicId("cloudinary_icon")).width(0.9).gravity("south_east").opacity(70).effect("brightness:50").crop("scale")).generate("lady.jpg");
iOS:
Copy to clipboard
imageView.cldSetImage(cloudinary.createUrl().setTransformation(CLDTransformation()
  .setWidth(500).setCrop("scale").chain()
  .setOverlay("cloudinary_icon").setWidth(0.9).setGravity("south_east").setOpacity(70).setEffect("brightness:50").setCrop("scale")).generate("lady.jpg")!, cloudinary: cloudinary)
Lady

Text overlay:

Ruby:
Copy to clipboard
cl_image_tag("lady.jpg", :transformation=>[
  {:width=>500, :crop=>"scale"},
  {:overlay=>{:font_family=>"Arial", :font_size=>50, :text=>"Awesome"}}
  ])
PHP v1:
Copy to clipboard
cl_image_tag("lady.jpg", array("transformation"=>array(
  array("width"=>500, "crop"=>"scale"),
  array("overlay"=>array("font_family"=>"Arial", "font_size"=>50, "text"=>"Awesome"))
  )))
PHP v2:
Copy to clipboard
(new ImageTag('lady.jpg'))
  ->resize(Resize::scale()->width(500))
  ->overlay(Overlay::source(Source::text('Awesome', (new TextStyle('Arial', 50)))));
Python:
Copy to clipboard
CloudinaryImage("lady.jpg").image(transformation=[
  {'width': 500, 'crop': "scale"},
  {'overlay': {'font_family': "Arial", 'font_size': 50, 'text': "Awesome"}}
  ])
Node.js:
Copy to clipboard
cloudinary.image("lady.jpg", {transformation: [
  {width: 500, crop: "scale"},
  {overlay: {font_family: "Arial", font_size: 50, text: "Awesome"}}
  ]})
Java:
Copy to clipboard
cloudinary.url().transformation(new Transformation()
  .width(500).crop("scale").chain()
  .overlay(new TextLayer().fontFamily("Arial").fontSize(50).text("Awesome"))).imageTag("lady.jpg");
JS:
Copy to clipboard
cloudinary.imageTag('lady.jpg', {transformation: [
  {width: 500, crop: "scale"},
  {overlay: new cloudinary.TextLayer().fontFamily("Arial").fontSize(50).text("Awesome")}
  ]}).toHtml();
jQuery:
Copy to clipboard
$.cloudinary.image("lady.jpg", {transformation: [
  {width: 500, crop: "scale"},
  {overlay: new cloudinary.TextLayer().fontFamily("Arial").fontSize(50).text("Awesome")}
  ]})
React:
Copy to clipboard
<Image publicId="lady.jpg" >
  <Transformation width="500" crop="scale" />
  <Transformation overlay={{fontFamily: "Arial", fontSize: 50, text: "Awesome"}} />
</Image>
Vue.js:
Copy to clipboard
<cld-image publicId="lady.jpg" >
  <cld-transformation width="500" crop="scale" />
  <cld-transformation :overlay="{fontFamily: 'Arial', fontSize: 50, text: 'Awesome'}" />
</cld-image>
Angular:
Copy to clipboard
<cl-image public-id="lady.jpg" >
  <cl-transformation width="500" crop="scale">
  </cl-transformation>
  <cl-transformation overlay="text:Arial_50:Awesome">
  </cl-transformation>
</cl-image>
.NET:
Copy to clipboard
cloudinary.Api.UrlImgUp.Transform(new Transformation()
  .Width(500).Crop("scale").Chain()
  .Overlay(new TextLayer().FontFamily("Arial").FontSize(50).Text("Awesome"))).BuildImageTag("lady.jpg")
Android:
Copy to clipboard
MediaManager.get().url().transformation(new Transformation()
  .width(500).crop("scale").chain()
  .overlay(new TextLayer().fontFamily("Arial").fontSize(50).text("Awesome"))).generate("lady.jpg");
iOS:
Copy to clipboard
imageView.cldSetImage(cloudinary.createUrl().setTransformation(CLDTransformation()
  .setWidth(500).setCrop("scale").chain()
  .setOverlay("text:Arial_50:Awesome")).generate("lady.jpg")!, cloudinary: cloudinary)
Awesome/lady

Blur:

Ruby:
Copy to clipboard
cl_image_tag("flowers.jpg", :effect=>"blur:300")
PHP v1:
Copy to clipboard
cl_image_tag("flowers.jpg", array("effect"=>"blur:300"))
PHP v2:
Copy to clipboard
(new ImageTag('flowers.jpg'))
  ->effect(Effect::blur()->strength(300));
Python:
Copy to clipboard
CloudinaryImage("flowers.jpg").image(effect="blur:300")
Node.js:
Copy to clipboard
cloudinary.image("flowers.jpg", {effect: "blur:300"})
Java:
Copy to clipboard
cloudinary.url().transformation(new Transformation().effect("blur:300")).imageTag("flowers.jpg");
JS:
Copy to clipboard
cloudinary.imageTag('flowers.jpg', {effect: "blur:300"}).toHtml();
jQuery:
Copy to clipboard
$.cloudinary.image("flowers.jpg", {effect: "blur:300"})
React:
Copy to clipboard
<Image publicId="flowers.jpg" >
  <Transformation effect="blur:300" />
</Image>
Vue.js:
Copy to clipboard
<cld-image publicId="flowers.jpg" >
  <cld-transformation effect="blur:300" />
</cld-image>
Angular:
Copy to clipboard
<cl-image public-id="flowers.jpg" >
  <cl-transformation effect="blur:300">
  </cl-transformation>
</cl-image>
.NET:
Copy to clipboard
cloudinary.Api.UrlImgUp.Transform(new Transformation().Effect("blur:300")).BuildImageTag("flowers.jpg")
Android:
Copy to clipboard
MediaManager.get().url().transformation(new Transformation().effect("blur:300")).generate("flowers.jpg");
iOS:
Copy to clipboard
imageView.cldSetImage(cloudinary.createUrl().setTransformation(CLDTransformation().setEffect("blur:300")).generate("flowers.jpg")!, cloudinary: cloudinary)
Flowers

Artistic Filter effects:

Ruby:
Copy to clipboard
cl_image_tag("flowers.jpg", :effect=>"art:sizzle")
PHP v1:
Copy to clipboard
cl_image_tag("flowers.jpg", array("effect"=>"art:sizzle"))
PHP v2:
Copy to clipboard
(new ImageTag('flowers.jpg'))
  ->effect(Effect::artisticFilter(ArtisticFilter::sizzle()));
Python:
Copy to clipboard
CloudinaryImage("flowers.jpg").image(effect="art:sizzle")
Node.js:
Copy to clipboard
cloudinary.image("flowers.jpg", {effect: "art:sizzle"})
Java:
Copy to clipboard
cloudinary.url().transformation(new Transformation().effect("art:sizzle")).imageTag("flowers.jpg");
JS:
Copy to clipboard
cloudinary.imageTag('flowers.jpg', {effect: "art:sizzle"}).toHtml();
jQuery:
Copy to clipboard
$.cloudinary.image("flowers.jpg", {effect: "art:sizzle"})
React:
Copy to clipboard
<Image publicId="flowers.jpg" >
  <Transformation effect="art:sizzle" />
</Image>
Vue.js:
Copy to clipboard
<cld-image publicId="flowers.jpg" >
  <cld-transformation effect="art:sizzle" />
</cld-image>
Angular:
Copy to clipboard
<cl-image public-id="flowers.jpg" >
  <cl-transformation effect="art:sizzle">
  </cl-transformation>
</cl-image>
.NET:
Copy to clipboard
cloudinary.Api.UrlImgUp.Transform(new Transformation().Effect("art:sizzle")).BuildImageTag("flowers.jpg")
Android:
Copy to clipboard
MediaManager.get().url().transformation(new Transformation().effect("art:sizzle")).generate("flowers.jpg");
iOS:
Copy to clipboard
imageView.cldSetImage(cloudinary.createUrl().setTransformation(CLDTransformation().setEffect("art:sizzle")).generate("flowers.jpg")!, cloudinary: cloudinary)
Flowers

Note: There are several effects, such as athena, audrey, frost, quartz, zorro and more. Check out the docs for more filter effects.

And consult the Cloudinary documentation to see a wide array image transformation techniques.

Conclusion

The Image Manipulation Chatbot can be further improved to provide more functionality. We can have the chatbot analyze images and detect objects in them. In addition, we can connect the chatbot with Google Cloud Speech API to enable a user to speak the commands to the bot. The chatbot will convert audio to text, pass the text onto the Parser Service, process and return the desired results.

One thing to consider, though. The chatbot understands commands written only in English. What about making it multilingual so that our Spanish, French, Dutch or Chinese colleagues could write commands in their language and have the chatbot process and work correctly? Awesome right? Google Cloud Translation Service might just come in handy here.

Building a chatbot is not rocket science. Harnessing the potential and competence of serverless backends, such as Cloudinary and PubNub, can empower you to automate tedious, time-consuming tasks by building interactive software that simply works.

What would you like a Cloudinary-powered Chatbot to do? Let me know in the comments section.

Recent Blog Posts

Generate Waveform Images from Audio with Cloudinary

This is a reposting of an article written by David Walsh. Check out his blog HERE!
I've been working a lot with visualizations lately, which is a far cry from your normal webpage element interaction coding; you need advanced geometry knowledge, render and performance knowledge, and much more. It's been a great learning experience but it can be challenging and isn't always an interest of all web developers. That's why we use apps and services specializing in complex tasks like Cloudinary: we need it done quickly and by a tool written by an expert.

Read more
Make All Images on Your Website Responsive in 3 Easy Steps

Images are crucial to website performance, but most still don't implement responsive images. It’s not just about fitting an image on the screen, but also making the the image size relatively rational to the device. The srcset and sizes options, which are your best hit are hard to implement. Cloudinary provides an easier way, which we will discuss in this article.

Read more

The Future of Audio and Video on the Web

By Prosper Otemuyiwa
The Future of Audio and Video on the Web

Web sites and platforms are becoming increasingly media-rich. Today, approximately 62 percent of internet traffic is made up of images, with audio and video constituting a growing percentage of the bytes.

Read more

Embed Images in Email Campaigns at Scale

By Sourav Kundu
Embed Images in Email Campaigns at Scale

tl;dr

Cloudinary is a powerful image hosting solution for email marketing campaigns of any size. With features such as advanced image optimization and on-the-fly image transformation, backed by a global CDN, Cloudinary provides the base for a seamless user experience in your email campaigns leading to increased conversion and performance.

Read more
Build the Back-End For Your Own Instagram-style App with Cloudinary

Github Repo

Managing media files (processing, storage and manipulation) is one of the biggest challenges we encounter as practical developers. These challenges include:

A great service called Cloudinary can help us overcome many of these challenges. Together with Cloudinary, let's work on solutions to these challenges and hopefully have a simpler mental model towards media management.

Read more

Build A Miniflix in 10 Minutes

By Prosper Otemuyiwa
Build A Miniflix in 10 Minutes

Developers are constantly faced with challenges of building complex products every single day. And there are constraints on the time needed to build out the features of these products.

Engineering and Product managers want to beat deadlines for projects daily. CEOs want to roll out new products as fast as possible. Entrepreneurs need their MVPs like yesterday. With this in mind, what should developers do?

Read more