Graphic designers often contemplate whether to add borders to their website elements. The decision of whether to add borders around frames, buttons and text elements really depends on the feeling the designer is trying to convey through the design.
In this blog post we wanted to tell you about a new cloud-based transformation available through Cloudinary - adding borders to images. Yes, you can use CSS3 or image masks to simulate borders around images, but the first is supported only on modern browsers and the latter clutters the HTML. In addition, if you plan on embedding images in emails or documents you can pretty much say goodbye to borders (certainly for images with rounded corners). For such cases, you can use Cloudinary's extremely simple image transformation API to add borders directly to the original image.
Consider the following photo. It was uploaded to Cloudinary using 'autumn_leaves' as its public ID:
Adding a border around the image is straightforward. Simply specify the 'border' parameter ('bo' for URLs) using a CSS-like format. In the following example '4px_solid_black' means a 4 pixels wide black border.
Same example in Ruby on Rails:
<% cl_image_tag("autumn_leaves.jpg", :width => 0.15, :crop => :scale,
                :border => { :width => 4, :color => 'black' }) %>
The border's color component also accepts RGB format. The following example rounds the corners of the image using the 'radius' parameter ('r' for URLs) and adds a 6 pixels solid green border ('#00390b').
Same example in PHP:
<?php echo cl_image_tag("autumn_leaves.jpg", array("width" => 0.15, "crop" => "scale",
       "radius" => 20, "border" => array("width" => 6, "color" => "#00390b"))) ?>
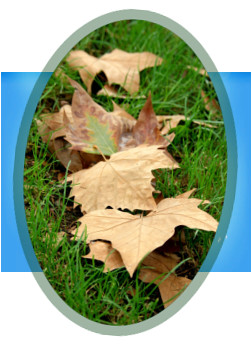
Cloudinary also supports adding semi-transparent borders. This is accomplished using the RGBA color format. The Alpha hex value ranges between 00 (fully transparent), to FF (opaque). The following example generates a semi transparent 10 pixels wide green border. We also use Cloudinary's chained transformations to make the image elliptic ('max' radius), rotate the image by 5 degrees and add an underlay blue background image (while resizing it and increasing its brightness).
Same example in Django:
import cloudinary
img = cloudinary.CloudinaryImage("autumn_leaves.jpg")
img.image(transformation=[
          dict(width=0.15, crop='scale', radius='max',
               border=dict(width=10, color='#00390b60')),
          dict(angle=5),
          dict(underlay='site_bg', width=250, height=200, effects='brightness:50')])
And one last example - the following URL generates an image based on a Facebook profile picture that was automatically fetched by Cloudinary. The image is resized and rounded, and a black border is added. We then use an overlay to add Cloudinary's logo with a semi-transparent wide border. As with all of the Cloudinary managed images, the resulting image is persistently stored in the Cloud and then delivered and cached through a fast CDN.
.../demo/image/facebook/c_fill,w_150,h_180,r_10,bo_2px_solid_black/
l_cloudinary_logo_white,w_90,g_south_east,r_5,y_7,x_7,bo_6px_solid_rgb:afcee990/itail.jpg
By the way, you can also add the border as an incoming transformation so the original image is stored in the cloud already with the border. Here's such an incoming transformation, this time in Node.js:
cloudinary.image("itail.jpg", { type: 'facebook', transformation: [
                 { crop: 'fill', width: 150, height: 180, radius: 10,
                   border: { width: 2, color: 'black'}},
                 { overlay: 'cloudinary_logo_white', width: 90,
                   gravity: 'south_east', radius: 5, y: 7, x: 7,
                   border: { width: 6, color: '#afcee990'}}]})
Summary
If you are a regular reader of our blog, you know that Cloudinary keeps enhancing on various fronts. One of these fronts is our ever increasing set of image manipulation capabilities. In this blog we introduced a cool new enhancement that you might find useful. We have more in our pipeline. If you want to see a new image manipulation capability added to Cloudinary,
just drop us a line.


