Cloudinary Blog

5 ways to optimize images for effective Facebook sharing

5 ways to optimize images for effective social sharing

As a website/app developer or owner, you’ve undoubtedly experienced your fair share of glitches and mishaps when it comes to users or site visitors sharing your content. Many outlets such as news and media sites, social networks, or e-commerce sites include the option to "like" or "share" content such as blog posts or images. Once shared, the social network site displays a snippet of the shared content alongside a featured image. This way, your site content gets maximum exposure in social networks and attracts additional visitors.

But, have you ever noticed that sometimes the content that you shared isn’t what you expected it to be, displaying the wrong featured image for a post, or if the correct image is displayed, its quality is subpar? Are you given credit for every image or piece of content that’s shared from your site? In this article, we list five ways to overcome these challenges and create a consistent user experience when sharing images on sites such as social networks.

While a text abstract is important, a piece of content’s featured image is even more so. Images on popular social networks like Facebook and LinkedIn play a bigger role nowadays and have more prominent placements within a post. Image quality and content is crucial to creating deeper user engagement, and ultimately, leads to more shares. Therefore, it’s even more important that the correct image is displayed in the appropriate high resolution for the best look and feel of the content.

There are a few ways to ensure that your image is shared in its optimal form. The first is by giving Facebook access to a version of the image with a high enough resolution within Facebook’s required aspect ratio for maximum quality. You may also want to be credited for the image so it doesn’t get lost in the sea of web images or re-branded by someone else. This can be done by adding a watermark of your logo or simply a text overlay. You may want to create a different snippet of an image specifically for sharing purposes. For example, you can display two pictures in a single image to show a comparison of people or products.  

Cloudinary allows you to easily solve all of these issues by enabling you to upload a single high resolution image and then adjusting it to build your social network snippet. Here are five ways in which images can be optimized for sharing on social networks:

1. Choosing the correct high resolution image

Social networks usually guess which image to use as the cover according to resolution and page placement. This can be counteracted by adding a meta tag to your post, allowing you to decide which one is used. The meta tag for Facebook defines a property named og:image in the header of your HTML page, other networks require the use of other property names, such as itemprop='image' for Google+. In addition, social networks have specific requirements for images. In order to boost your engagement in Facebook, for example, you need to comply with specific restraints, such as minimum image size and aspect ratio. This is particularly important for images in Facebook Ads as well as images shown on mobile devices.

Let’s say an image on your e-commerce site is too small to fit the requirements laid out by Facebook. Usually you would need two separate images: one for your site and one to share. In addition, if you use a CMS that allows you to set a link to the image for your meta tag, you can simply fill it in with a URL for a high resolution image that is within Facebook’s required aspect ratio.

With Cloudinary's dynamic image manipulation, you can use the same original high resolution image and programmatically adjust it to be used anywhere. The image on the page can be a small thumbnail while the image you want to share on Facebook (using the the meta property URL) can be a full-size, high resolution or custom resolution image:

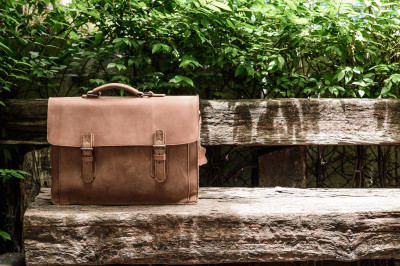
For example, the following hi-res (2464x1640) image was uploaded with the leather_bag ID.
Ruby:
Copy to clipboard
cl_image_tag("leather_bag.jpg")
PHP v1:
Copy to clipboard
cl_image_tag("leather_bag.jpg")
PHP v2:
Copy to clipboard
(new ImageTag('leather_bag.jpg'));
Python:
Copy to clipboard
CloudinaryImage("leather_bag.jpg").image()
Node.js:
Copy to clipboard
cloudinary.image("leather_bag.jpg")
Java:
Copy to clipboard
cloudinary.url().imageTag("leather_bag.jpg");
JS:
Copy to clipboard
cloudinary.imageTag('leather_bag.jpg').toHtml();
jQuery:
Copy to clipboard
$.cloudinary.image("leather_bag.jpg")
React:
Copy to clipboard
<Image publicId="leather_bag.jpg" >

</Image>
Vue.js:
Copy to clipboard
<cld-image publicId="leather_bag.jpg" >

</cld-image>
Angular:
Copy to clipboard
<cl-image public-id="leather_bag.jpg" >

</cl-image>
.NET:
Copy to clipboard
cloudinary.Api.UrlImgUp.BuildImageTag("leather_bag.jpg")
Android:
Copy to clipboard
MediaManager.get().url().generate("leather_bag.jpg");
iOS:
Copy to clipboard
imageView.cldSetImage(cloudinary.createUrl().generate("leather_bag.jpg")!, cloudinary: cloudinary)
Original bag photo

In your web pages you might want to include a small thumbnail of the image. The example below generated a 300x220 thumbnail that can fit well in a web page.

Ruby:
Copy to clipboard
cl_image_tag("leather_bag.jpg", :width=>300, :height=>220, :gravity=>"custom", :crop=>"thumb")
PHP v1:
Copy to clipboard
cl_image_tag("leather_bag.jpg", array("width"=>300, "height"=>220, "gravity"=>"custom", "crop"=>"thumb"))
PHP v2:
Copy to clipboard
(new ImageTag('leather_bag.jpg'))
  ->resize(Resize::thumbnail()->width(300)->height(220)
    ->gravity(Gravity::focusOn(FocusOn::custom())));
Python:
Copy to clipboard
CloudinaryImage("leather_bag.jpg").image(width=300, height=220, gravity="custom", crop="thumb")
Node.js:
Copy to clipboard
cloudinary.image("leather_bag.jpg", {width: 300, height: 220, gravity: "custom", crop: "thumb"})
Java:
Copy to clipboard
cloudinary.url().transformation(new Transformation().width(300).height(220).gravity("custom").crop("thumb")).imageTag("leather_bag.jpg");
JS:
Copy to clipboard
cloudinary.imageTag('leather_bag.jpg', {width: 300, height: 220, gravity: "custom", crop: "thumb"}).toHtml();
jQuery:
Copy to clipboard
$.cloudinary.image("leather_bag.jpg", {width: 300, height: 220, gravity: "custom", crop: "thumb"})
React:
Copy to clipboard
<Image publicId="leather_bag.jpg" >
  <Transformation width="300" height="220" gravity="custom" crop="thumb" />
</Image>
Vue.js:
Copy to clipboard
<cld-image publicId="leather_bag.jpg" >
  <cld-transformation width="300" height="220" gravity="custom" crop="thumb" />
</cld-image>
Angular:
Copy to clipboard
<cl-image public-id="leather_bag.jpg" >
  <cl-transformation width="300" height="220" gravity="custom" crop="thumb">
  </cl-transformation>
</cl-image>
.NET:
Copy to clipboard
cloudinary.Api.UrlImgUp.Transform(new Transformation().Width(300).Height(220).Gravity("custom").Crop("thumb")).BuildImageTag("leather_bag.jpg")
Android:
Copy to clipboard
MediaManager.get().url().transformation(new Transformation().width(300).height(220).gravity("custom").crop("thumb")).generate("leather_bag.jpg");
iOS:
Copy to clipboard
imageView.cldSetImage(cloudinary.createUrl().setTransformation(CLDTransformation().setWidth(300).setHeight(220).setGravity("custom").setCrop("thumb")).generate("leather_bag.jpg")!, cloudinary: cloudinary)
Photo thumbnail for web page

Now you can add a meta tag to your HTML page telling Facebook to use a much larger image of 1200x900 pixels for example:

Copy to clipboard
<meta content='https://res.cloudinary.com/demo/image/upload/w_1200,h_900,g_custom,c_thumb/leather_bag.jpg' property='og:image'>

2. Add a watermark or image overlay

If the content you created goes viral, you will probably want credit and not have it simply spread all over the internet without any connection to the original post. Making an image traceable back to you is simple, just add a watermark of your logo, create a new image and set the meta tag accordingly. With Cloudinary you can programmatically add your logo or any specific image as an overlay on top of the shared blog post’s featured image.

As you can see below, when shared on Facebook, the image has the Cloudinary logo as a watermark overlay. A previously uploaded image was dynamically added as an overlay while the color brightness was increased and the opacity was reduced to 25% to create a semi-transparent result:

Ruby:
Copy to clipboard
cl_image_tag("leather_bag.jpg", :transformation=>[
  {:width=>400, :height=>300, :gravity=>"custom", :crop=>"thumb"},
  {:overlay=>"cloudinary_icon", :opacity=>25, :effect=>"brightness:200", :width=>0.5, :flags=>"relative"}
  ])
PHP v1:
Copy to clipboard
cl_image_tag("leather_bag.jpg", array("transformation"=>array(
  array("width"=>400, "height"=>300, "gravity"=>"custom", "crop"=>"thumb"),
  array("overlay"=>"cloudinary_icon", "opacity"=>25, "effect"=>"brightness:200", "width"=>"0.5", "flags"=>"relative")
  )))
PHP v2:
Copy to clipboard
(new ImageTag('leather_bag.jpg'))
  ->resize(Resize::thumbnail()->width(400)->height(300)->gravity(Gravity::focusOn(FocusOn::custom())))
  ->overlay(
      Overlay::source(Source::image('cloudinary_icon')
        ->transformation((new ImageTransformation())
          ->resize(Resize::scale()->width(0.5)->relative())
          ->adjust(Adjust::opacity(25))
          ->adjust(Adjust::brightness()->level(200))
  )));
Python:
Copy to clipboard
CloudinaryImage("leather_bag.jpg").image(transformation=[
  {'width': 400, 'height': 300, 'gravity': "custom", 'crop': "thumb"},
  {'overlay': "cloudinary_icon", 'opacity': 25, 'effect': "brightness:200", 'width': "0.5", 'flags': "relative"}
  ])
Node.js:
Copy to clipboard
cloudinary.image("leather_bag.jpg", {transformation: [
  {width: 400, height: 300, gravity: "custom", crop: "thumb"},
  {overlay: "cloudinary_icon", opacity: 25, effect: "brightness:200", width: "0.5", flags: "relative"}
  ]})
Java:
Copy to clipboard
cloudinary.url().transformation(new Transformation()
  .width(400).height(300).gravity("custom").crop("thumb").chain()
  .overlay(new Layer().publicId("cloudinary_icon")).opacity(25).effect("brightness:200").width(0.5).flags("relative")).imageTag("leather_bag.jpg");
JS:
Copy to clipboard
cloudinary.imageTag('leather_bag.jpg', {transformation: [
  {width: 400, height: 300, gravity: "custom", crop: "thumb"},
  {overlay: new cloudinary.Layer().publicId("cloudinary_icon"), opacity: 25, effect: "brightness:200", width: "0.5", flags: "relative"}
  ]}).toHtml();
jQuery:
Copy to clipboard
$.cloudinary.image("leather_bag.jpg", {transformation: [
  {width: 400, height: 300, gravity: "custom", crop: "thumb"},
  {overlay: new cloudinary.Layer().publicId("cloudinary_icon"), opacity: 25, effect: "brightness:200", width: "0.5", flags: "relative"}
  ]})
React:
Copy to clipboard
<Image publicId="leather_bag.jpg" >
  <Transformation width="400" height="300" gravity="custom" crop="thumb" />
  <Transformation overlay="cloudinary_icon" opacity="25" effect="brightness:200" width="0.5" flags="relative" />
</Image>
Vue.js:
Copy to clipboard
<cld-image publicId="leather_bag.jpg" >
  <cld-transformation width="400" height="300" gravity="custom" crop="thumb" />
  <cld-transformation :overlay="cloudinary_icon" opacity="25" effect="brightness:200" width="0.5" flags="relative" />
</cld-image>
Angular:
Copy to clipboard
<cl-image public-id="leather_bag.jpg" >
  <cl-transformation width="400" height="300" gravity="custom" crop="thumb">
  </cl-transformation>
  <cl-transformation overlay="cloudinary_icon" opacity="25" effect="brightness:200" width="0.5" flags="relative">
  </cl-transformation>
</cl-image>
.NET:
Copy to clipboard
cloudinary.Api.UrlImgUp.Transform(new Transformation()
  .Width(400).Height(300).Gravity("custom").Crop("thumb").Chain()
  .Overlay(new Layer().PublicId("cloudinary_icon")).Opacity(25).Effect("brightness:200").Width(0.5).Flags("relative")).BuildImageTag("leather_bag.jpg")
Android:
Copy to clipboard
MediaManager.get().url().transformation(new Transformation()
  .width(400).height(300).gravity("custom").crop("thumb").chain()
  .overlay(new Layer().publicId("cloudinary_icon")).opacity(25).effect("brightness:200").width(0.5).flags("relative")).generate("leather_bag.jpg");
iOS:
Copy to clipboard
imageView.cldSetImage(cloudinary.createUrl().setTransformation(CLDTransformation()
  .setWidth(400).setHeight(300).setGravity("custom").setCrop("thumb").chain()
  .setOverlay("cloudinary_icon").setOpacity(25).setEffect("brightness:200").setWidth(0.5).setFlags("relative")).generate("leather_bag.jpg")!, cloudinary: cloudinary)
Photo with a watermark for branded social sharing

3. Personalized images with a stylized text caption

Text can also be added to create a recognizable image. You may wish to add your brand name, your site's name, the photographer, product name, or teaser text with a call to action such as "Sign up to receive updates". With Cloudinary, text can be added dynamically. Again, simply add an overlay and insert your desired text, specifying the font style and size. You may want to take a look at how-to use Cloudinary to create a watermark or text overlay on your image.

The following image shows one of the many ways text can dynamically added as an overlay to an image and manipulated for best placement and recognition. The caption 'Leather laptop bag' using the Arial font was dynamically added as an overlay above a semi-transparent black bar.

Ruby:
Copy to clipboard
cl_image_tag("leather_bag.jpg", :transformation=>[
  {:width=>350, :height=>250, :gravity=>"custom", :crop=>"thumb"},
  {:overlay=>"black_bar", :width=>1.0, :height=>0.1, :flags=>"relative", :gravity=>"south", :opacity=>50},
  {:overlay=>{:font_family=>"Arial", :font_size=>16, :font_weight=>"bold", :text=>"Leather%20laptop%20bag"}, :color=>"white", :gravity=>"south", :y=>4}
  ])
PHP v1:
Copy to clipboard
cl_image_tag("leather_bag.jpg", array("transformation"=>array(
  array("width"=>350, "height"=>250, "gravity"=>"custom", "crop"=>"thumb"),
  array("overlay"=>"black_bar", "width"=>"1.0", "height"=>"0.1", "flags"=>"relative", "gravity"=>"south", "opacity"=>50),
  array("overlay"=>array("font_family"=>"Arial", "font_size"=>16, "font_weight"=>"bold", "text"=>"Leather%20laptop%20bag"), "color"=>"white", "gravity"=>"south", "y"=>4)
  )))
PHP v2:
Copy to clipboard
(new ImageTag('leather_bag.jpg'))
  ->resize(Resize::thumbnail()->width(350)->height(250)->gravity(Gravity::focusOn(FocusOn::custom())))
  ->overlay(
      Overlay::source(Source::image('black_bar')
        ->transformation((new ImageTransformation())
          ->resize(Resize::scale()->width(1.0)->height(0.1)->relative())
          ->adjust(Adjust::opacity(50))))
      ->position((new Position())
        ->gravity(Gravity::compass(Compass::south()))))
    ->overlay(
        Overlay::source(
            Source::text('Leather laptop bag', (new TextStyle('Arial', 16))
              ->fontWeight(FontWeight::bold()))
            ->textColor(Color::WHITE))
              ->position((new Position())
                ->gravity(Gravity::compass(Compass::south()))
                ->offsetY(4)
          
        
        ));
Python:
Copy to clipboard
CloudinaryImage("leather_bag.jpg").image(transformation=[
  {'width': 350, 'height': 250, 'gravity': "custom", 'crop': "thumb"},
  {'overlay': "black_bar", 'width': "1.0", 'height': "0.1", 'flags': "relative", 'gravity': "south", 'opacity': 50},
  {'overlay': {'font_family': "Arial", 'font_size': 16, 'font_weight': "bold", 'text': "Leather%20laptop%20bag"}, 'color': "white", 'gravity': "south", 'y': 4}
  ])
Node.js:
Copy to clipboard
cloudinary.image("leather_bag.jpg", {transformation: [
  {width: 350, height: 250, gravity: "custom", crop: "thumb"},
  {overlay: "black_bar", width: "1.0", height: "0.1", flags: "relative", gravity: "south", opacity: 50},
  {overlay: {font_family: "Arial", font_size: 16, font_weight: "bold", text: "Leather%20laptop%20bag"}, color: "white", gravity: "south", y: 4}
  ]})
Java:
Copy to clipboard
cloudinary.url().transformation(new Transformation()
  .width(350).height(250).gravity("custom").crop("thumb").chain()
  .overlay(new Layer().publicId("black_bar")).width(1.0).height(0.1).flags("relative").gravity("south").opacity(50).chain()
  .overlay(new TextLayer().fontFamily("Arial").fontSize(16).fontWeight("bold").text("Leather%20laptop%20bag")).color("white").gravity("south").y(4)).imageTag("leather_bag.jpg");
JS:
Copy to clipboard
cloudinary.imageTag('leather_bag.jpg', {transformation: [
  {width: 350, height: 250, gravity: "custom", crop: "thumb"},
  {overlay: new cloudinary.Layer().publicId("black_bar"), width: "1.0", height: "0.1", flags: "relative", gravity: "south", opacity: 50},
  {overlay: new cloudinary.TextLayer().fontFamily("Arial").fontSize(16).fontWeight("bold").text("Leather%20laptop%20bag"), color: "white", gravity: "south", y: 4}
  ]}).toHtml();
jQuery:
Copy to clipboard
$.cloudinary.image("leather_bag.jpg", {transformation: [
  {width: 350, height: 250, gravity: "custom", crop: "thumb"},
  {overlay: new cloudinary.Layer().publicId("black_bar"), width: "1.0", height: "0.1", flags: "relative", gravity: "south", opacity: 50},
  {overlay: new cloudinary.TextLayer().fontFamily("Arial").fontSize(16).fontWeight("bold").text("Leather%20laptop%20bag"), color: "white", gravity: "south", y: 4}
  ]})
React:
Copy to clipboard
<Image publicId="leather_bag.jpg" >
  <Transformation width="350" height="250" gravity="custom" crop="thumb" />
  <Transformation overlay="black_bar" width="1.0" height="0.1" flags="relative" gravity="south" opacity="50" />
  <Transformation overlay={{fontFamily: "Arial", fontSize: 16, fontWeight: "bold", text: "Leather%20laptop%20bag"}} color="white" gravity="south" y="4" />
</Image>
Vue.js:
Copy to clipboard
<cld-image publicId="leather_bag.jpg" >
  <cld-transformation width="350" height="250" gravity="custom" crop="thumb" />
  <cld-transformation :overlay="black_bar" width="1.0" height="0.1" flags="relative" gravity="south" opacity="50" />
  <cld-transformation :overlay="{fontFamily: 'Arial', fontSize: 16, fontWeight: 'bold', text: 'Leather%20laptop%20bag'}" color="white" gravity="south" y="4" />
</cld-image>
Angular:
Copy to clipboard
<cl-image public-id="leather_bag.jpg" >
  <cl-transformation width="350" height="250" gravity="custom" crop="thumb">
  </cl-transformation>
  <cl-transformation overlay="black_bar" width="1.0" height="0.1" flags="relative" gravity="south" opacity="50">
  </cl-transformation>
  <cl-transformation overlay="text:Arial_16_bold:Leather%20laptop%20bag" color="white" gravity="south" y="4">
  </cl-transformation>
</cl-image>
.NET:
Copy to clipboard
cloudinary.Api.UrlImgUp.Transform(new Transformation()
  .Width(350).Height(250).Gravity("custom").Crop("thumb").Chain()
  .Overlay(new Layer().PublicId("black_bar")).Width(1.0).Height(0.1).Flags("relative").Gravity("south").Opacity(50).Chain()
  .Overlay(new TextLayer().FontFamily("Arial").FontSize(16).FontWeight("bold").Text("Leather%20laptop%20bag")).Color("white").Gravity("south").Y(4)).BuildImageTag("leather_bag.jpg")
Android:
Copy to clipboard
MediaManager.get().url().transformation(new Transformation()
  .width(350).height(250).gravity("custom").crop("thumb").chain()
  .overlay(new Layer().publicId("black_bar")).width(1.0).height(0.1).flags("relative").gravity("south").opacity(50).chain()
  .overlay(new TextLayer().fontFamily("Arial").fontSize(16).fontWeight("bold").text("Leather%20laptop%20bag")).color("white").gravity("south").y(4)).generate("leather_bag.jpg");
iOS:
Copy to clipboard
imageView.cldSetImage(cloudinary.createUrl().setTransformation(CLDTransformation()
  .setWidth(350).setHeight(250).setGravity("custom").setCrop("thumb").chain()
  .setOverlay("black_bar").setWidth(1.0).setHeight(0.1).setFlags("relative").setGravity("south").setOpacity(50).chain()
  .setOverlay("text:Arial_16_bold:Leather%20laptop%20bag").setColor("white").setGravity("south").setY(4)).generate("leather_bag.jpg")!, cloudinary: cloudinary)
Photo with text overlay for personalized social sharing

4. Multiple images

In some cases, you may want to combine multiple pictures into one in order to properly represent the content of your post. For example, letting people vote between two people or a blog post feature image that contains one image that represents the story and another to show the author. In this case, you’d want to share a collage of multiple images in Facebook. With Cloudinary’s overlay capability, you can place images next to each other (and even enhance the feeling of comparison or competition by adding a “___ vs ___” to the caption).

In addition, if you combine two pictures, the aspect ratio of the resulting image will generally change. In some cases, Facebook will arbitrarily cut images in order to have them fit into the snippet, meaning they won't look as desired, especially if the images are narrow or tall. But, you should cut or crop and combine them, which can be easily done with Cloudinary by resizing and cropping images, then placing one as an overlay, generating a single image that appears as desired on different devices.

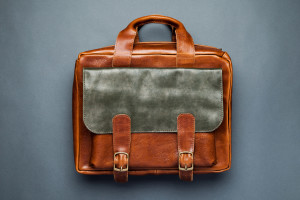
Below you can see another image of a bag that was uploaded with the given leather_bag_gray ID.
Ruby:
Copy to clipboard
cl_image_tag("leather_bag_gray.jpg")
PHP v1:
Copy to clipboard
cl_image_tag("leather_bag_gray.jpg")
PHP v2:
Copy to clipboard
(new ImageTag('leather_bag_gray.jpg'));
Python:
Copy to clipboard
CloudinaryImage("leather_bag_gray.jpg").image()
Node.js:
Copy to clipboard
cloudinary.image("leather_bag_gray.jpg")
Java:
Copy to clipboard
cloudinary.url().imageTag("leather_bag_gray.jpg");
JS:
Copy to clipboard
cloudinary.imageTag('leather_bag_gray.jpg').toHtml();
jQuery:
Copy to clipboard
$.cloudinary.image("leather_bag_gray.jpg")
React:
Copy to clipboard
<Image publicId="leather_bag_gray.jpg" >

</Image>
Vue.js:
Copy to clipboard
<cld-image publicId="leather_bag_gray.jpg" >

</cld-image>
Angular:
Copy to clipboard
<cl-image public-id="leather_bag_gray.jpg" >

</cl-image>
.NET:
Copy to clipboard
cloudinary.Api.UrlImgUp.BuildImageTag("leather_bag_gray.jpg")
Android:
Copy to clipboard
MediaManager.get().url().generate("leather_bag_gray.jpg");
iOS:
Copy to clipboard
imageView.cldSetImage(cloudinary.createUrl().generate("leather_bag_gray.jpg")!, cloudinary: cloudinary)
Another bag photo for social sharing

Now we can use Cloudinary's image overlays to dynamically generate an image of both bags that might be compared in a web page. The URL of the combined image should be specified using a meta HTML tag for optimal Facebook sharing.

Ruby:
Copy to clipboard
cl_image_tag("leather_bag.jpg", :transformation=>[
  {:width=>600, :height=>700, :gravity=>"custom", :crop=>"thumb"},
  {:overlay=>"leather_bag_gray", :width=>600, :height=>700, :x=>600, :gravity=>"west", :crop=>"fill"}
  ])
PHP v1:
Copy to clipboard
cl_image_tag("leather_bag.jpg", array("transformation"=>array(
  array("width"=>600, "height"=>700, "gravity"=>"custom", "crop"=>"thumb"),
  array("overlay"=>"leather_bag_gray", "width"=>600, "height"=>700, "x"=>600, "gravity"=>"west", "crop"=>"fill")
  )))
PHP v2:
Copy to clipboard
(new ImageTag('leather_bag.jpg'))
  ->resize(Resize::thumbnail()->width(600)->height(700)->gravity(Gravity::focusOn(FocusOn::custom())))
  ->overlay(
      Overlay::source(Source::image('leather_bag_gray')
        ->transformation((new ImageTransformation())
          ->resize(Resize::fill()->width(600)->height(700))))
      ->position((new Position())
        ->gravity(Gravity::compass(Compass::west()))
        ->offsetX(600)
  ));
Python:
Copy to clipboard
CloudinaryImage("leather_bag.jpg").image(transformation=[
  {'width': 600, 'height': 700, 'gravity': "custom", 'crop': "thumb"},
  {'overlay': "leather_bag_gray", 'width': 600, 'height': 700, 'x': 600, 'gravity': "west", 'crop': "fill"}
  ])
Node.js:
Copy to clipboard
cloudinary.image("leather_bag.jpg", {transformation: [
  {width: 600, height: 700, gravity: "custom", crop: "thumb"},
  {overlay: "leather_bag_gray", width: 600, height: 700, x: 600, gravity: "west", crop: "fill"}
  ]})
Java:
Copy to clipboard
cloudinary.url().transformation(new Transformation()
  .width(600).height(700).gravity("custom").crop("thumb").chain()
  .overlay(new Layer().publicId("leather_bag_gray")).width(600).height(700).x(600).gravity("west").crop("fill")).imageTag("leather_bag.jpg");
JS:
Copy to clipboard
cloudinary.imageTag('leather_bag.jpg', {transformation: [
  {width: 600, height: 700, gravity: "custom", crop: "thumb"},
  {overlay: new cloudinary.Layer().publicId("leather_bag_gray"), width: 600, height: 700, x: 600, gravity: "west", crop: "fill"}
  ]}).toHtml();
jQuery:
Copy to clipboard
$.cloudinary.image("leather_bag.jpg", {transformation: [
  {width: 600, height: 700, gravity: "custom", crop: "thumb"},
  {overlay: new cloudinary.Layer().publicId("leather_bag_gray"), width: 600, height: 700, x: 600, gravity: "west", crop: "fill"}
  ]})
React:
Copy to clipboard
<Image publicId="leather_bag.jpg" >
  <Transformation width="600" height="700" gravity="custom" crop="thumb" />
  <Transformation overlay="leather_bag_gray" width="600" height="700" x="600" gravity="west" crop="fill" />
</Image>
Vue.js:
Copy to clipboard
<cld-image publicId="leather_bag.jpg" >
  <cld-transformation width="600" height="700" gravity="custom" crop="thumb" />
  <cld-transformation :overlay="leather_bag_gray" width="600" height="700" x="600" gravity="west" crop="fill" />
</cld-image>
Angular:
Copy to clipboard
<cl-image public-id="leather_bag.jpg" >
  <cl-transformation width="600" height="700" gravity="custom" crop="thumb">
  </cl-transformation>
  <cl-transformation overlay="leather_bag_gray" width="600" height="700" x="600" gravity="west" crop="fill">
  </cl-transformation>
</cl-image>
.NET:
Copy to clipboard
cloudinary.Api.UrlImgUp.Transform(new Transformation()
  .Width(600).Height(700).Gravity("custom").Crop("thumb").Chain()
  .Overlay(new Layer().PublicId("leather_bag_gray")).Width(600).Height(700).X(600).Gravity("west").Crop("fill")).BuildImageTag("leather_bag.jpg")
Android:
Copy to clipboard
MediaManager.get().url().transformation(new Transformation()
  .width(600).height(700).gravity("custom").crop("thumb").chain()
  .overlay(new Layer().publicId("leather_bag_gray")).width(600).height(700).x(600).gravity("west").crop("fill")).generate("leather_bag.jpg");
iOS:
Copy to clipboard
imageView.cldSetImage(cloudinary.createUrl().setTransformation(CLDTransformation()
  .setWidth(600).setHeight(700).setGravity("custom").setCrop("thumb").chain()
  .setOverlay("leather_bag_gray").setWidth(600).setHeight(700).setX(600).setGravity("west").setCrop("fill")).generate("leather_bag.jpg")!, cloudinary: cloudinary)
Multiple photos merged into a single image for social sharing

5. Enhance photos for better engagement

Users show more interest in good looking photos. By making photos more eye-catching with stronger, sharper colors and improved color balance, you can enhance user engagement that could possibly lead to conversion. With Cloudinary, you can increase color saturation by setting the effect transformation parameter to saturation with a specified saturation level (e.g., saturation:80), automatically balance contrast and sharpen the photo.

See the difference below:

Ruby:
Copy to clipboard
cl_image_tag("leather_bag.jpg", :transformation=>[
  {:gravity=>"custom", :height=>350, :width=>350, :crop=>"thumb"},
  {:effect=>"auto_contrast"},
  {:effect=>"saturation:80"},
  {:effect=>"sharpen"}
  ])
PHP v1:
Copy to clipboard
cl_image_tag("leather_bag.jpg", array("transformation"=>array(
  array("gravity"=>"custom", "height"=>350, "width"=>350, "crop"=>"thumb"),
  array("effect"=>"auto_contrast"),
  array("effect"=>"saturation:80"),
  array("effect"=>"sharpen")
  )))
PHP v2:
Copy to clipboard
(new ImageTag('leather_bag.jpg'))
  ->resize(Resize::thumbnail()->width(350)->height(350)->gravity(Gravity::focusOn(FocusOn::custom())))
  ->adjust(Adjust::autoContrast())
  ->adjust(Adjust::saturation()->level(80))
  ->adjust(Adjust::sharpen());
Python:
Copy to clipboard
CloudinaryImage("leather_bag.jpg").image(transformation=[
  {'gravity': "custom", 'height': 350, 'width': 350, 'crop': "thumb"},
  {'effect': "auto_contrast"},
  {'effect': "saturation:80"},
  {'effect': "sharpen"}
  ])
Node.js:
Copy to clipboard
cloudinary.image("leather_bag.jpg", {transformation: [
  {gravity: "custom", height: 350, width: 350, crop: "thumb"},
  {effect: "auto_contrast"},
  {effect: "saturation:80"},
  {effect: "sharpen"}
  ]})
Java:
Copy to clipboard
cloudinary.url().transformation(new Transformation()
  .gravity("custom").height(350).width(350).crop("thumb").chain()
  .effect("auto_contrast").chain()
  .effect("saturation:80").chain()
  .effect("sharpen")).imageTag("leather_bag.jpg");
JS:
Copy to clipboard
cloudinary.imageTag('leather_bag.jpg', {transformation: [
  {gravity: "custom", height: 350, width: 350, crop: "thumb"},
  {effect: "auto_contrast"},
  {effect: "saturation:80"},
  {effect: "sharpen"}
  ]}).toHtml();
jQuery:
Copy to clipboard
$.cloudinary.image("leather_bag.jpg", {transformation: [
  {gravity: "custom", height: 350, width: 350, crop: "thumb"},
  {effect: "auto_contrast"},
  {effect: "saturation:80"},
  {effect: "sharpen"}
  ]})
React:
Copy to clipboard
<Image publicId="leather_bag.jpg" >
  <Transformation gravity="custom" height="350" width="350" crop="thumb" />
  <Transformation effect="auto_contrast" />
  <Transformation effect="saturation:80" />
  <Transformation effect="sharpen" />
</Image>
Vue.js:
Copy to clipboard
<cld-image publicId="leather_bag.jpg" >
  <cld-transformation gravity="custom" height="350" width="350" crop="thumb" />
  <cld-transformation effect="auto_contrast" />
  <cld-transformation effect="saturation:80" />
  <cld-transformation effect="sharpen" />
</cld-image>
Angular:
Copy to clipboard
<cl-image public-id="leather_bag.jpg" >
  <cl-transformation gravity="custom" height="350" width="350" crop="thumb">
  </cl-transformation>
  <cl-transformation effect="auto_contrast">
  </cl-transformation>
  <cl-transformation effect="saturation:80">
  </cl-transformation>
  <cl-transformation effect="sharpen">
  </cl-transformation>
</cl-image>
.NET:
Copy to clipboard
cloudinary.Api.UrlImgUp.Transform(new Transformation()
  .Gravity("custom").Height(350).Width(350).Crop("thumb").Chain()
  .Effect("auto_contrast").Chain()
  .Effect("saturation:80").Chain()
  .Effect("sharpen")).BuildImageTag("leather_bag.jpg")
Android:
Copy to clipboard
MediaManager.get().url().transformation(new Transformation()
  .gravity("custom").height(350).width(350).crop("thumb").chain()
  .effect("auto_contrast").chain()
  .effect("saturation:80").chain()
  .effect("sharpen")).generate("leather_bag.jpg");
iOS:
Copy to clipboard
imageView.cldSetImage(cloudinary.createUrl().setTransformation(CLDTransformation()
  .setGravity("custom").setHeight(350).setWidth(350).setCrop("thumb").chain()
  .setEffect("auto_contrast").chain()
  .setEffect("saturation:80").chain()
  .setEffect("sharpen")).generate("leather_bag.jpg")!, cloudinary: cloudinary)
Enhanced photo for optimized social sharing

Original photo

Summary

In some cases, it may be ideal to change visual results just for social network sharing without having to change your site’s graphic design. If the look and feel of your site is generally simple, basic, or neutral, you may want your image to stand out on Facebook, in turn earning you a greater level of engagement. In addition to the five use cases listed above, with Cloudinary, there are various manipulations you can make to your site/product/post to increase its chances of success when shared on Facebook and other social networks.

As the modern day direction of social network sharing is heading more and more towards images being the focal point of shared content, the importance of making them relevant and attention grabbing is increasing. Making the necessary adjustments is vital to successful shares and conversions. With Cloudinary, you can dynamically manipulate and create images that match your content and are appealing to social network users, consequently heightening engagement.

All of the features discussed above are available in our free and paid plans. If you don't have a Cloudinary account yet, you are welcome to sign up for a free account and try it out today.

Recent Blog Posts

Generate Waveform Images from Audio with Cloudinary

This is a reposting of an article written by David Walsh. Check out his blog HERE!
I've been working a lot with visualizations lately, which is a far cry from your normal webpage element interaction coding; you need advanced geometry knowledge, render and performance knowledge, and much more. It's been a great learning experience but it can be challenging and isn't always an interest of all web developers. That's why we use apps and services specializing in complex tasks like Cloudinary: we need it done quickly and by a tool written by an expert.

Read more
Make All Images on Your Website Responsive in 3 Easy Steps

Images are crucial to website performance, but most still don't implement responsive images. It’s not just about fitting an image on the screen, but also making the the image size relatively rational to the device. The srcset and sizes options, which are your best hit are hard to implement. Cloudinary provides an easier way, which we will discuss in this article.

Read more

The Future of Audio and Video on the Web

By Prosper Otemuyiwa
The Future of Audio and Video on the Web

Web sites and platforms are becoming increasingly media-rich. Today, approximately 62 percent of internet traffic is made up of images, with audio and video constituting a growing percentage of the bytes.

Read more

Embed Images in Email Campaigns at Scale

By Sourav Kundu
Embed Images in Email Campaigns at Scale

tl;dr

Cloudinary is a powerful image hosting solution for email marketing campaigns of any size. With features such as advanced image optimization and on-the-fly image transformation, backed by a global CDN, Cloudinary provides the base for a seamless user experience in your email campaigns leading to increased conversion and performance.

Read more
Build the Back-End For Your Own Instagram-style App with Cloudinary

Github Repo

Managing media files (processing, storage and manipulation) is one of the biggest challenges we encounter as practical developers. These challenges include:

A great service called Cloudinary can help us overcome many of these challenges. Together with Cloudinary, let's work on solutions to these challenges and hopefully have a simpler mental model towards media management.

Read more

Build A Miniflix in 10 Minutes

By Prosper Otemuyiwa
Build A Miniflix in 10 Minutes

Developers are constantly faced with challenges of building complex products every single day. And there are constraints on the time needed to build out the features of these products.

Engineering and Product managers want to beat deadlines for projects daily. CEOs want to roll out new products as fast as possible. Entrepreneurs need their MVPs like yesterday. With this in mind, what should developers do?

Read more